


How to Cook a Turkey: Turkey Temperature & Doneness
Thanksgiving and turkey are practically synonymous—no other holiday has such a laser focus on a single piece of food. If the turkey isn’t right, the whole day gets an asterisk. If the turkey is just perfect, everyone somehow feels more thankful.
And yet, how often do you cook a whole turkey during the other 364 days of the year? Maybe at Christmas? Maybe never? Cooking a perfect Thanksgiving Turkey on cue is a little like being called in to throw the winning touchdown when you haven’t touched a football all year. But don’t worry. We’ve got you covered.
Here’s the plain truth: The secret to perfect turkey is temperature. And that’s our jam. Use whatever recipe you like—deep-fry it, smoke it, roast it. No matter how you do it, the proteins react to heat the same way. Temperature monitoring and control are key. Neglect these fundamental principles at your own peril!
Turkey Doneness Temperature
The first thing to know is this: turkey doneness is lower than you think. It’s 157°F (69°C) in the breast—not 165°F—and 175°F (79°C) in the thigh for moist turkey. (USDA charts here or read more below to see why this is safe.) If that’s what you landed here to get, we’re happy you stopped by! But, if you’re looking for more in-depth info, keep reading!
How to Cook a Turkey at a Glance: Cooking Time and More
- The first, slightly more in-depth, thing we’ll give you is this basic method for cooking a great turkey. Do this and your bird will be better than most people’s.
- Thawing: You need to verify that your turkey is fully thawed before cooking it to avoid disaster. The best thaw method is in the fridge—1 day per 4 lbs.
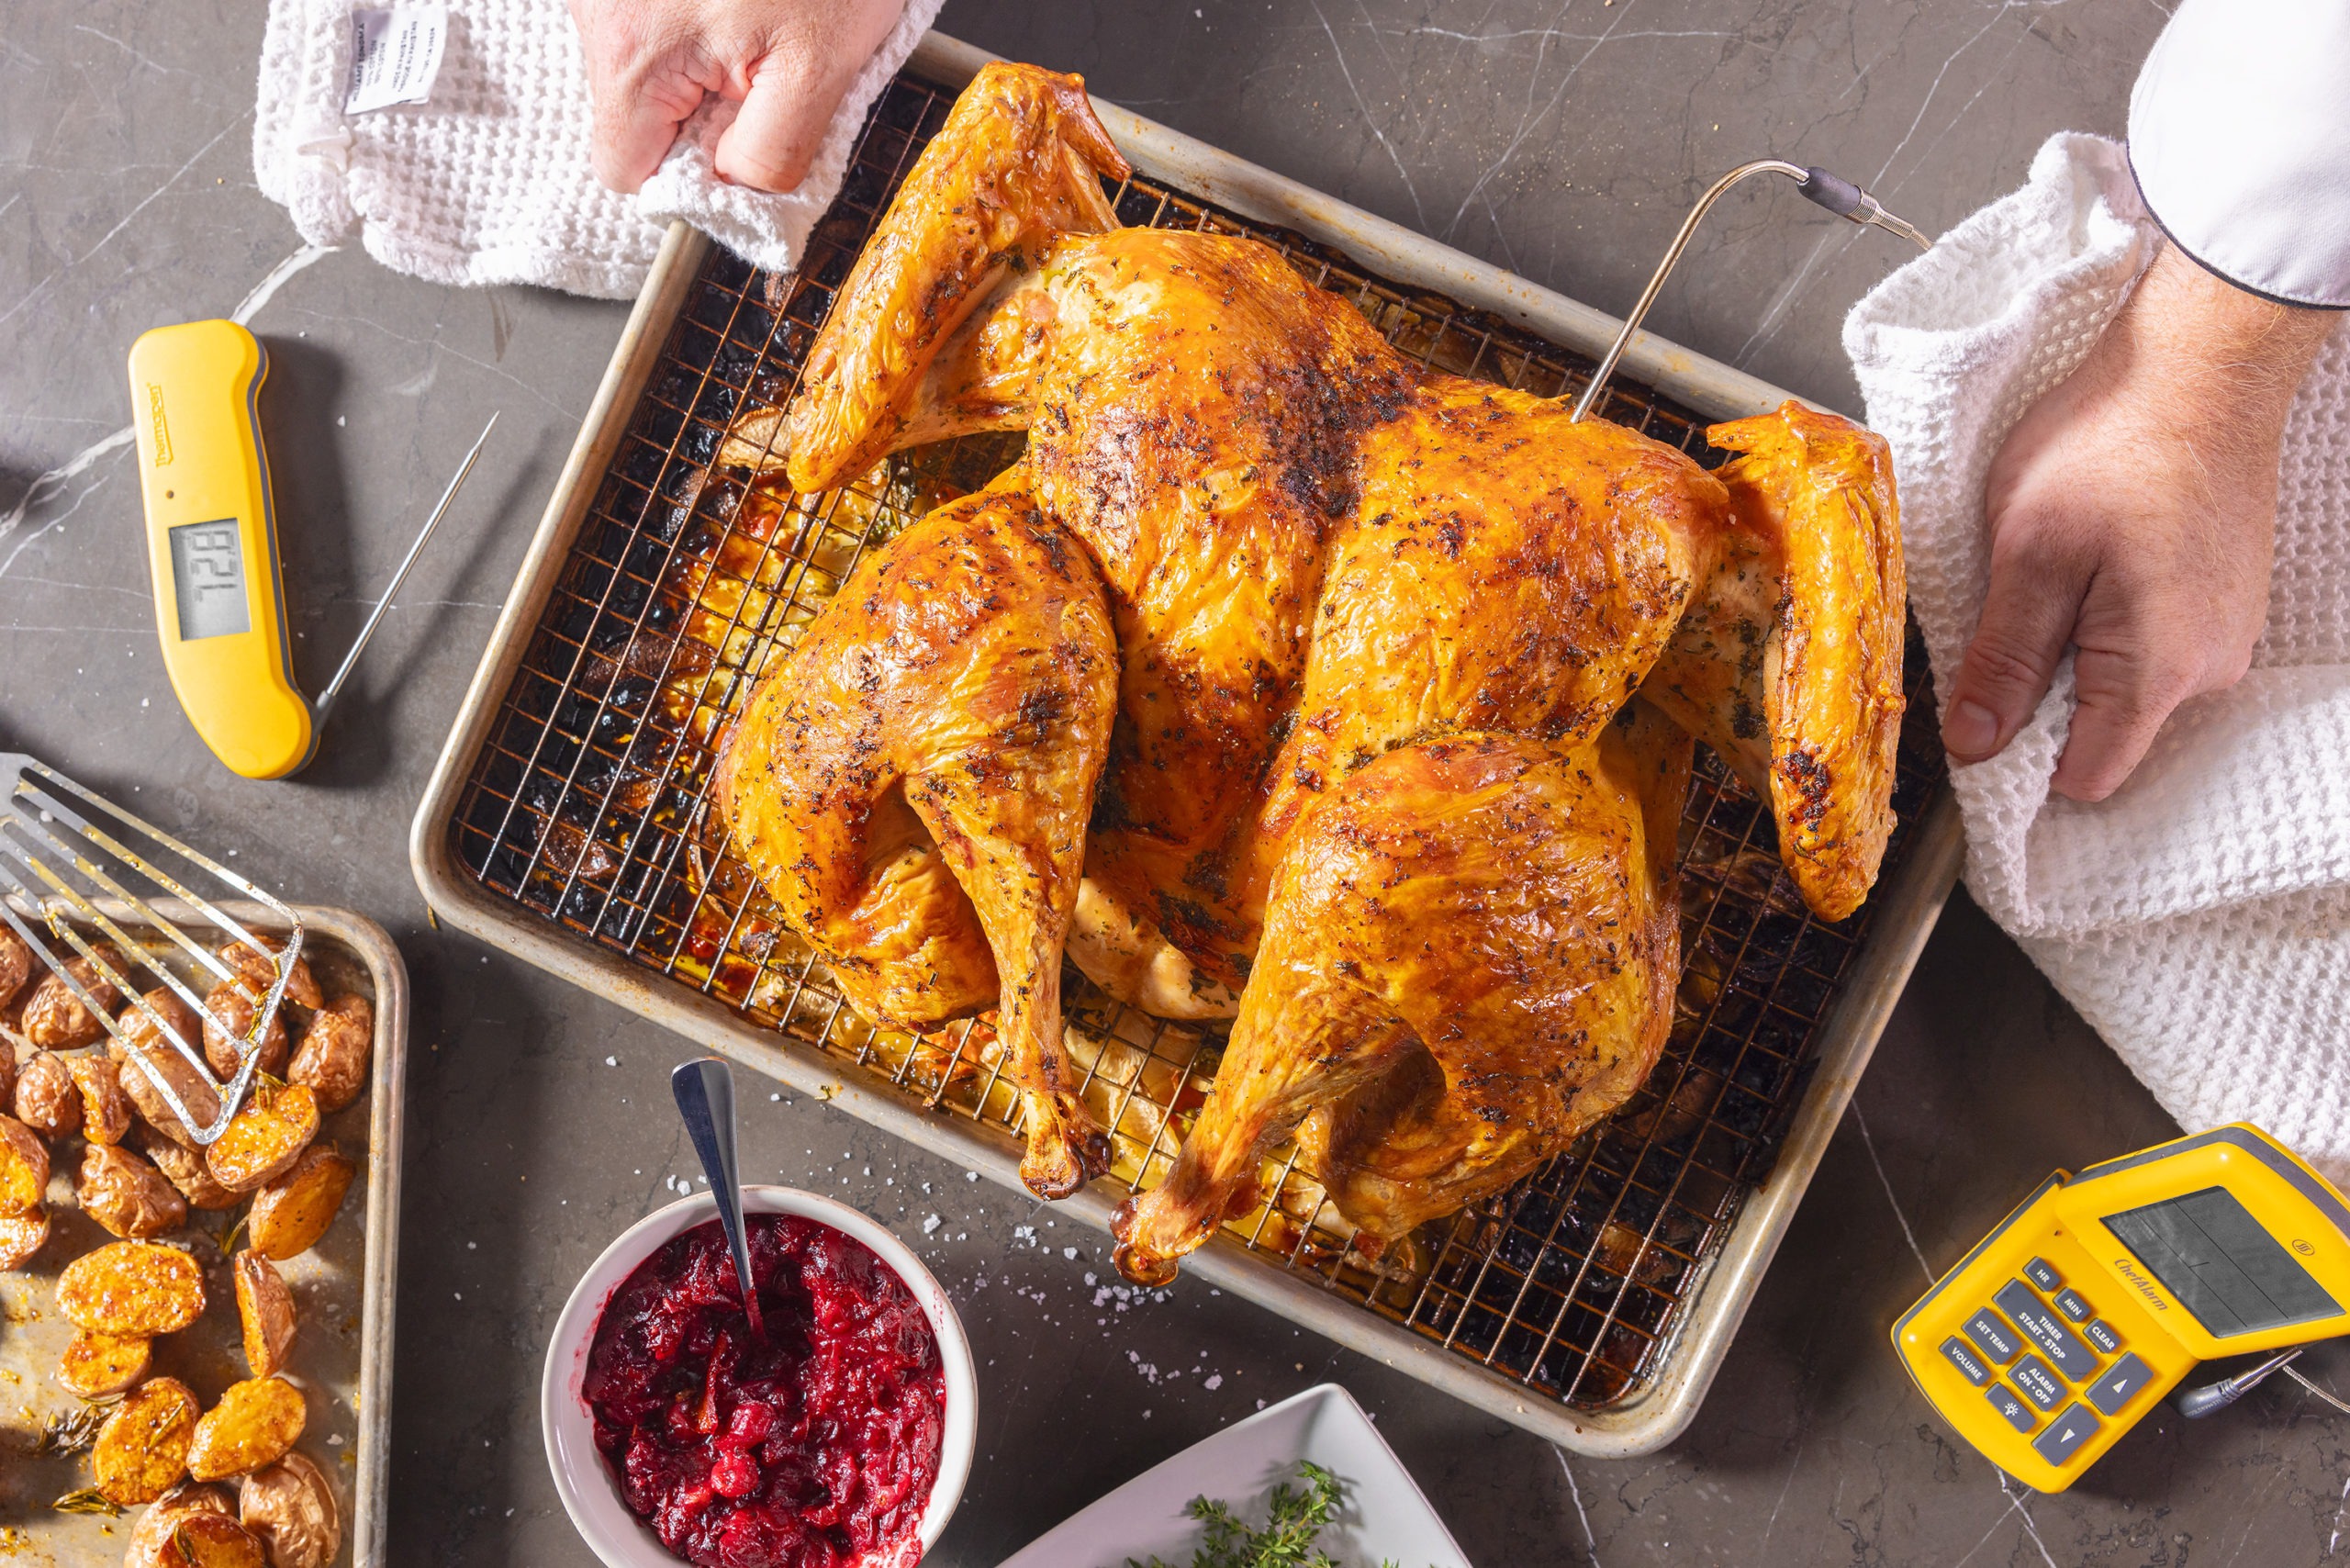
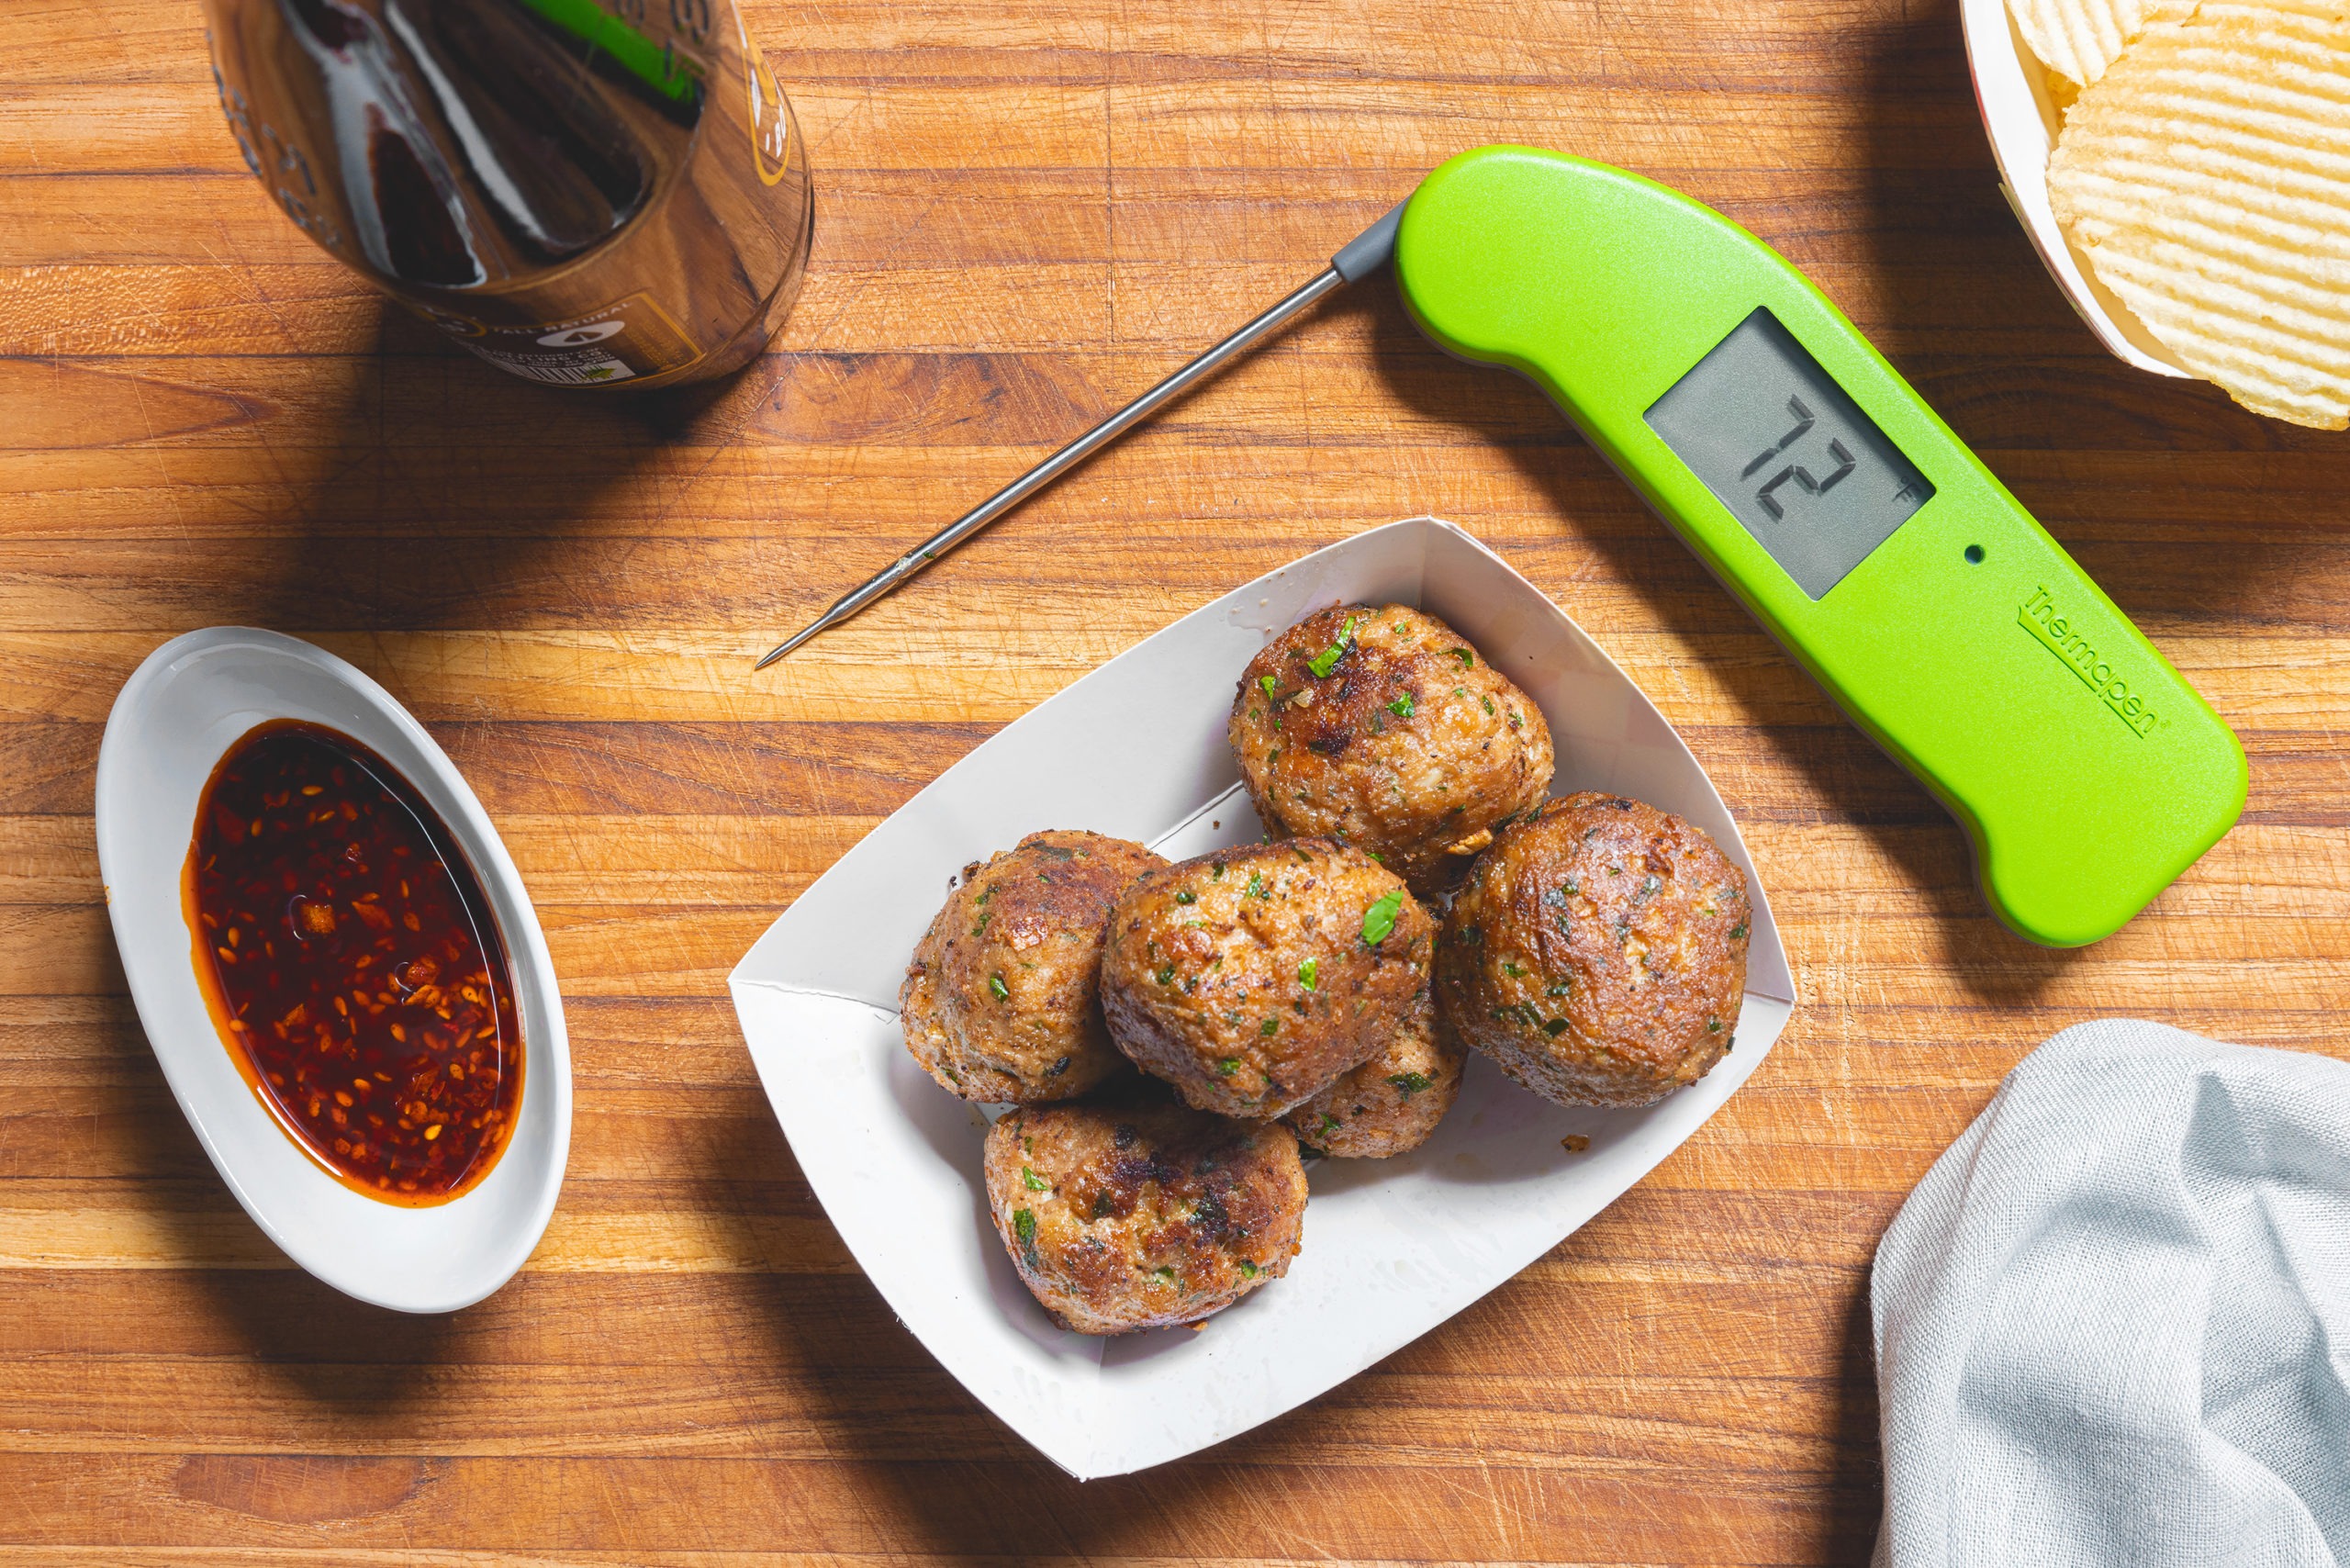
- Internal Temp Tracking: Track internal turkey temps while roasting, if you can. Place an alarm thermometer probe in the thickest part of the breast and, if you have it, another in the thigh.
- Oven Temps: We recommend a two-stage process—425°F (218°C) for 1 hour, then turn your oven down to 325°F (163°C). For how long? However long it takes until the turkey is done. (See the doneness temp above or read on below).
- Verify Turkey Doneness: Be sure to verify your doneness temps with an instant-read thermometer. The lowest reading you find should be 157°F (69°C) in the breast. If you don’t see that, keep cooking.
How to Cook a Turkey In Depth: Everything You Need to Know…
To cook a turkey the very best, there are a few steps. Some are intuitive, some you may not have thought of. We’ll walk you through each one, so you can succeed in your turkey craft. To cook the best turkey ever, you must
- Thaw it properly
- Prep its skin for maximum crispness
- Use a thermometer to track its temperature
- Let the turkey rest after cooking
If those all go right, you’re bound to have a juicy, succulent feast of a bird for any gathering. We’ll walk through all these steps. So let’s start at the beginning…
1—How To Thaw A Turkey
A partially frozen turkey will cook up in one of two ways: undercooked on the inside, or overcooked on the outside. We don’t care for either of those options, so we’re always sure to thaw our turkeys fully before we cook them. (Though you can cook a fully frozen turkey. Just know it will will take a long time and not be as good as one cooked from a full thaw.)
For a full, deep dive into the how’s and how-not’s of turkey thawing, we recommend you read our exhaustive post on the subject. But as you’re here, now, we’ll give you the punch line.
The best way to thaw a turkey is in the refrigerator
Do NOT thaw your turkey on the counter.
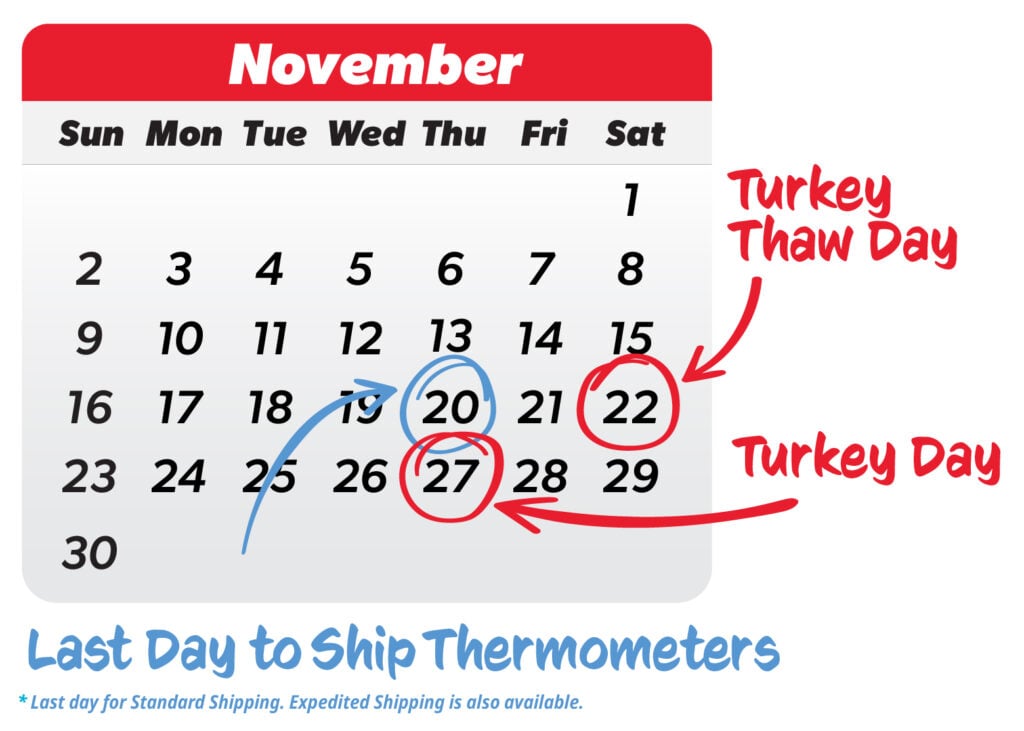
Place your frozen bird on a rimmed baking sheet, breast-side-up, on the bottom shelf of your refrigerator. Plan on one day of thaw time for every four pounds of turkey—a 12 pounder will take three days to thaw, a 16 pounder will take four. To make certain your bird is thawed in time, we recommend putting it in the fridge to thaw on the Saturday before Thanksgiving. If you would like a reminder to do so, sign up for our text message reminder on that day.
This method requires the least cleanup and the least hands on-attention, while delivering a perfectly thawed bird, which is why we think it best.
Verify the thaw
Do make sure your turkey is properly thawed by checking it with an instant-read thermometer like Thermapen® ONE inserted into the deepest part of the breast. It should read 30°F (-1°C) or higher throughout.
2—Crispy Turkey Skin Takes Planning
We all know that crispy skin is one of the reasons we love turkey. But crisp turkey skin doesn’t just happen; it takes preparation. The key to remember is that crispness comes from cooking all the water out of the skin, and all our preparations aim at that.
If we put a turkey right out of the bag in our oven or smoker, the heat must cook all that water out of the skin before it begins to crisp. If we can get some of that water out first, we’re that much closer to golden-brown deliciousness.
For crisper skin:
- Dry brine is best. One of the best things you can do for crisp skin (and for juicy, flavorful turkey) is a dry brine. We have a whole post on the benefits and method of dry brining that gives the deep hows and whys. But basically, you liberally salt the turkey the night before you cook, then let it sit uncovered in the fridge overnight. This pulls excess water out of the skin, helping it crisp.
- Pat the bird dry. Whether you dry brine or not, do your best to pat the skin dry before the bird goes in the cooker. A stack of paper towels will do well here.
- Oil it up. Slathering the bird with butter or oil (especially under the skin) will help the skin crisp and it will also help the flavors of any herbs or spices you use spread across and through the meat.
3—Turkey Internal Temperature Matters, and a Thermometer is Your Best Friend
The only way to know if your turkey is cooked properly is to measure its temperature. Time charts might get you close, but they are mere suggestions. Cutting the meat open to see if the juice runs clear is a great way to dry your bird out. And done-to-be safe is different from safe-and-still-juicy. The (justified) fear of foodborne illness drives many a turkey well beyond the internal temp they need to be to be safe.
An accurate thermometer is the only way to know what’s going on in that bird.
Or, even better, two thermometers.
“Sure, the guy from ThermoWorks wants us to buy two thermometers…right.” But hear me out.
If you only have one, Thermapen ONE is the more important thermometer, since it allows you to verify doneness temperature in multiple places. But each time you open the oven door or the smoker lid to check your turkey temperature, you’re likely to reduce the internal temperature of the oven or smoker by as much as 50°F (28°C)
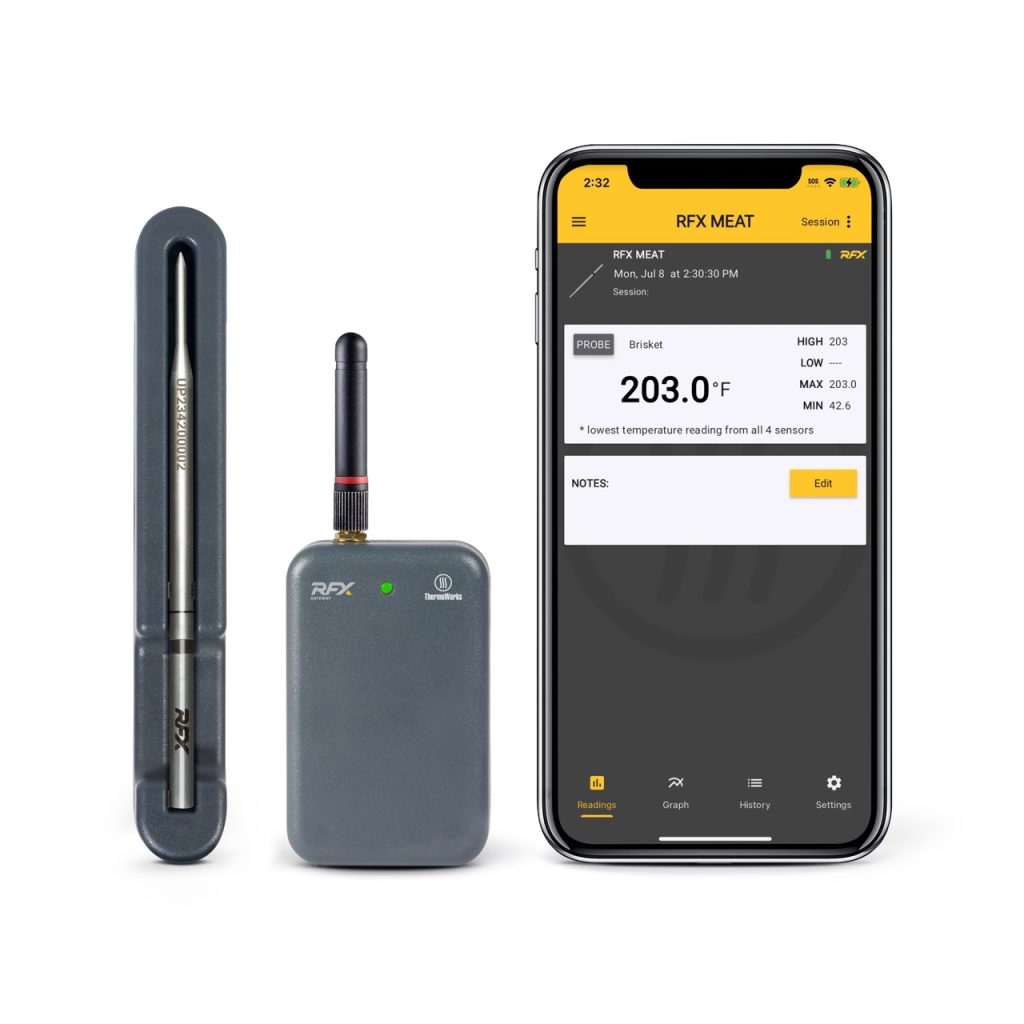
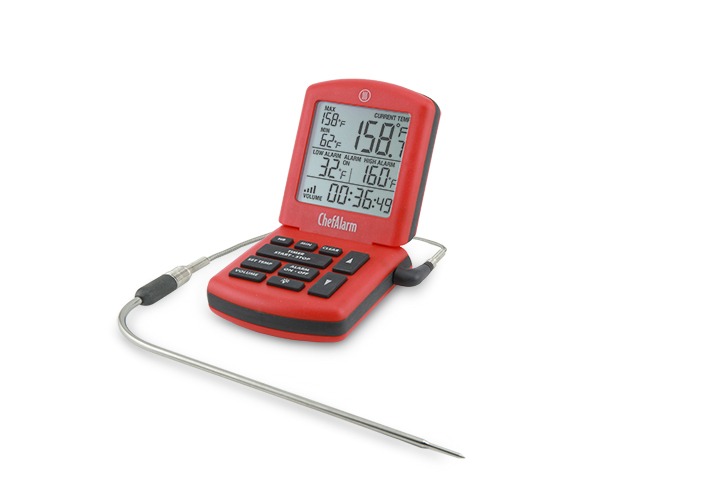
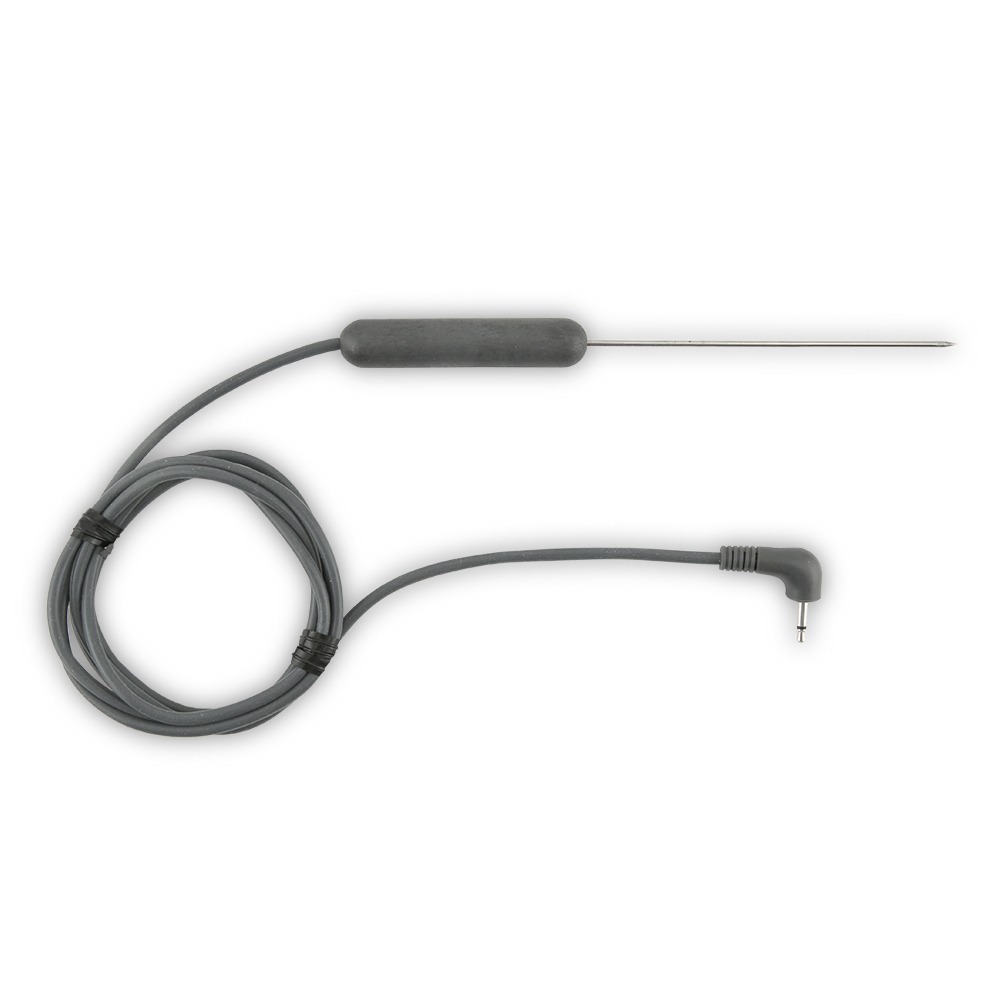
But with an alarm thermometer like Smoke X, ChefAlarm, DOT, or our wireless probe thermometer, RFX MEAT™, you’ll be able to track your turkey’s internal cooking temperature from outside the oven or smoker, so you won’t miss the critical moment when your turkey is done.
You track and monitor your current internal temps with a cooking alarm thermometer, and you verify your doneness temps with your instant read. Two different thermometers for two different but very important jobs.
But where do I put the thermometer into a turkey?
That’s a great question, and we’re glad you asked it! The best way to insert your alarm thermometer into a turkey is from behind, near the bottom of the breast.
As a turkey cooks, the temperature gradients build up, and if you go into the breast vertically, you pass through those gradients very quickly. That’s fine for verifying the temp with your Thermapen ONE, but makes it harder to hit the thermal center with the leave-in. (The thermal center is the part of the bird furthest from any surface. It’s the part that will heat last and most slowly.
Going along the length of the gradients—parallel to the baking tray—means you’re more likely to hit the thermal center.
This may seem pedantic at first, but we cook dozens of turkeys a year here and even we rarely hit the exact thermal center of the bird the first time. But to increase the chance that you’ll hit the right spot, follow these steps:
- Line the probe up on the outside of the bird, simulating where you’ll want the tip to end up. Look at how deep the probe will need to go into the breast to hit that spot and mark it with your fingers.
- Insert the probe from near the neck cavity, parallel to the pan, inserting it until you reach the depth you marked with your fingers.
- The probe’s tip should be about 1/2 to 1 inch (1.3 to 2.5 cm) from the internal cavity of the bird to avoid touching the bone. You can wiggle the probe tip inside the turkey breast and feel with your other hand to verify it is near the center of the breast.
Set your thermometer’s high alarm to 157°F (69°C) in the breast. If you have a second channel for a second probe in the thigh meat, set its high alarm to 175°F (79°C).
(If you DO have a second probe to work with, push it deep into the thigh—between the leg and the body of the turkey. If you hit bone, pull the probe tip back half an inch.)
With a cooking alarm thermometer, you will be able to track your turkey’s internal temperature from your countertop! Avoid the temptation to open the oven or smoker until the alarm sounds.
When the alarm sounds, it’s time to verify the doneness of your turkey.
Your thermometer is right, but did you put it in the right place? Verify your turkey’s doneness temperature.
The alarm sounds, the turkey smells great, but is it really done? Your ChefAlarm, Smoke X4, or RFX probes are super accurate, but they can only tell you the temperature in the place they are. If you missed the thermal center, they’re telling you the temperature of the wrong part of the bird. And a turkey is only as cooked as its least-cooked part.
So we verify.
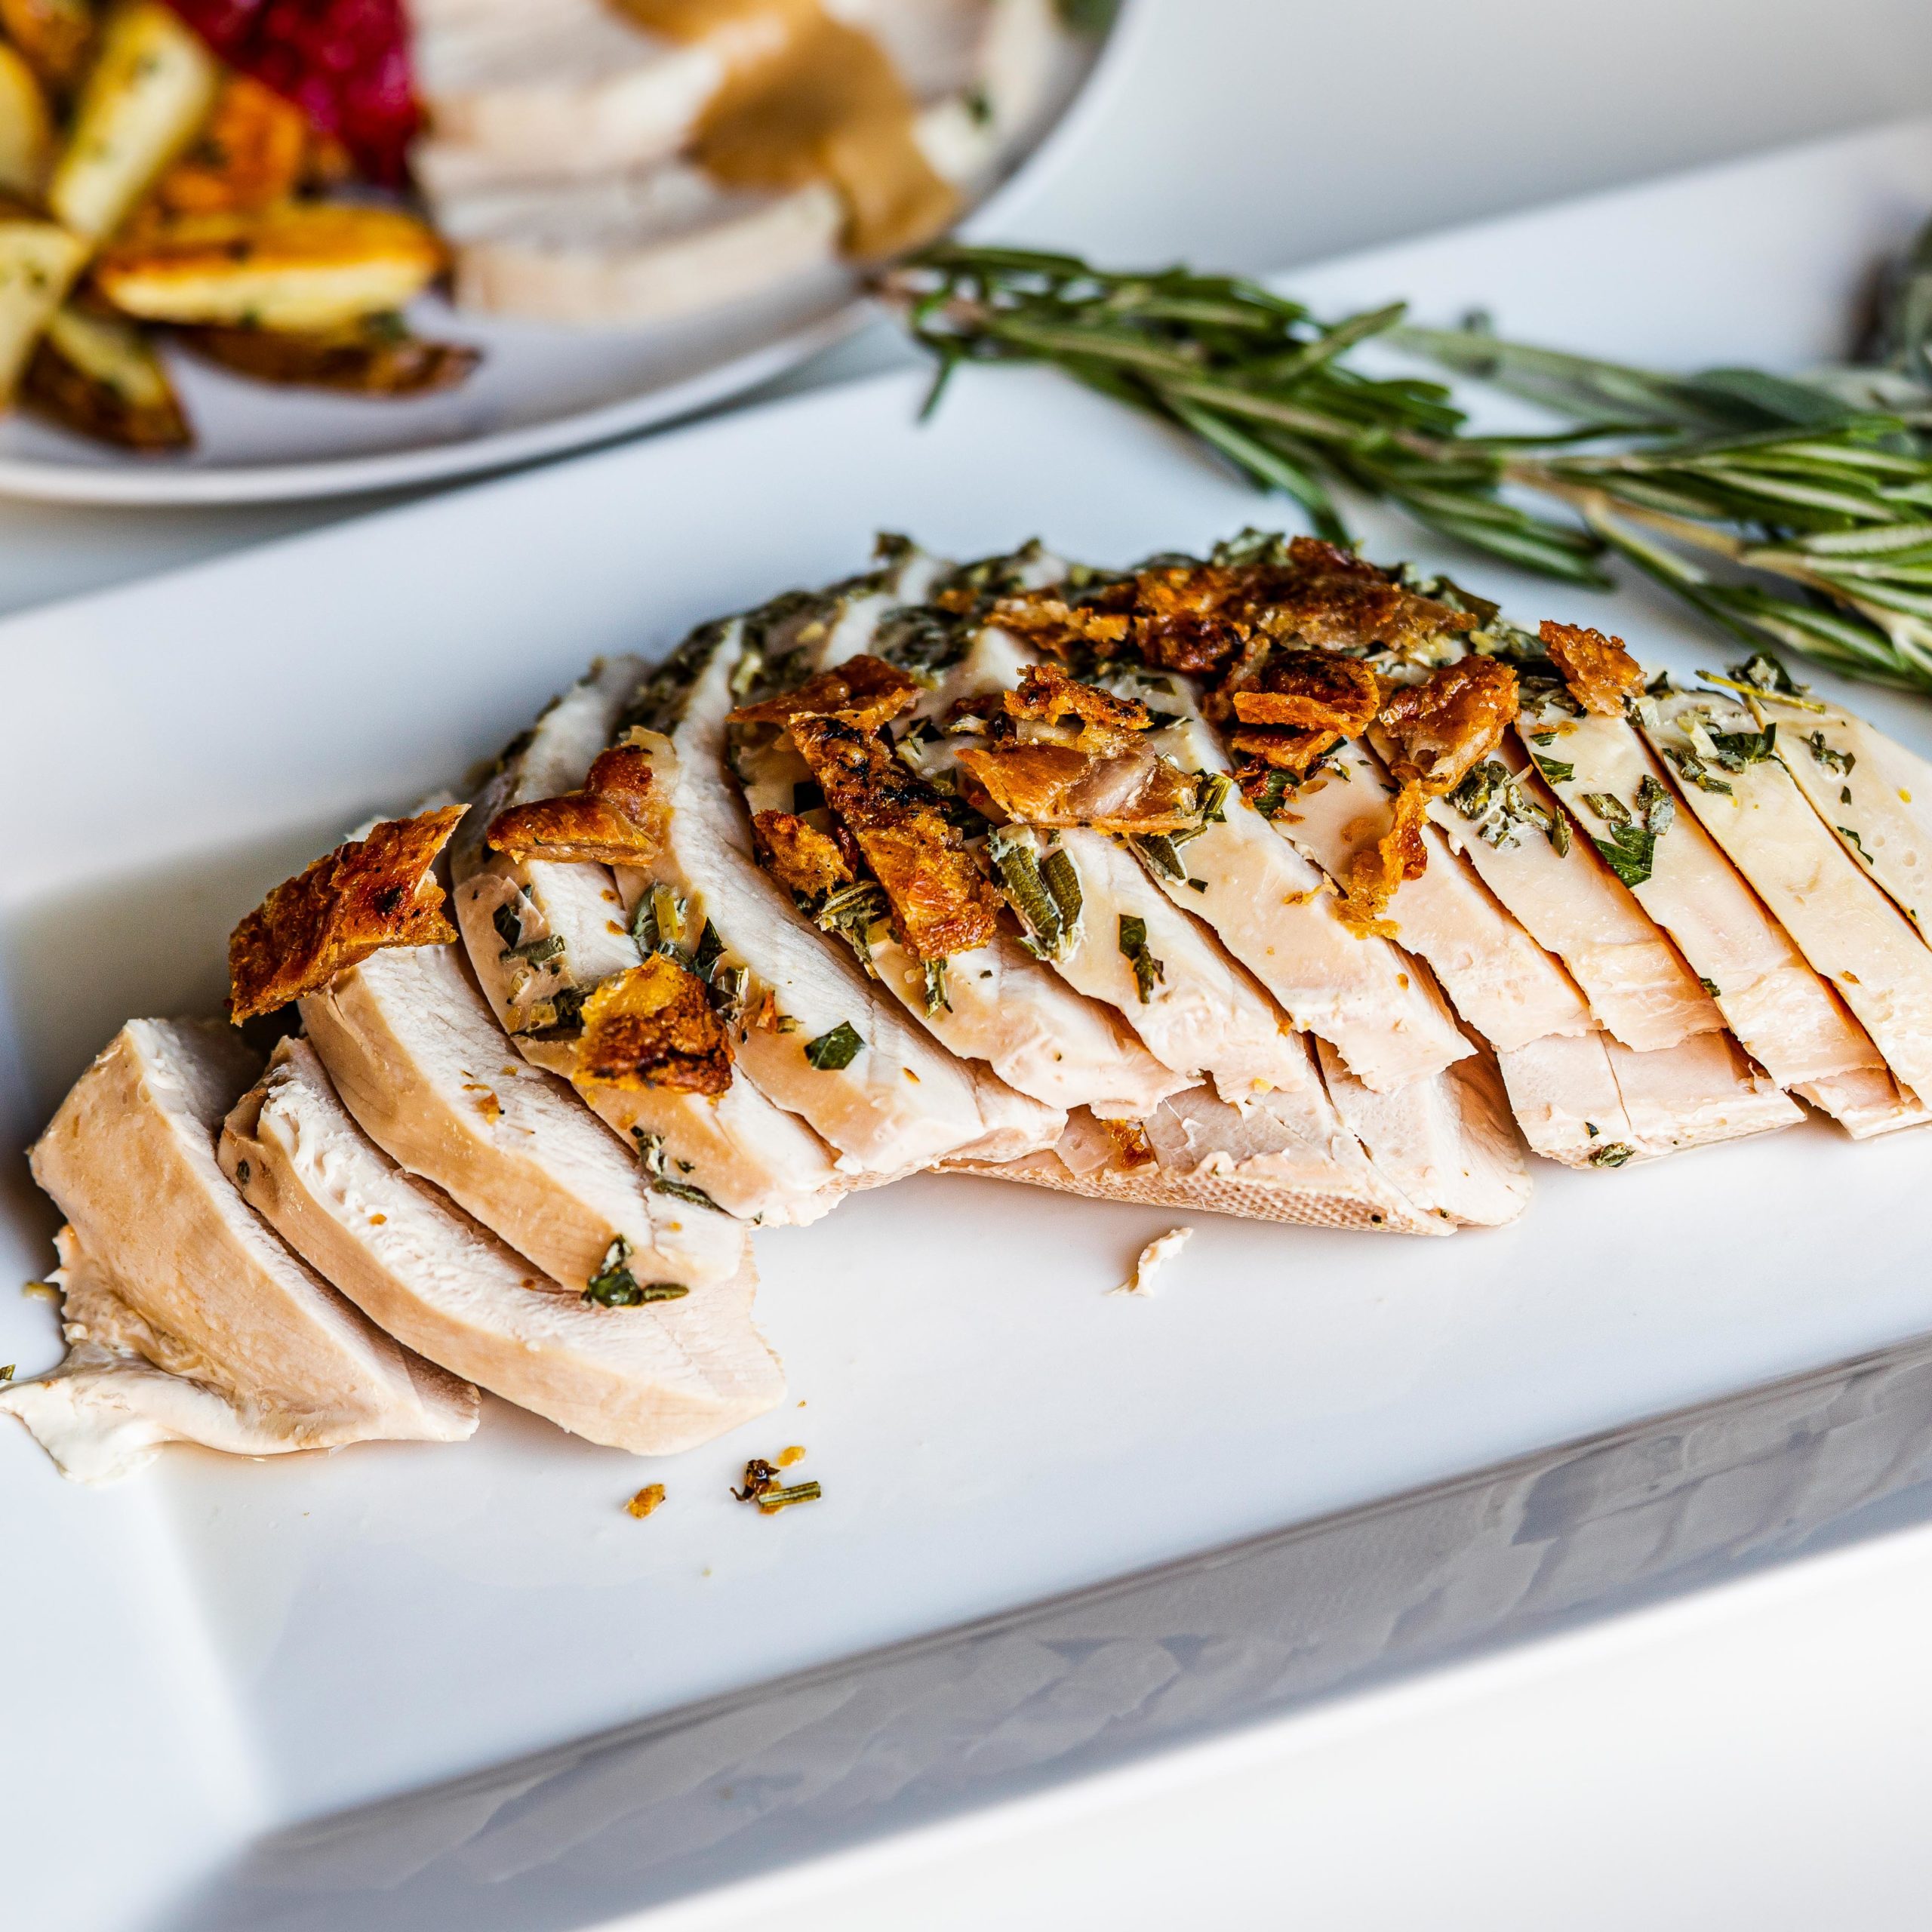
- Insert your Thermapen ONE vertically into the breast, going all the way through. Then pull the thermometer slowly up through the breast while looking at the temperature display.
- If you see any readings lower than 157°F (69°C), reposition your leave-in probe so that it reflects the lower temperature and keep cooking.
- When the lowest verified temperature in the breast is what it should be (157°F), also check the temps in the thigh between the leg and the body–we’re looking for temperatures of 175°F (79°F) or higher. Note: Thigh and leg meat is safe to eat at the same temperature as the breast, it just isn’t very good at that temp. (Read more on getting higher-temp leg meat here.)
3a—What temperature is turkey done?
This is a more nuanced question than most recipes will lead you to believe. We’ve been throwing 157°F (69°C) around a lot in this post, and there’s good reason for it. Bone-dry turkey white meat is the reason so many people kind of hate turkey. It’s also why turkey gravy and cranberry sauce are de rigueur on so many Thanksgiving dinner tables. But bone-dry breast meat is exactly what you’ll get if you cook your bird to 165°F (74°C) or—heaven forbid—180°F (82°C), the temperature set on pop-up turkey timers!
Are you trying to kill me? How is 157°F a safe turkey temp?
The recommendation that turkey be cooked to 165°F (74°C) comes from a simplification of the actual data. At that temperature, salmonella dies almost instantly. However, bacterial death is a function of both time and temperature. Note this screenshot from the USDA’s own tables on turkey safety…
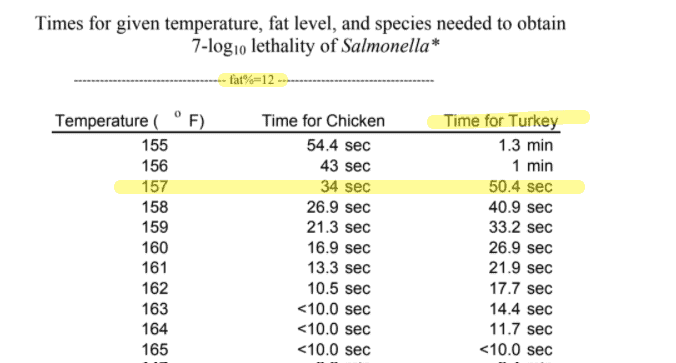
This shows that a turkey held at 157°F (69°C) for 50.4 seconds will achieve the same lethality on Salmonella that a turkey cooked to 165°F (74°C) does instantaneously. And what are the odds that a turkey pulled at 157°F (69°C) will remain at that temp for at least a minute? Basically 100%. In fact, the temperature will continue to climb after you take the turkey out of the oven.
Why does this matter? The white meat in turkey will start to expel its water in the 150’s F (60’s C) and be super dry by the time it reaches 165°F (74°C). If you take your turkey out of the oven at 165*F (74°C) and it continues to climb, it will be dry.
Do your family a favor this Thanksgiving. Pull your turkey from the oven or smoker at 157°F (69°C). But remember to verify with your instand-read Thermapen ONE!
4—Rest your turkey after cooking
Pulling your turkey from the cooker (whatever that may be) is actually NOT the last step before carving and serving. Resting your turkey is. We recommend a 30-minute rest before carving.
Why rest? Conventional wisdom says it’s to “reabsorb juices.” But that reasoning has little science or data to back it up. The real reason is alluded to above: To allow the carryover cooking to play out.
When your bird comes out of the oven, the higher temperatures that exist on the outside of the turkey will continue moving toward the lower temperature center area of the meat.
While small cuts of meat like steaks or chops experience less carryover, large cuts, like turkeys or roasts, can easily experience as much as 15°F (8°C) increase in internal temperature while the exterior cools. Carryover cooking is the “equilibration” of temperatures within a piece of meat, and it results in a more even doneness.
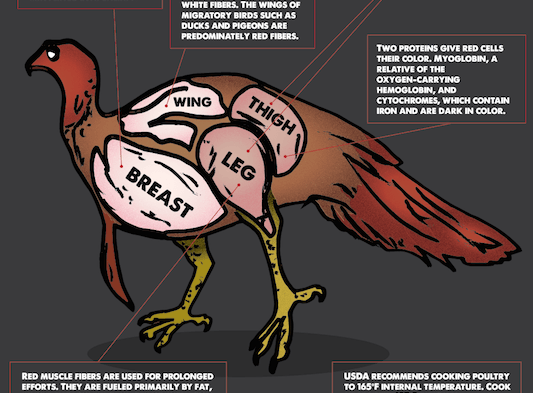
Appendix 1: How to get hotter dark meat than white meat
We’ve alluded to different temperatures in the breast and the thigh in this post. Why? Isn’t it all one bird? Hardly!
Two Types of Turkey Meat
Part of the challenge is that a whole turkey actually has two very different types of meat on one bird. There is lean and tender white breast meat and the heavily worked dark meat of the legs and thighs. Cooking them at the same time is like trying to cook a steak and a brisket in the same oven. Since dark meat, like brisket, needs higher temperatures for the collagen to melt, the internal temperature in the thighs needs to be at least 175°F (79°C) by the time the breast meat reaches 157°F (69°C).
To help cook two completely different types of meat at the same time, chefs and food science experts have come up with various methods. These include roasting the turkey upside down, shielding the breasts with tin foil, or even separating the white meat from the dark meat and cooking them separately.
But if you want to keep the turkey whole, there are two (thermally minded) methods that we have found stand above the rest.
Option 1: Ice The Breasts
This method, recommended by Harold McGee, gives the dark meat a thermal head start before the cooking, and it works like a charm. It may seem a bit alarming to leave the turkey out on the counter for a couple of hours before putting it in the oven or smoker, but food safety experts who know about the Temperature Danger Zone, know that food can safely rest between 40 and 70°F (4 and 21°C) for a total of 4 hours.
Steps
- Fill one or two quart-sized zip-closure bags (depending upon the size of the turkey) with ice.
- Place the ice bags on a baking sheet on the counter and place the turkey, upside-down, on top of the bags, with the breasts pressed into the ice. Set a timer, like Extra Big & Loud, for 2–3 hours. When the timer goes off, remove the ice bags, properly place your probes, and immediately put the turkey in the oven or smoker as usual.
- You should see a 10–15°F (6–8°C) differential between the thigh and breast that lasts all the way through the cook. For extra credit, preheat a pizza stone in the oven on your cooking rack at 500°F (260°C) for about an hour before the bird goes in. When it’s time to cook, reduce the oven heat to 425°F (218°C) and put your turkey pan right on the pizza stone. The extra radiant heat from the bottom will help cook the legs to a higher temperature. Reduce the oven further to 325°F (163°C) after the first hour of cooking.
Option 2: Spatchcock your bird
Of all the turkey cooking methods, this one delivers the biggest punch, in our humble opinion. If you’ve ever baked a pan of brownies you must have noticed how the brownies near the edge of the pan are fully cooked while the brownies in the center of the pan are still gooey.
Spatchcocking involves removing the backbone of the turkey to allow it to be flattened into a roasting tray and relies on the same principle to “fully cook” the dark meat on the outside of the tray while keeping the white meat in the center at a lower, less overcooked temperature.
Learn more about spatchcocking turkey here.
Conclusion
We hope that your Thanksgiving or holiday turkey is the best you’ve ever had! No matter your recipe, be sure to follow all these thermal guidelines to get the very best results this year and again next year, too. Good luck and happy cooking!
How to Cook a Turkey: Classic Recipe for Roast Turkey


Ingredients
- 1 turkey thawed until no part of the bird is colder than 30°F (-1°C)
- Kosher salt
- Black pepper
- Oil, butter, or rendered fat butter, or rendered fat
Instructions
The day before you cook the turkey—dry brine: optional but highly recommended.
- Unwrap the turkey and remove the neck and giblets, if present.
- Place the turkey on a rack set in a rimmed baking tray.
- Liberally coat the skin of the turkey with kosher salt and season it with pepper.
- Place the turkey, unwrapped, in the refrigerator on the bottom shelf. Let it sit overnight.
The day of the cook
- Preheat oven to 425°F (218°C)
- Dry the skin with paper towels if it is damp, or if you didn’t dry brine it.
- Rub the skin well with oil or rendered fat.
- Place a handful of aromatics in the cavity of the turkey.
- If you didn’t dry brine, season the skin well with salt and pepper.
- Place the turkey in the oven and cook for 1 hour.
- Turn your oven's temperature down to 325°F (163°C), open the door briefly to vent heat.
- Continue to cook the turkey until the high-temp alarm sounds.
- Verify the temperature with your Thermapen ONE. If you find a lower temp than 157°F (69°C), move the ChefAlarm probe to the cooler spot and continue to cook.
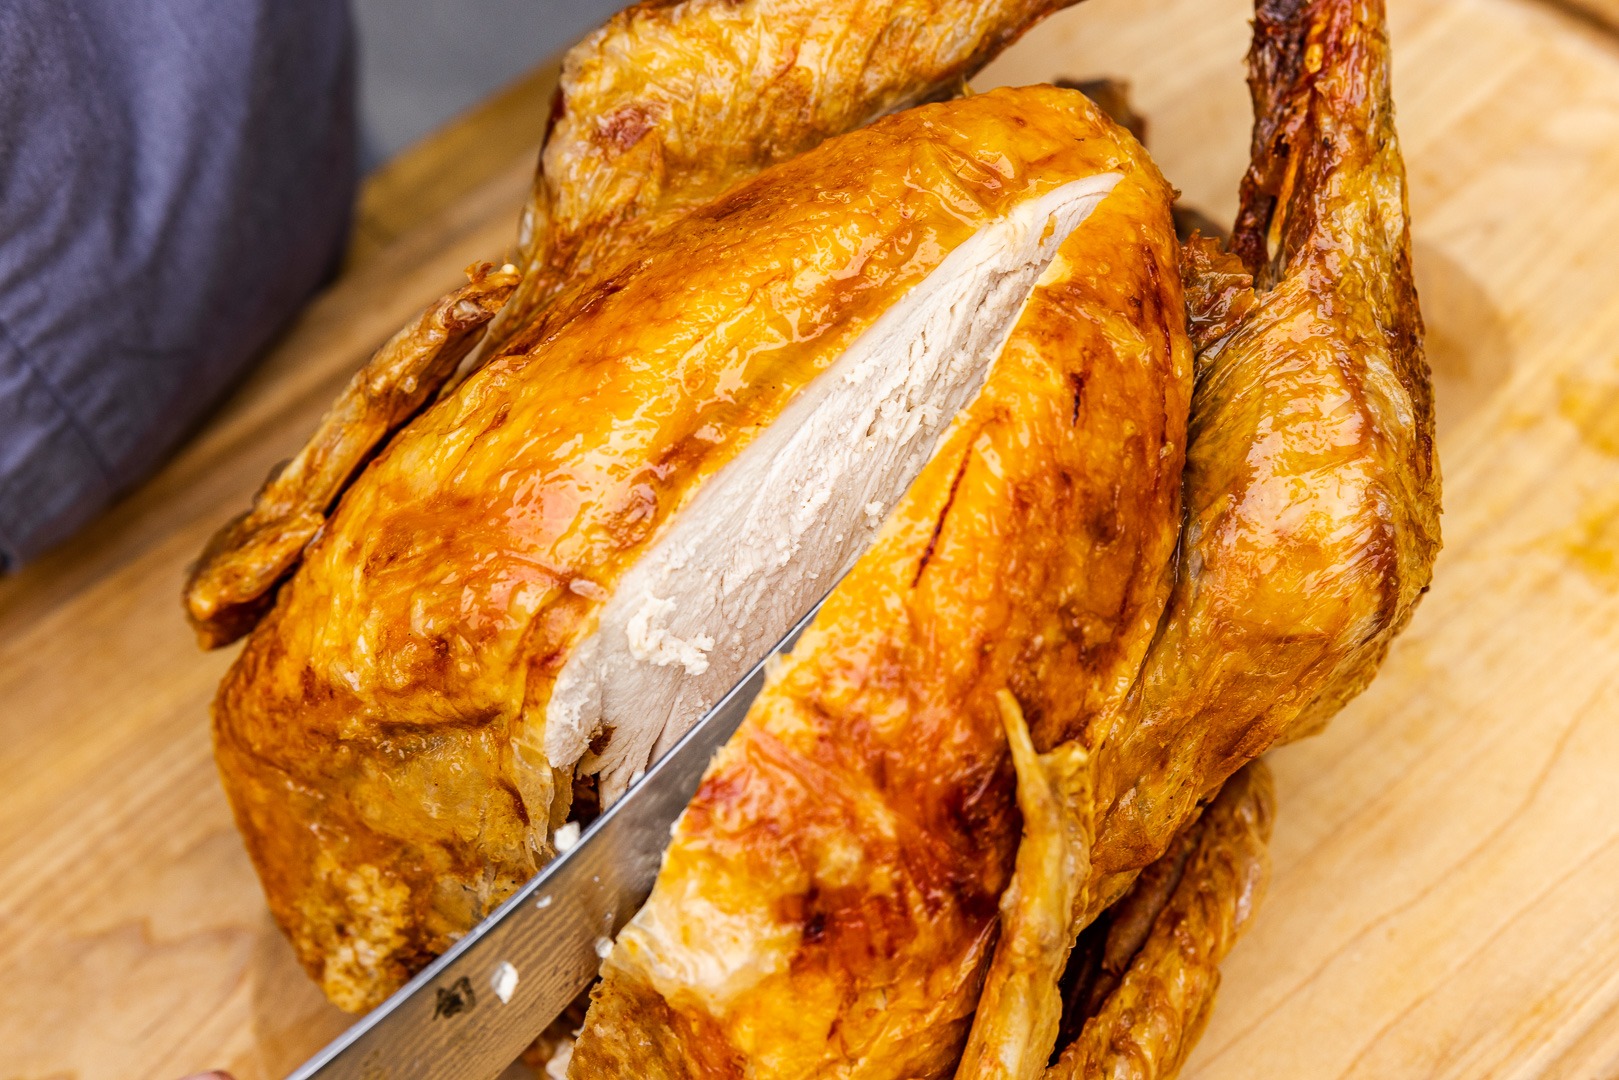
- If your Thermapen gives the appropriate pull temp, remove the turkey from the oven.
- Allow the turkey to rest on the countertop for about 30 minutes. Don’t worry, it will still be plenty hot!
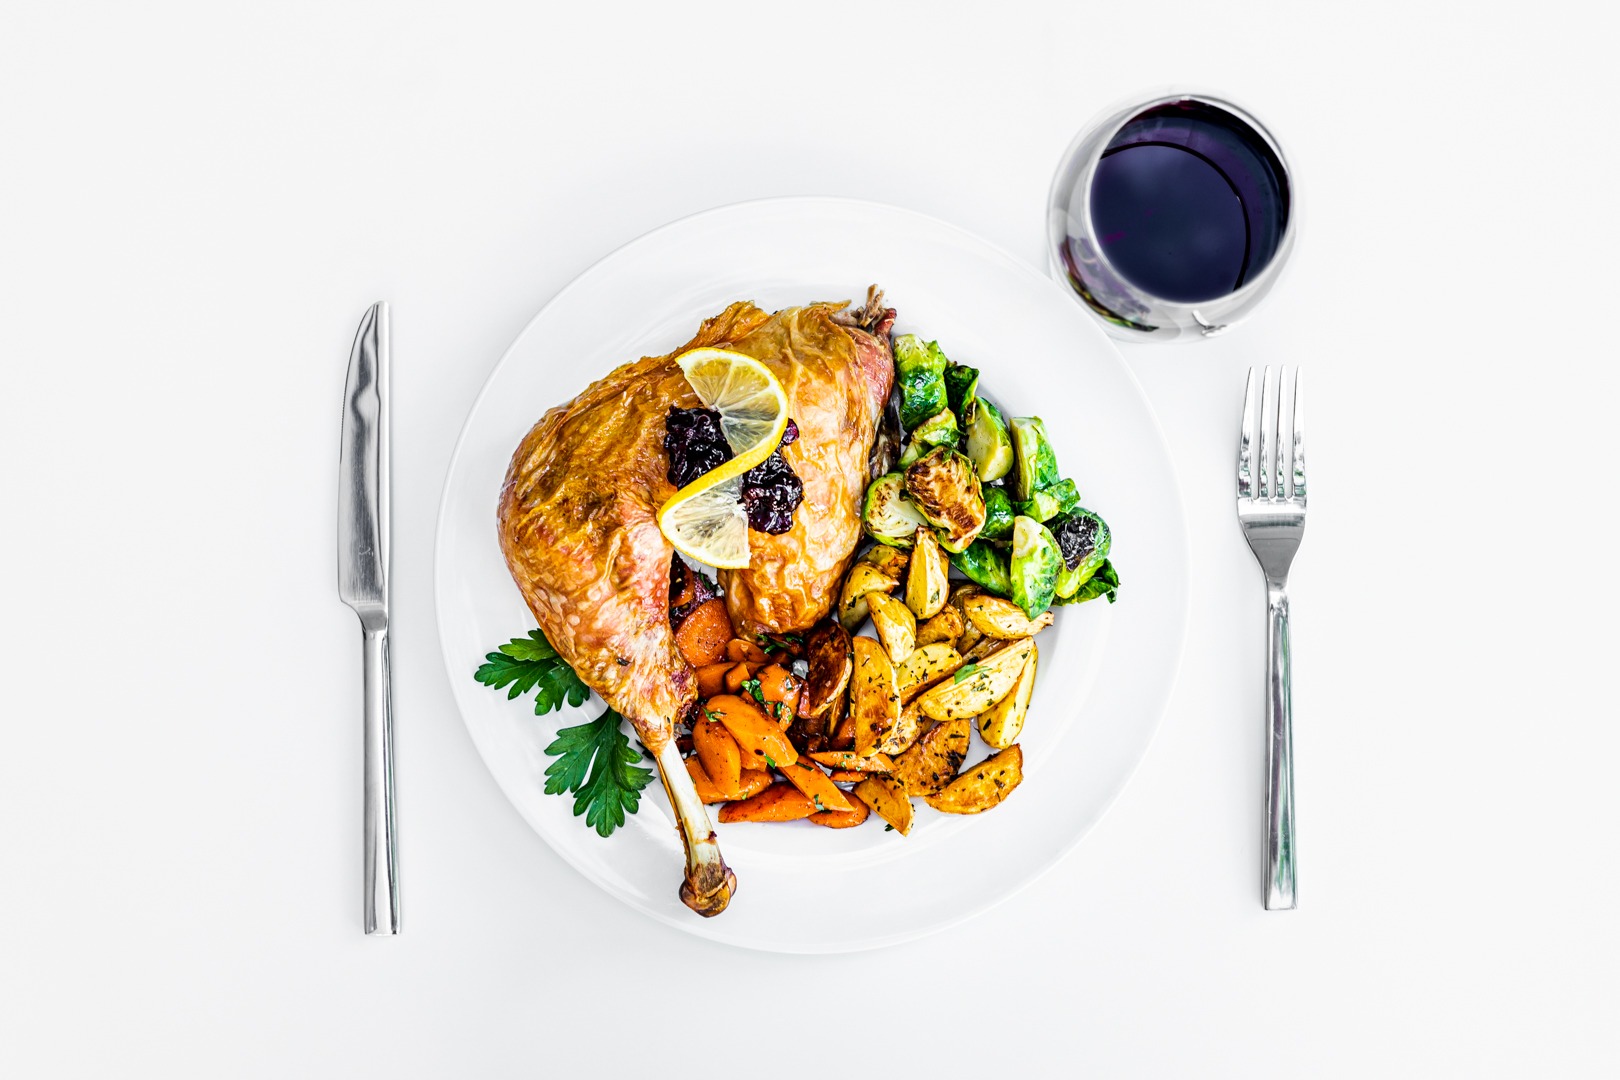
- Carve and serve!
For more methods and recipes, check out some of these posts

Shop now for products used in this post:


Resources:
Turkey Basics: Safe Cooking, USDA
On Food and Cooking, Harold McGee
Barbecue Turkey and Grilled Turkey, AmazingRibs.com, Meathead Goldwyn
The Food Lab’s Guide to Smoking a Turkey, SeriousEats.com, J. Kenji Lopez-Alt
Planning on smoking two 13lb birds on the big green egg at 300 using my smoke thermometer to moniter temps. Thinking one bird will take approximately four hours. Any idea how much longer the cook will take with two?
Jarven,
I’m honestly not sure. That will be a thermal mass taking up thermal space in the smoker, but I don’t know how that’ll affect the whole thing. I’d plan on at least an extra hour.
Thanks for all the great and detailed info!!!!
I would NEVER depend on a clock to tell me when my turkey is done, however it is good to know an approximate time so you can plan when dinner will be served.
Ron,
That is a good point. Cooking-time tables can be useful for estimating cooking times, but you are right that they cannot tell you everything you need to know!
So would a 9-10 # turkey not rise to 165 degrees if removed from oven @ 157 degrees since it was stated that the smaller the bird the less the rise in temp at rest? Or should oven temp be raised to insure carryover rise?
Lisa,
A 9-10# turkey will still mostly likely hit165°F. But remember, even if it doesn’t get all the way there, as long as it spends more than 50 seconds above 157°F it’s completely safe to eat.
what to do if breast temp is 157, but thigh temp is lower than 165.
Richard,
If it’s still at a food-safe temperature, you can eat it (157°, for instance). It will be rubberier, but edible. If you have the time, I’d cut the breasts off and keep cooking the rest of the carcass until you get tot he right temperature. Keep the breasts warm in a cooler.
Martin,
In the article above, it says that “A turkey carved and served without resting will spill more of its juices onto the cutting board and not be as moist”. If you cut off the breasts and continue to cook the rest of the carcass, will this result in losing fluids that would otherwise be redistributed in the breast meat?
A little, yes, but not as much as making multiple cuts to slice the breast into serving portions. It should be ok.
Fantastic source of information, best I have come across, thanks
I’ve been using this method for several years now since I first read it. I use the ice on the breast. I also put it on a rotisserie and position the breast to get less heat. Unfortunately I can’t use my Smoke to monitor the temperature. One additional thing I add is baking soda on the skin the night before to help dry it out and achieve crisp skin. This method works for chicken as well.
I was thinking of using my rotisserie this year as well, do you use offset heat? Looking for any tips that might help. Thank you!
For a rotisserie, I’d use direct heat for the first 10–20 minutes to get the rendering process moving, then move to indirect heat for the majority of the cook. If you want to blast it at the end a little to crisp the skin, it’s not a bad idea. Good luck!
Are these temperatures for doneness the same for a stuffed turkey?
Yes, but you have to take the temp in the center of the stuffing as well as in the meat. The stuffing will absorb uncooked turkey juices during the cook, and those will need to be cooked. The best thing to do is to cook your stuffing separately and insert it into the bird before taking it to the table. Or, just serve it on the side.
Or…when the turkey is done, remove the stuffing and finish cooking it to 165 degrees in the oven. I don’t care what anyone says, it’s not easy to duplicate the flavor of stuffing actually cooked inside the turkey. My mom cooked stuffing both ways (inside and out) every Thanksgiving, so I’ve done plenty of side-by-side comparisons. It’s not even close. Those few bites of stuffing from inside the turkey made your first plate special.
This isn’t a bad idea. Cook the turkey to proper doneness, then finish the stuffing in the oven. I like it!
What I’ve done for years now, for my stuffing addicted family, is stuff the turkey using a cheesecloth stuffing bag (but prep double or even triple that amount of stuffing). I always roast breast side down for a bit more than half the expected cooking time, and when I turn the turkey I pull out the stuffing bag and mix that stuffing it into the rest of the stuffing and then bake all the stuffing. The turkey is always perfectly cooked (I always pull it at 160°, and will now start using 157°) and there is plenty of flavorful stuffing.
What should the temperature of stuffing in the bird be?
157°F, just like the bird itself.
A great resource on cooking turkeys can be found at the Serious Eats website. J. Kenji López-Alt pulls his turkey at 150 degrees and 165 in the thigh but makes sure it rests for a long time to properly pasteurize it. He also spatchcocks it — something that is a great idea.
Do you tie up the legs when you cook in the oven or leave it open?
Leaving the legs open allows more heat to get to the dark meat of the thighs where it needs to be. I recommend against trussing the bird in the oven.
Great article! Thank you for not making fun of my ignorance and teaching me how to do Turkey properly! Wish I’d read this years ago!
I used this recipe to roast a15 lb. turkey today with my new ThermoWorks Signals. The turkey turned out PERFECT!
Used a highly abbreviated version of the dry brining (2 hours instead of 8).
Iced the breasts exactly as described. Used the pizza stone directions verbatim (used large rectangular stone).
The breast reached the pull temperature of 157 F in the same minute the thigh reached the temperature of 175 F… 1 hour, 44 minutes into the cook! This is a testament to using the icing/pizza stone technique to balancing the unique cooking needs of these very different meats.
The breast meat was clearly the BEST turkey I’ve ever eaten! It was so tender and juicy. The aromatics (onion, carrot, celery, thyme) really lent to a very tasty turkey! I’m not normally a fan of dark turkey meat, but I must admit it was tender, juicy, and flavorful.
I couldn’t have been happier with my ThermoWorks Signals system. I learned that I’ve been over cooking turkey for decades!
This is so great to hear! I’m happy you’ve craked the code for delicious turkey, and I wish you many tasty birds to come.
I followed these instructions for a brined 17 lb turkey and it was the best turkey I’ve every made. Zero leftovers! The breast was so tender and was the best part. Usually I prefer the dark meat but not this time. Thanks so much for sharing such detailed knowledge.
Wonderful!
Love my Thermoworks thermometers. Just bought some for my oldest son as he’s moving out and I have always intended my boys learn the importance of a good thermometer in cooking. Cooked this years turkey and never have I cooked to 157F. I saw your guide and decided to give it a shot. Hands down the best turkey I have ever made. Moist breasts and so awesome!! Everyone agreed it was the best turkey they’ve ever had. I am so thankful I found your guide suggesting to cook to 157F instead of the typical 170F for the breast. The breast was definitely done and the best ever. THANK YOU THANK YOU THANK YOU!!!!
Fantastic! I’m glad we could make your celebration more tasty.
Well actually I’m cooking a 3 pound turkey breast in the slow cooker and I think 157 F still applies. Norm
Yes, I think it should still apply.
I’m curious about how 157 degrees was arrived at, given all of the options on the USDA chart. Why not 155 or even 150 with longer rest times given when the breast starts to release moisture?
157°F is the lowest temperature we felt we could recommend without people bombarding us with comments about underdone turkey, but would still provide a much better bird than 165°F. I usually pull mine at 152°F.
Do you put the Turkey pan directly on pizza stone to bake after the 1 hour heat time?
Directly on the stone, yes.
Glad for this pizza stone clarity. The instructions don’t include exactly what to do with the hot pizza stone, and could use a quick review and edit. Thanks for all the great info!
I like to cook the turkey on the grill’s rotisserie. Once the bird hits the target temp, I turn off the burners but keep the rotisserie turning for about 30 minutes. This seems to result in a good distribution of the juices throughout the turkey. But, my question is, should I turn off the burners a few degrees before the target temp is reached? The grill cover will be closed, so it’ll take a little while for the ambient temp inside the grill to dissipate.
I think that’s a very good idea! the carryover will certainly get you there, and it’ll be that many degrees juicier.
I have iced the breast on previous occasions, works like a charm! This year I want to incorporate the pizza stone but had a question about the stones placement.
Do you recommend putting the roasting pan directly on the stone or do you place the stone on a lower rack separate from the roasting pan?
It should go directly on the stone.
Great (& valid!) guide. The best summary of the essential steps and options. Thanks
Any thoughts on a 4lb roulade stuffed breast timing? I’m still going with 157?
Great article. I will dry brine and keep it simple as suggested (no ice pack!)
Yes, still go with 157°F, it still won’t cool fast enough to make it dangerous.
At the beginning of this article under “How to Cook a Turkey at a Glance: Cooking Time and More”, it states it’s best to cook the turkey in two stages – 450 deg for one hour & then reduce the temp to 325 deg until it’s done.
Then at the end of the article under “How to Cook a Turkey: Turkey Temperature”, it states to preheat the oven to 425 deg and cook for 1 hour & then reduce the temperature to 325 deg.
So, what is the correct temperature to start the turkey cooking, 450 deg or 425 deg?
Go with 425°F.
I just received the Chef Alarm probe and am excited to use it. The turkey I ordered will be spatchcocked. Should I insert the probe into the breast, or in one of the thighs?
Insert the probe into the breast and set the high-temp alarm for 157°F—or lower, with the corresponding adjustment to resting time. Be sure to verify your temp when the alarm sounds, it’s not always easy to get the thermal center on your first go!
Oh one more! How long to cook a 4 lb roulade and recommended temp. Thank you!
Reading recipes temps are all over from 325 to 400
I’d cook a turkey roulade—which I assume is made of butterflied breast—at 325 or 350°F. I suspect it’ll take close to an hour, hour-fifteen.
White chicken meat looks very tasty, I want to cook right away, thanks for the temperature information, the pictures to the article give a complete answer, I have not met such sites for a long time. thanks to the author, I liked it!
how about the fried turkey? same temps?
Yes! Same doneness temps. For info on the cooking temps, see our post on safely frying a turkey.
Should liquid be put in roaster pan to avoid scorching drippings?
You can, but I ususally don’t, and the drippings almost always come out fine. If you’re super concerned, put a half cup of water or so in there.
I am making a bone in breast ( 5.6 lbs). Should I do 425 or 375 for the temp? I just purchased both thermos ( one for inside turkey and one pen). So excited to use tomorrow …. Great articles and info!
375 is your best bet there, I think.