

Spatchcocked Turkey: The Best Turkey Ever, in Record Time

The turkey is the star of the show on Thanksgiving Day, golden and juicy. But it can also be problematic. It takes up space in the oven, for one thing. Doesn’t that bird know you have green bean casserole, sweet potatoes, and rolls waiting in line? Plus it is often overcooked, and half the skin—which we want ultra crisp—is soaked and squidgy at the bottom of the bird. But a little time-saving trick of laying the bird out flat while roasting is a complete game-changer on all fronts. If you’re the type of person who thinks outside the box with an affinity for the unorthodox, keep reading. This fast-roasting turkey method is for you.
What is “Spatchcocking”?
The origins of the word spatchcock are vague and disputed, though it is generally agreed that the word comes from Scottish or Irish usages. No matter its origin, when the term is applied to whole fowl, it is equivalent to “butterflying.” We’ll do a deeper dive into the exact process below, but in essence, we flatten the bird out by removing the backbone and arranging the legs and wings around the breast, like rays shining out from a white-meat sun. This vastly increases the bird’s surface area, much improving it over the semi-spherical shape it originally inhabits.
“But what,” we hear you asking, “about the perfect turkey being brought to table to be carved by Grandfather?!?” And we suppose that is something of a fair question, but we would also remind people that Norman Rockwell was famous for being a painter, not a cook. Just because it’s pretty doesn’t mean it’s the best way to cook something! We’re not the only ones who think so, either.
Preferred by people who know
Mark Bittman of the NY Times, and the author of How to Cook Everything, once put together a minimalist Thanksgiving dinner to cut down on prep, cook time, and ingredients so he could have time and energy to actually enjoy the meal with family and friends. This method was part of it. Bittman’s first spatchcocking video made its appearance in 2008. Since then a number of celebrity chefs have also applied the same method, with spatchcocking becoming an official foodie trend by 2012.
Kenji Lopez-Alt is another chef who swears by a flat bird! His discussion about and recipe for a spatchcocked turkey and many others can be found in his book, The Food Lab.
Cook after cook, professional after professional—people who know prefer the spatchcock method.
Advantages of Spatchcocking:
- It’s a Timesaver: To take the time out of the turkey roasting process, Mark splits and flattens out the turkey. With the turkey flattened out, the amount of exposed surface area increases and the overall thickness of the bird comes down to a nearly even level. With this preparation, you can blast the turkey at a higher oven temperature to expedite the cooking process. Depending on the size of the bird, it could take as little as 45 minutes to cook all the way through. Spatchcocking addresses the issue not only of time, but oven space too. With the turkey flattened out, you’ll still have room in the oven for pies, rolls, and anything else you may be baking.
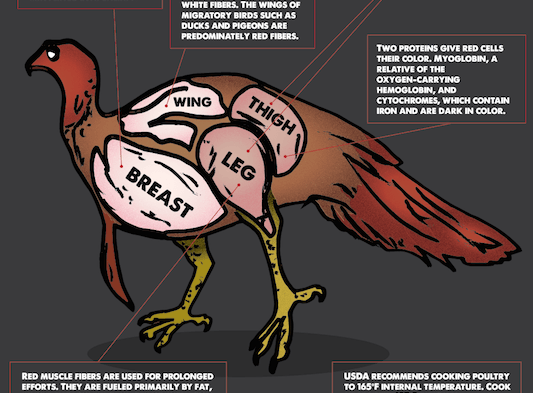
- Flat Shape = Even Cooking: A turkey is pretty much spherical in shape; no wonder there are issues with even cooking! In a spatchcocked turkey, the legs will be far more exposed than a turkey in its natural shape. This is great because the dark meat needs to reach a higher temperature than the light meat in the breast.
- Juicier Meat and Crisper Skin: On a spatchcocked bird, all of the skin is facing up and fully exposed. This will result in a turkey with crackling, crisp skin and even browning all around. As the juices render from the skin, they help keep the meat nice and moist.
- Better Gravy: With the backbone removed, you have another component to add flavor to your gravy. Make a quick stock using the neck, giblets and backbone, and use that in addition to the drippings from the turkey to make your gravy. No need to use store-bought chicken stock to make the gravy. (Not that you’ll need gravy for your bird … you won’t. But you will need some for your potatoes.)
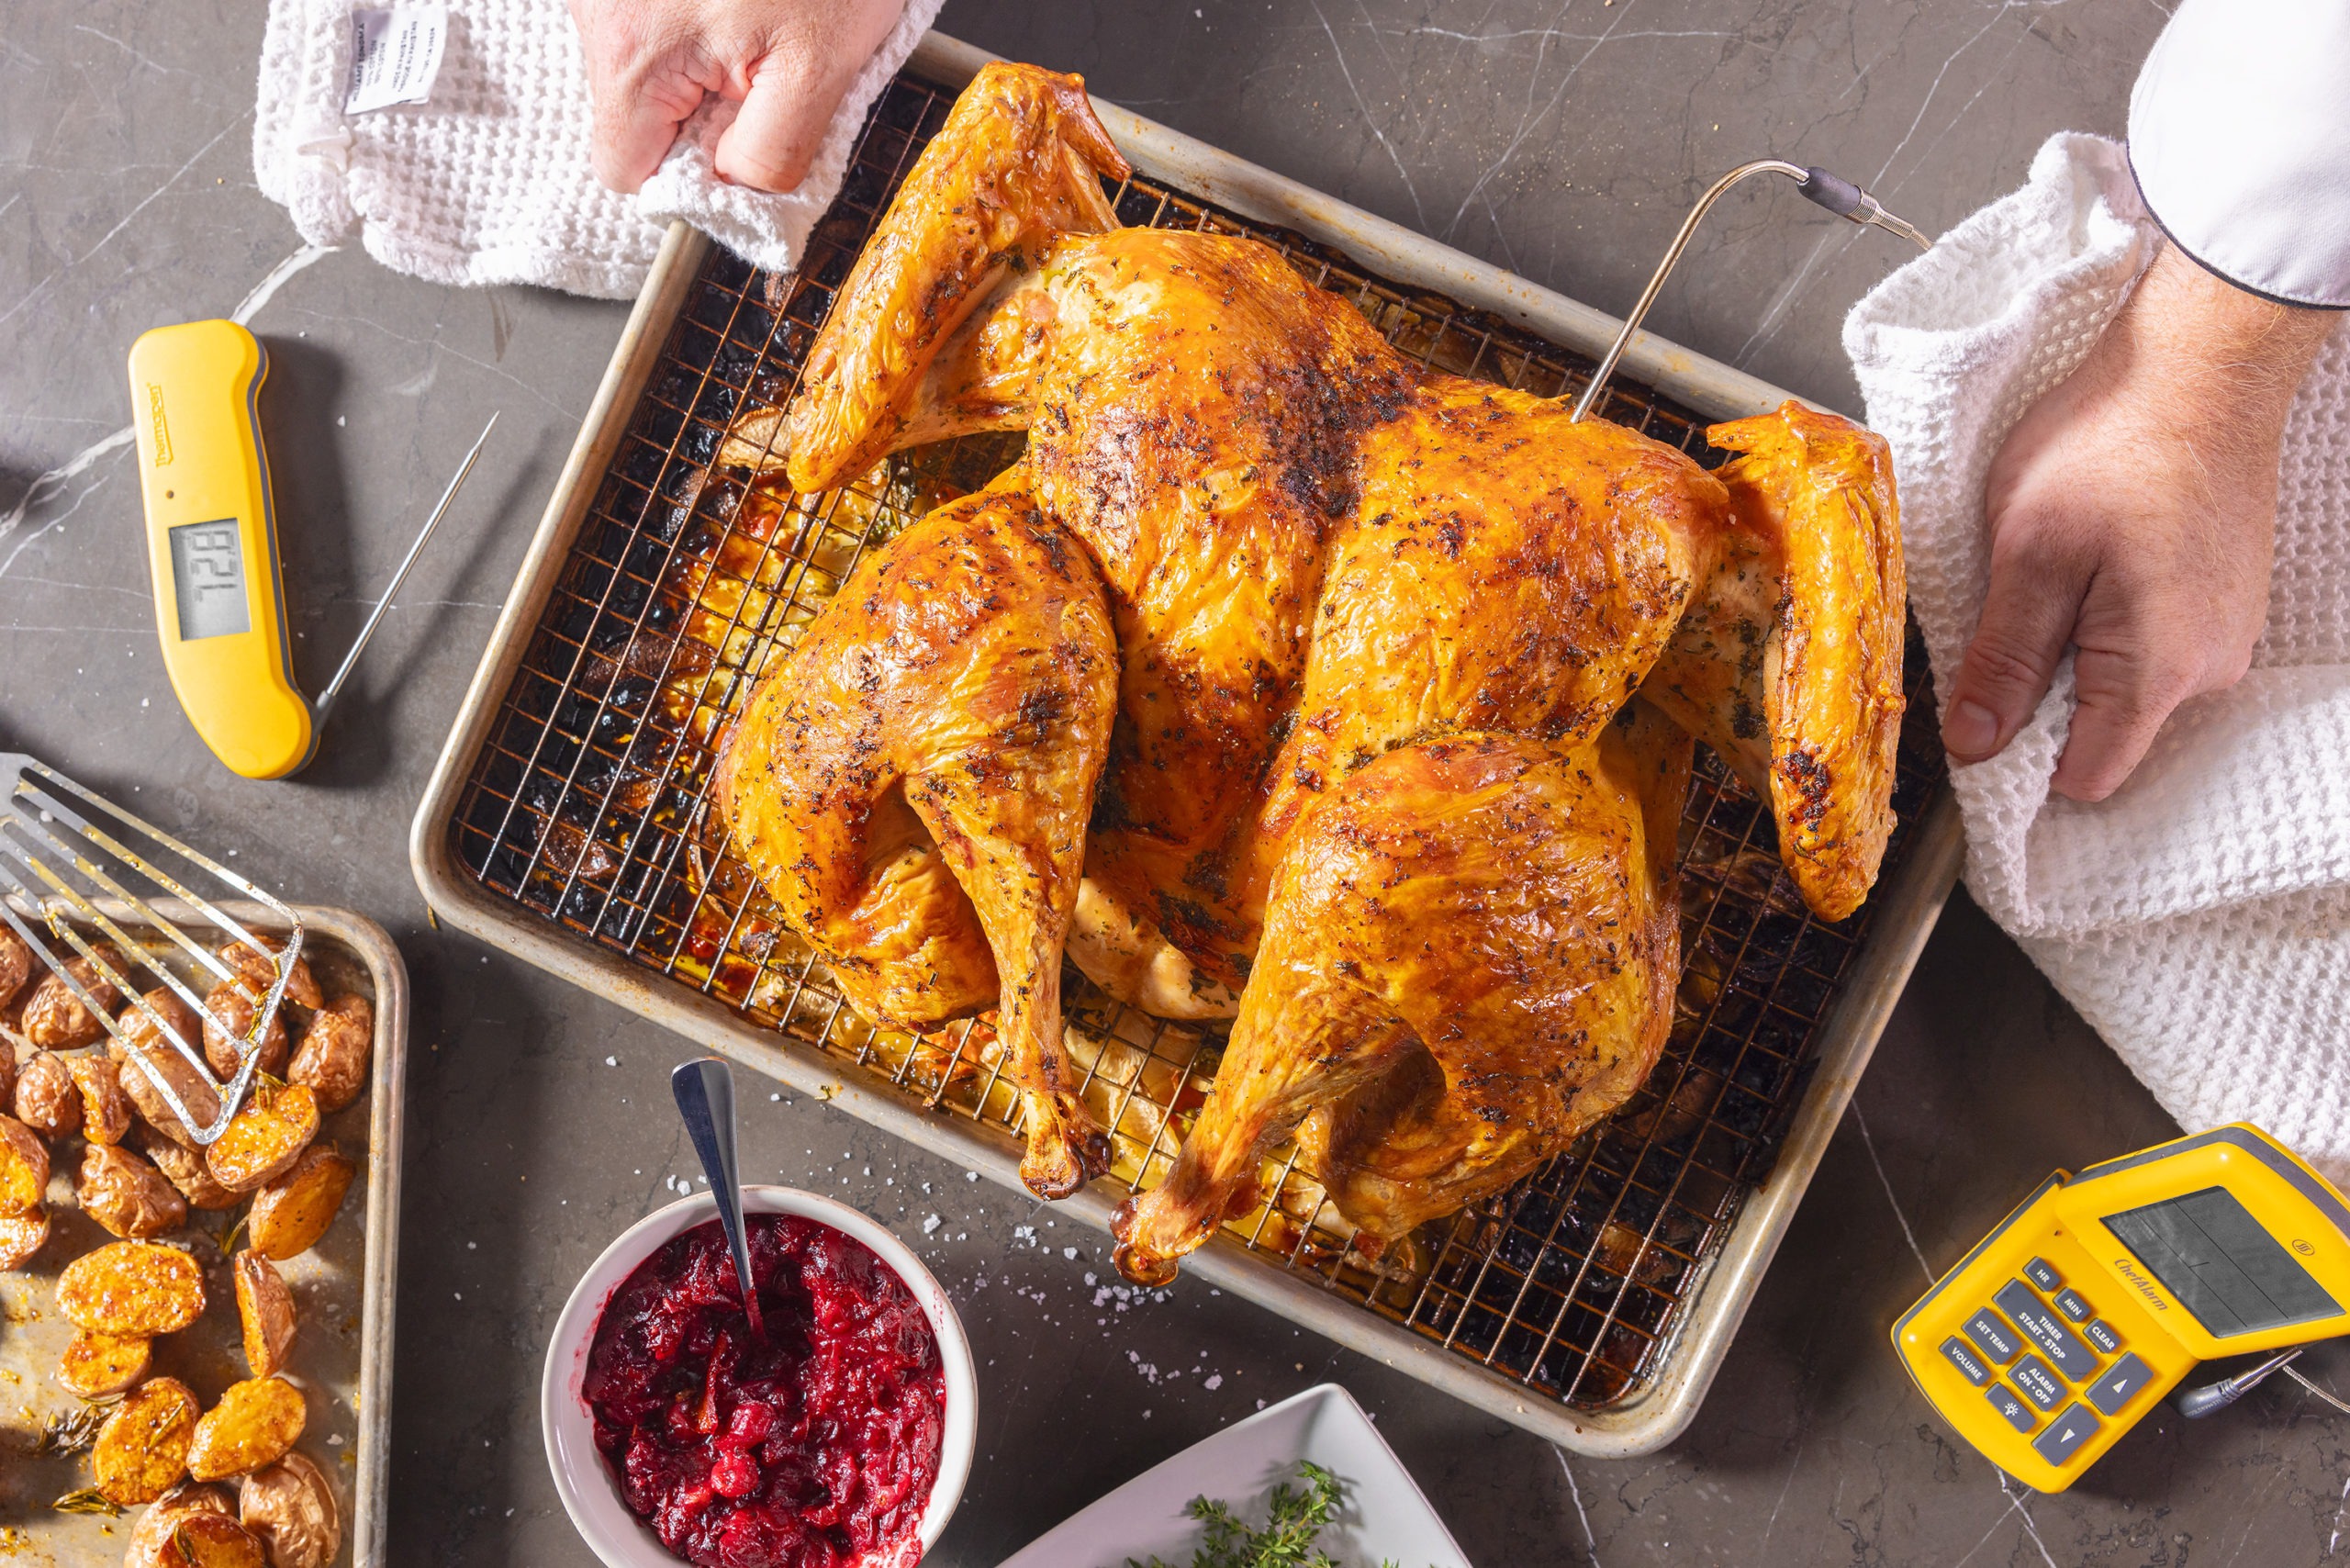
- The Drippings: Oh, the drippings! Fill the bottom of your sheet tray with carrots, celery, onion, parsnip, turnip, green apple, herbs, and lemon. As you cook your bird, the juices and butter (don’t forget the butter) run down, not into the bird’s own cavity, but into a hot pan filled with aromatic goodness. The veggies braise and cook in the juices, producing the BEST pan sauce ever. No need for thickener, no need for gravy. Just dip the meat in this stuff, scoop up the veggies with it, and you’ll never want to cook your bird another way.
Disadvantages:
We’ve exhausted the good points of this method, but what are the drawbacks? The most common complaint about spatchcocking is that it “just doesn’t look right”. Well, we’ve already established that we don’t need to hold onto that piece of ill-gotten nostalgia. The only real drawback is the anatomical aspect of the process. It could be deemed … unpleasant. For the squeamish. But really, it’s quite satisfying once you give it a try.
Break Down the Bird
Enough talk about why spatchcocking is so great. It’s so much easier than you might think! All you need are a cutting board, poultry shears, and a chef’s knife. As long as you’re not squeamish to the sound of bones breaking, it’s a cinch.
Follow These Easy Steps:
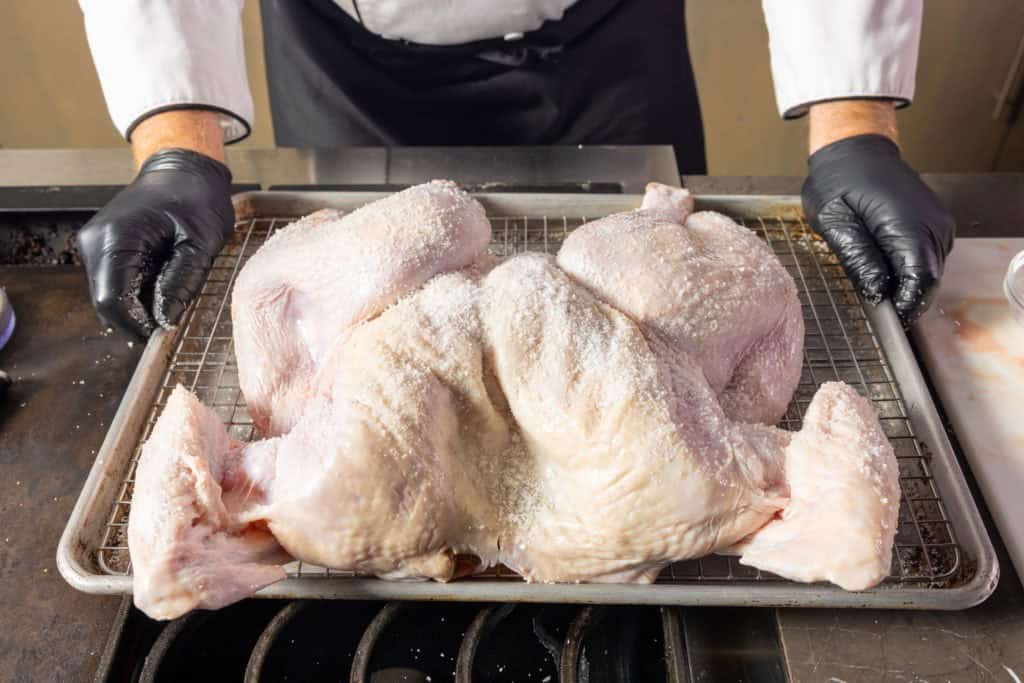
- Pat the turkey dry and place it backbone side-up on a cutting board.
- Use poultry shears and cut on either side of the backbone, starting from the bottom cutting up toward the neck. If you get to an area that you can’t get through with the shears, use a knife to crack through. You have now removed the backbone. Set aside to use when making your gravy.


- Make a cut either down the center of the breastbone or one cut on either side of it. Turn the turkey breast side up.
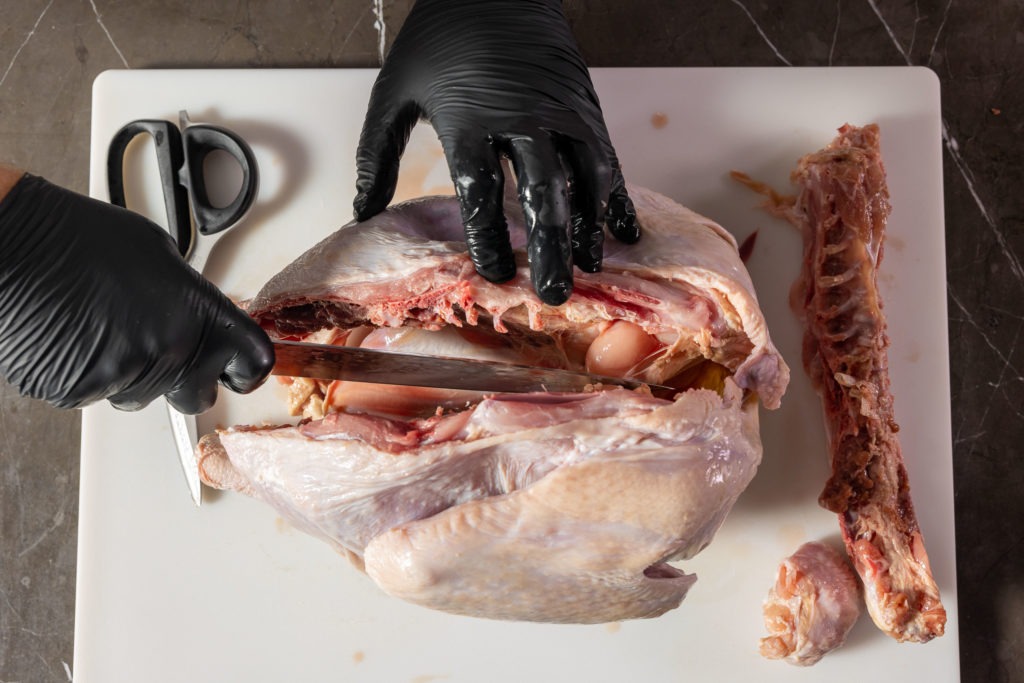
- Flatten the bird out by pressing down on the breastbone with your palms, and break it (ribs will break too). You may need to stand on a stool for more leverage.
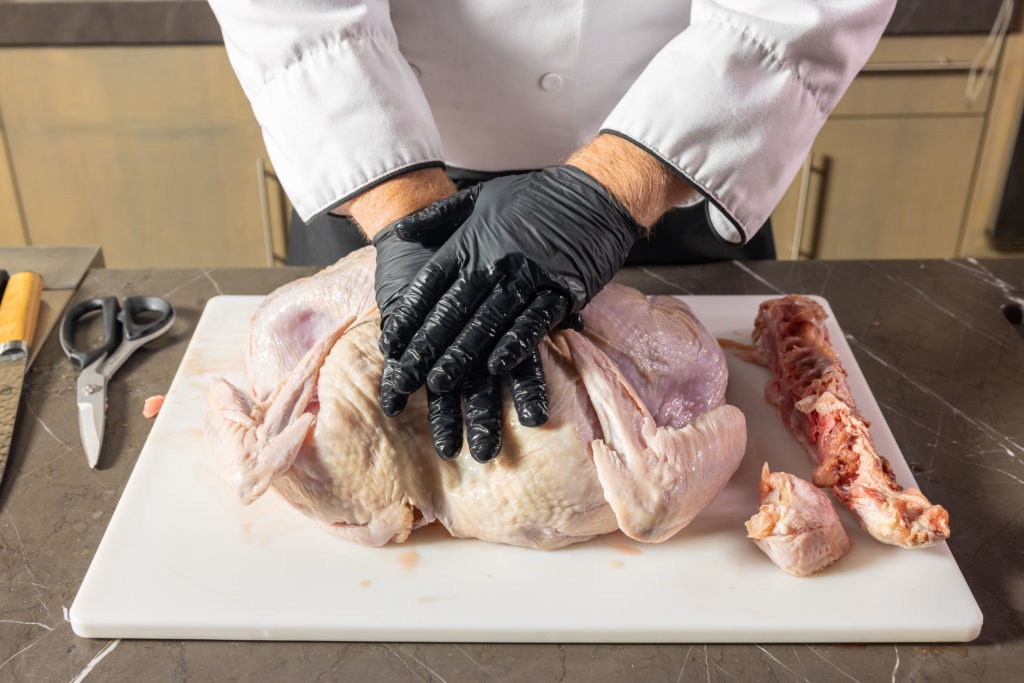
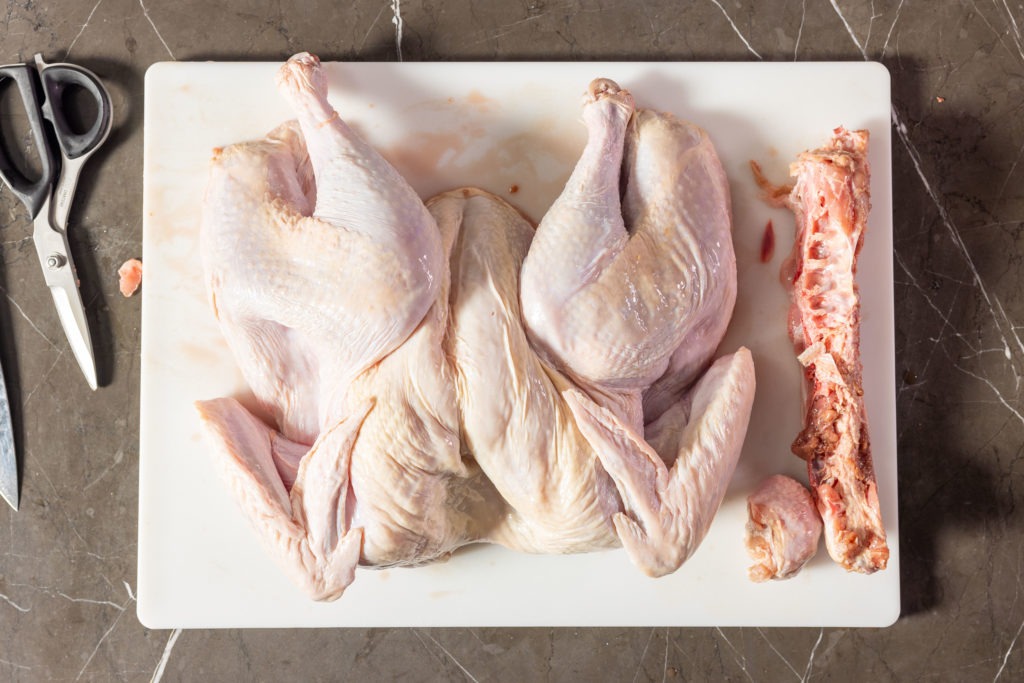
- Tuck the wings under and move the legs out toward the side. Trim the excess neck skin. Your bird is now spatchcocked and ready to go.
Spatchcocked turkey roasting temp
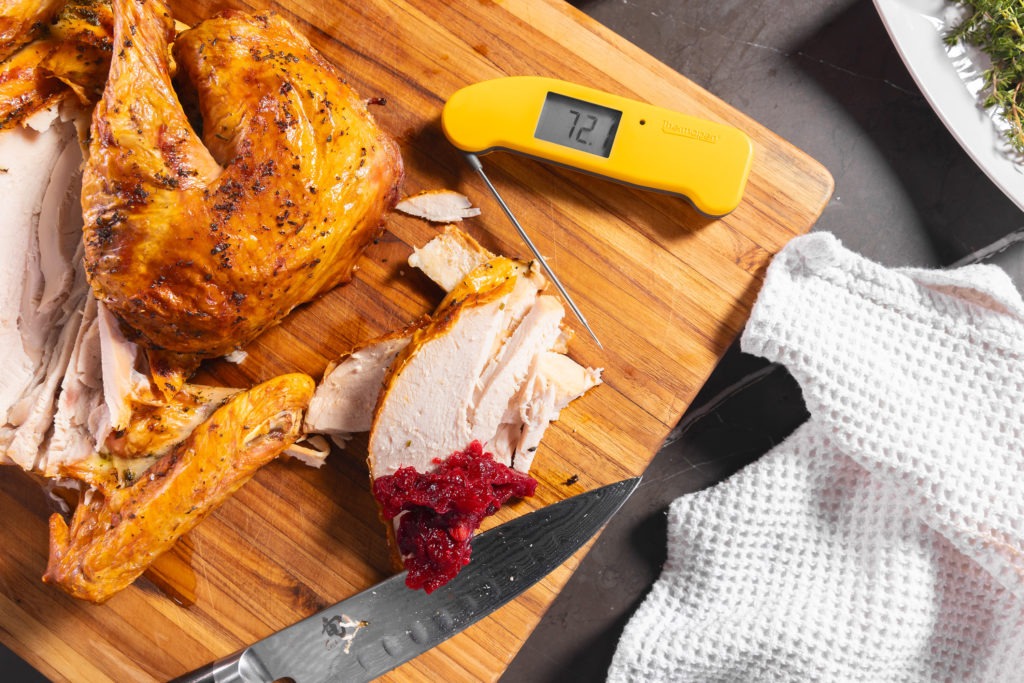
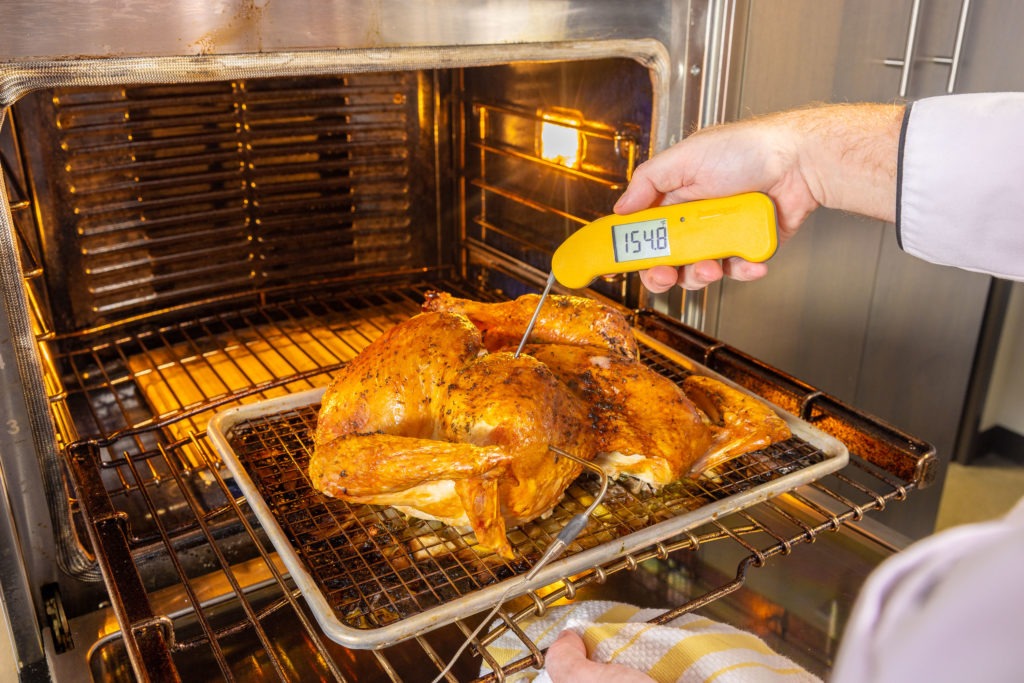
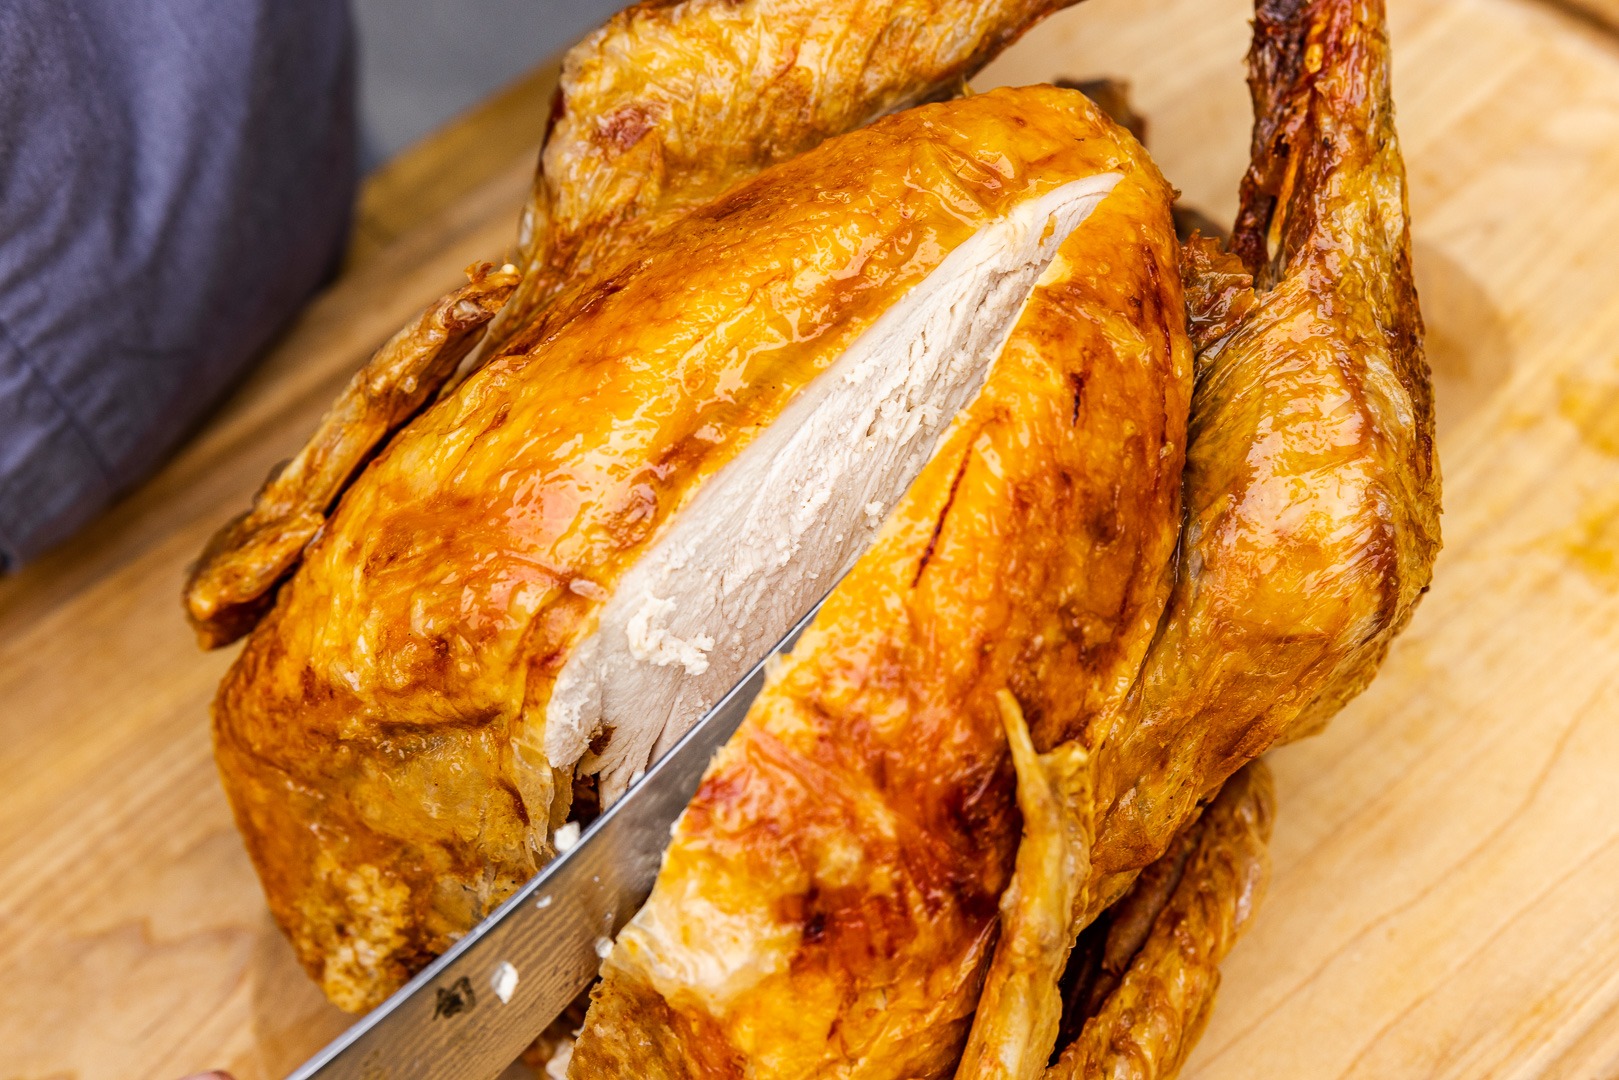
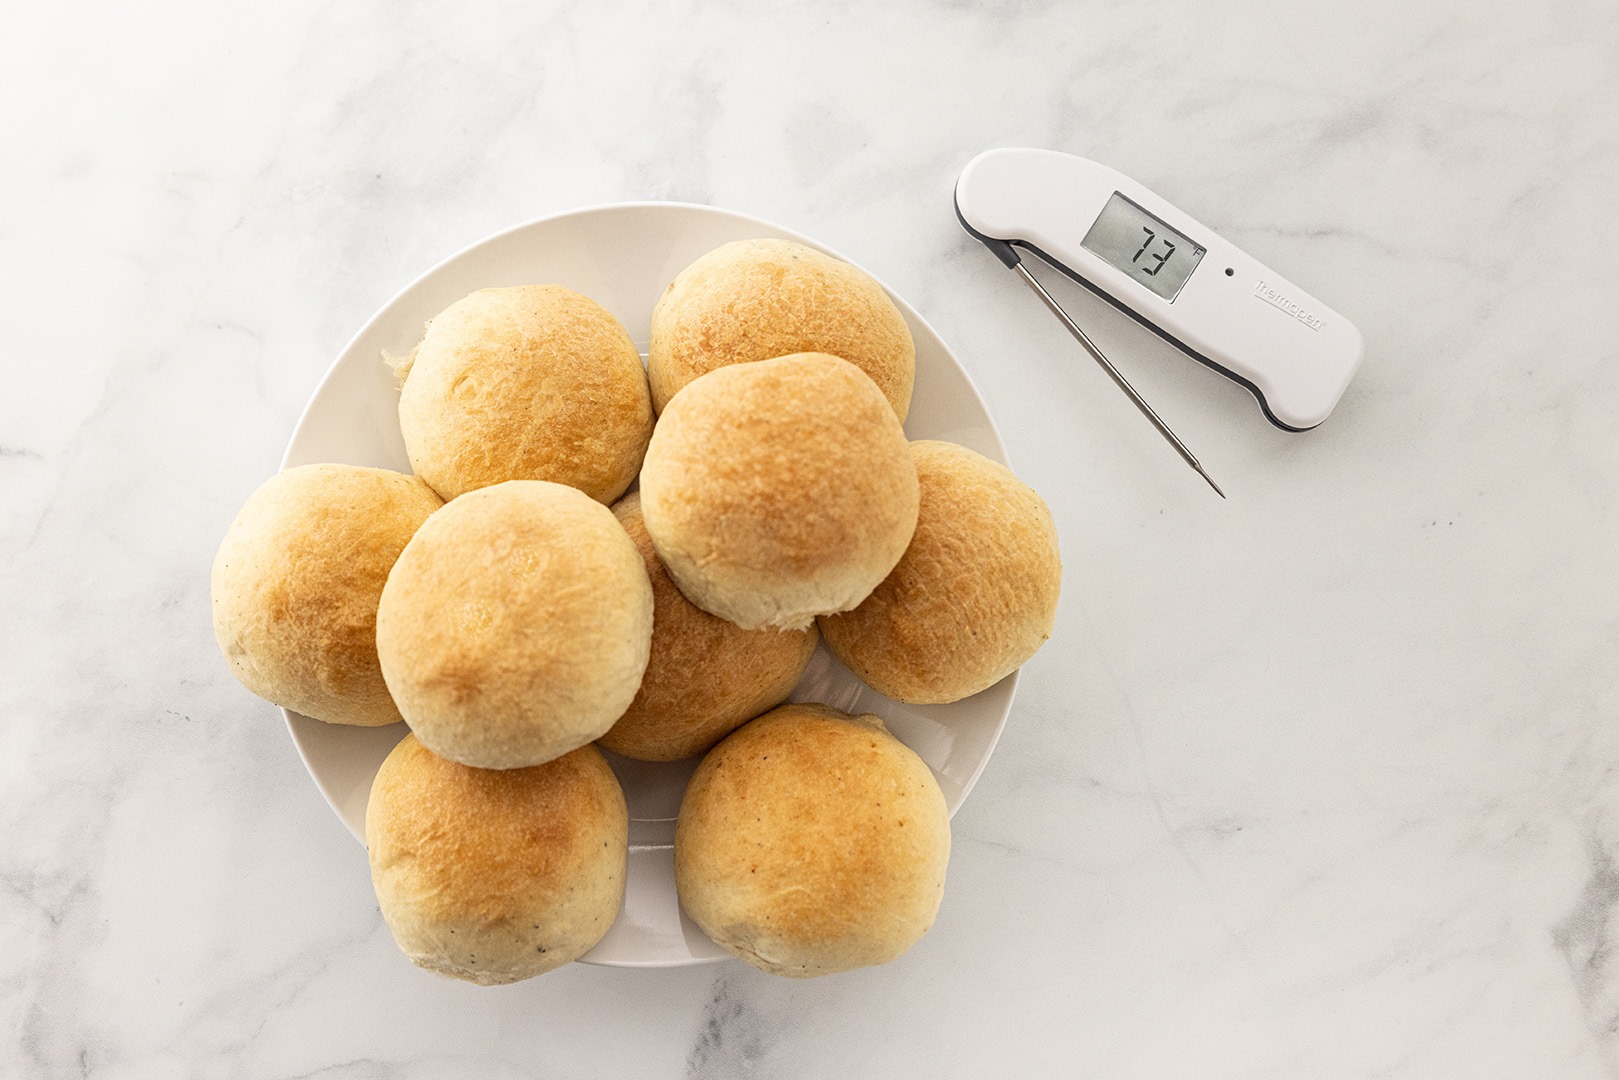
Once your bird is well flattened, it’s time to roast. Cook your bird at 425°F (218°C) until it reaches an internal temperature on your ChefAlarm® or RFX MEAT™ Wireless Probe Thermoemter of 155°F (68°C). (If that seems low, read our article on chicken internal temps—the same concepts apply to turkey as they do to chicken. Trust us, a turkey cooked to that temp will be WAY juicier than one cooked to a higher temp.) Verify that temperature with your Thermapen® ONE to make sure you don’t find any lower temperatures. If you don’t, you’re done! Chances are you’ll have cooked a 16-pound turkey in about 90 minutes. Wow!
We hope you give this unorthodox turkey a try. It is better in every way and will provide you with a turkey that people will actually enjoy eating, not just pretend to like. Stick to our recommended temps, don’t forget the aromatics, and you’ll be crowned Thanksgiving royalty, for sure.
Perfect Spatchcocked Turkey Recipe


Ingredients
- 1 turkey not larger than 15 pounds, properly thawed, preferably dry-brined the night before.
- Kosher salt and fresh-ground black pepper
- 1/2 lb unsalted butter
- Fresh sage, parsley, thyme
- 1 parsnip peeled
- 1 turnip peeled
- 1 medium yellow onion skinned
- 2 carrots scraped
- 2 stalks celery
- 1 medium Granny Smith apple sliced thin
- 1 lemon
- 1 onion sliced thin
Instructions
- Preheat your oven to 425°F (218°C).
- Spatchcock the turkey by cutting out the backbone with heavy shears, making an incision in the breastbone, turning the bird onto its back and pressing down firmly to flatten it out.
- If you didn’t dry brine it beforehand, season the bird well with salt and pepper.
- Make a compound butter with the butter and minced herbs and black pepper, reserving a sprig of each herb for later.
- Stuff some of the compound butter up under the skin of the bird.
- Melt the remaining herb butter and pour and rub it into the surface of the turkey.
- Slice the vegetables, apple, and lemon in 1⁄4” slices and place them in the bottom of a regular baking sheet. Top with the remaining sprigs of herbs.
- Place a cooling rack over the veggies and put the turkey on the rack. Arrange the legs so that they cover the thinnest part of the breasts. Tuck the wing tips in behind the turkey so that it looks nice and relaxed.

- Insert a leave-in probe thermometer in the thickest part of the breast. Set the high-temp alarm on your ChefAlarm for 155°F (68°C).
- Put the turkey in the oven and roast.
- When the high-temp alarm sounds, check the breast temp with your Thermapen ONE.
- If you don’t see a temp lower than 155°F (68°C), remove the turkey from the oven.
- If you find a lower temperature, move the leave-in probe to the cooler spot and continue to cook.
- Move the turkey to a carving board. Spoon all the vegetables, turkey juice, and melted butter into a serving bowl to pass at the table.
- Carve and serve!
Shop now for products used in this post:


I Received my chef alarm last week and have many questions that could be answered with an in striation manual. ! I am cooking a 14 Lb Turkey Fr(Have 14 for this one Have a ham also don’t need help there.The low alarm is set at 164 is this like a warning because the high alarms set at 165. I hope this is correct.) Have other meat do not need help there.Cooking . Cooking a full psmo filet Sat after Xmas Setting at 135 deg should I set low alarm at 132?. And would I need to set a time for either of these. Your help will be appreciated.I will be showing off my new
cooking aid to a lot of people ( guests don’t want to screw up.Thanks for your help.
Ken,
With your turkey we actually recommend a pull temperature of 157ºF to account for the rise in temperature after you remove the turkey from the oven–carryover cooking will bring the internal temperature up to 165ºF. Set your high alarm to 157ºF, and we recommend spot-checking temperatures with an instant read digital thermometer like a ThermoPop or Thermapen. There isn’t a need to set a low alarm for this application. The time it takes to cook depends in large part on the cooking method and cooking temperature.
For a smaller piece of meat like a filet, a leave-in probe thermometer isn’t usually our recommended thermometer. Small pieces of meat that cook faster than roasts are best suited for an instant read thermometer like a ThermoPop or Thermapen. With those steaks you’ll want to pull them when the internal temperature reaches 130F for a final temperature of 135F. For more information check out our blog posts on filet mignon: Perfectly Cooked Filet Mignon Prepared Two Ways, and Date Night Steak Night. How will you be preparing your filets? If grilling, you’ll only need to cook for a couple of minutes on each side.
Please feel free to email me with any further questions that you have. kim.allison@thermoworks.com
-Kim
Used this method to cook a turkey for this Thanksgiving. It was wonderful. Wondering if I could put the dressing under the turkey and cook them simultaneously?
Carol,
That ought to work. I’d temp the dressing though, just to be safe!
I have cooked my deconstructed Turkey over a mound of dressing for years and it works great. When you “reconstruct “ the Turkey over the mound it gives it the presentation that resembles a whole bird, for all those Norman Rockwell fans. Best is all those juices and butter soak into the dressing Dale
Love it!
This is my plan for Thanksgiving. I will be cooking mine on a Kamado Joe smoker using my recently acquired Thermoworks Signals and Billows! Great job, chef!
I’ve brined, then smoked a turkey the last couple of years. Any idea of how this would work with smoking a turkey?
Bruce,
It should work fine! It won’t get as crispy at the lower smoking temp, but it will still cook faster and you’ll also get more smoke exposure. Go for it!
When cooking on top of dressing, the juices will flavor the dressing. Take the turkey off and crisp up the dressing. YUM
Jjust how would you carve ? It dose not look easier to me. Any help would be appreciated
Mike,
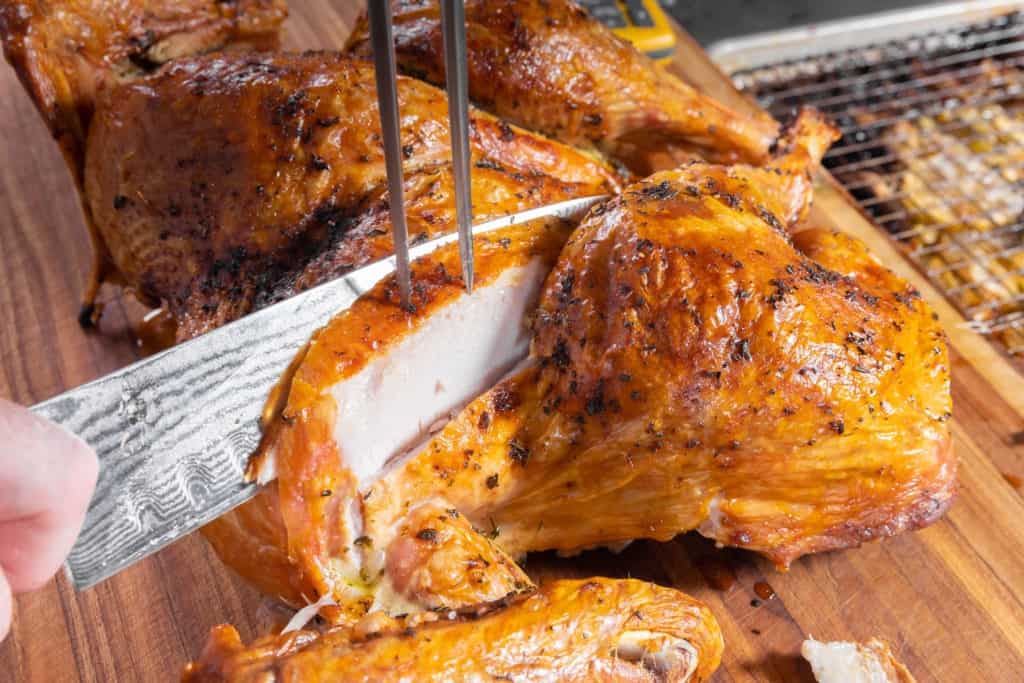
The legs fairly fall off, and the meat can be sliced from those or eaten on the bone. The breasts are best carved out of the carcass and sliced on a board, much like on a whole turkey, but that is easier (at least to me) on this shape bird than on the standard whole one. The wings get split just as always.
in the video at first he chef said a 5 pound turkey at the end he refered to it as 10 pound turkey which one is it
It was 10.
How big a roasting pan do I need? I don’t want turkey hanging over the edge. Thanks.
I use a standard baking sheet. A rather large turkey can still fit on one fo those!
i watched this spatchcock video 3 times b4 attempting. I dry brined the turkey uncovered for 2 days. I used the compound butter under the skin and melted butter for the skin. Veggies and herbs under the flat rack holding the meat. I used the chef alarm and thermapen combination as advised. Set alarm to 157.
My turkey came out horrible! Very dry and overcooked.
What did I do wrong?
Oh no! I don’t know what went wrong. How big a turkey was it? Maybe email me and we can figure it out.
I tried cooking a 4.7# chicken using this method to practice before attempting a turkey. I used coconut oil instead of butter and cooked in a Traeger pellet grill that was set to 425F. I pulled after 66mins when the lowest temp in breast that I could find was 158F and rested for 10mins. The skin was awesome and the white meat was perfect. I forgot to temp the dark meat, which I was sure was safe to eat, however, the connective tissues was not well rendered and was a little difficult to separate from the bone. I like dark meat that is more well cooked than how this turned out. Do others have the same experience? I’m not sure if it is possible to use this technique to achieve perfect white meat but also have “fall off the bone” dark meat. Any advice on how to adjust this method to get this result?
John,
You might try some of the suggestions we make for getting higher dark meat temps in our Turkey Temperature Guide. For instance, let your turkey sit out on the counter for an hour before cooking it with bags of ice ont he bresasts but not on the legs. The legs will get warmer, while the breast stays cold, and that temperature variance should track all the way up through the cook. Good luck!
I have a 19 lb. turkey. Could you give me an approximate time and temp you recommend for this method?
Well, this answer is certainly too late, but for the benefit of the future…
Cook it for about 75 minutes at 425°F, then turn it down to 325°F. It should take close to 2 hours to cook.
When you state “It should take close to 2 hours to cook.” Do you mean 2 hours total, or two additional hours at 325 degrees?
2 hours TOTAL, and the entire cook happens at 425°F.
??? Whaa. If the entire cook takes place at 425° what happened to “then turn it down to 325° “ Is this a revision?
Ah! Sorry, I looked through the body of the post trying to find where I said that, but I didn’t look at the old comments, which is where we are! Ok, with that clarification, I can say that I was referencing a super large bird, and if using the super large, yes turn it down, and I still think it will take about 2 hours TOTAL, to cook, but would budget 2:30 for it, just in case. Sorry for the confusion!
I’m no rocket scientist but 325° is still a cooking temp.
Terrific article. Have always had problems with uniformity when cooking turkeys. Used twice last year on BBQ and turkeys turned out perfectly for our tastes. Will cook one this coming week and spatchcock, of course.
Hey Thermoworks, I love the article! I will have around 15 guests this year for Thanksgiving, which translates into an around 20lb turkey. From a thermal perspective, I would think it would be better to cook two 10 pounders vs one 20lbs turkey. My questions are:
– does this make sense to you as well (ie am I barking up the correct metaphorical tree)?; and
– have you ever done this before (cook 2 10lbs, spachcocked turkeys at the same time) and if so, given that I have used a ton of your articles before and my oven always seems to run around the same heat offset as yours, about how long should I expect to plan for?
I am assuming it will take a little longer than one 10lb turkey like in this article and associated video, but certainly not as long as it takes to cook one 20 lb turkey.
Thank you for your help!
Chris,
Great questions! First, you are 100% correct that you should avoid the 20-pounder. I have, however, not cooked two spatchcocked turkeys at once in the same oven. In theory, it should work, but I can foresee challenges. For instance, I would switch them top-bottom halfway through cooking. The one on the bottom might have trouble crisping otherwise. And the one on top might not get the veggies as tender.
Here’s what I’d recommend: do a practice cook well in advance of Thanksgiving using two chickens. That should reveal any big problems you might face. If, after your trial, you find it won’t work, you can always cook one, then move it to an empty cooler to keep warm while you cook the other one. Its skin may not be super crips, but the meat will still be hot and delicious. I hope it all works out!
Hey Martin! Thanks for the tips! I was actually planning on cooking them side by side over the same baking sheet (I have a giant one and a decent sized oven). I like the idea of the chickens as well. I will give that a shot, see how it goes, and then I’ll get back to you on this forum to let you know for future reference.
Also just want to reiterate how much I love the Thermoworks products, as well as the blog you run!
I did a 22 lb turkey last Christmas and it was perfection. Everyone agreed it was the only way to roast turkey! (I do have a mega sheet pan though.) the much shorter cooking time is a huge advantage.
Wonderful!
I did a 22 pounder last year and it was great. I used a mega sheet pan and rack and the bird fit on it just fine. I’m doing the same again this year!
Wonderful!
We do a 10 pounder in the oven and a 10 pounder in the smoker. Perfect solution!
Fantastic!
Hey Martin! Thanks for the tips! I was actually planning on cooking them side by side over the same baking sheet (I have a giant one and a decent sized oven). I like the idea of the chickens as well. I will give that a shot, see how it goes, and then I’ll get back to you on this forum to let you know for future reference.
Also just want to reiterate how much I love the Thermoworks products, as well as the blog you run!
Thank you so much, and good luck with the cook!
How does this approach work for a turkey that is liquid brined for 24 hours? Does the brining mixture, example William Sonoma brining kit, conflict with the vegetables on the bottom pan? Your thoughts on this?
You may get slightly saltier drippings, and the skin may not crisp quite as well, but will still be more crisp than if you standard-roasted it.
EXCELLENT VIDEO!! My new approach to turkey, any time. Thank you so much for a clear and informative video.
I have used the spatchcock method for roasting turkey and it is a game changer! I first learned about it from one of Ina Garten’s recipes. I figured if it worked for a chicken, why not a turkey? I tried it with a 12 lb turkey and it turned out beautifully! Cooked much faster than I anticipated; it was juicy and flavorful. No basting every 30 minutes, no worries if the breast is done and the thighs are not. Now it’s the only way I make my Thanksgiving turkey.
I like to Spatchcock most of the birds I cook. Much quicker to cook.
Can you please tell me why some Chefs will Butterflied the Turkey by cutting through the breast and not Spatchcock the turkey by removing the backbone? What is the difference between cooking these two methods?
I can’t tell you why they would do that, because it doesn’t make any sense to me! Standard spatchcocking protects the breast meat and doing that would expose it.
Great recipe – I plan to make this for Thanksgiving !!
I’d love to see the RECIPE for MAKING GRAVY with the roasted veggies & turkey drippings👍🏼
THANK YOU SO MUCH!!
POur the drippings and veggies into a blender, and puree. Make a roux of equal parts butter and flour in a pan, about 3 Tbsp each. When the roux ix blond and smells like shortbread, add the pureed veggie mix and bring to a boil. It will be too thick. Thin with enough turkey stock to create the thickness you want. Season to taste with salt and pepper and a dash of sherry or red wine.
Martin! This is genius!
I poured off the drippings and made gravy as usual. I had time, while the gravy simmered, to scrape the veg off the pan into a bowl and then pureed it with an immersion blender and added it to the gravy.
I already make great gravy, using a roux of pan drippings and browned flour and homemade turkey stock from the prior year’s poultry carcasses and parts. We reserved some of the “before” gravy to facilitate taste testing.
Everyone agreed that the “with veg” gravy was even better. I’m shaking my head about the decades I’ve spent throwing those vegetables out.
I have an 18 Pound Butterball Fresh Turkey. How would you recommend I cook this turkey?
Due to its size, would it be better to spatchcock the turkey or roast it whole?
Please provide me with the temperatures and approximate time I would need to use.
Thank you
Spatchcocked will be better! A bird that size may still end up less than perfectly moist, but it will be better spatchcocked than any other way.
I’ve cooked turkeys using many different methods and this is by far the best.
My question is would it be helpful to use the convection fan when roasting? Shorter cook time? Crisper skin?
Thanks
I need to run some experiments on convection—I haven’t tried it yet. You would certainly need to decrease the temperature, as convection always demands. I can’t imagine a much faster cook or much crisper skin!
I plan on using your recipe for spatchcocked turkey. However, with dry brining before hand, you did not specify which brand of Kosher salt… Diamond or Morton as they are different in what amounts to use.
Thank you
I have had great success with each brand. The diamond gives a more thorough, finer coat, the Morton a coarser coat. I can’t specify amounts, as surface area on turkey varies widely. They way the two different salts adhere seems to compensate somewhat for their differing densities. I’m sorry I can’t be much more help than that!
Do you ice the breast when you spatchcock the turkey? I noticed (in the video) your temperature in the breast was 157° but the dark meat was extremely high 200° I’m guessing the dark meat was very dry? I want to try this method for Thanksgiving this year but I don’t want to dry out half of the turkey. Is it normal for dark meat to get that much hotter when using this method?
Dark meat is GREAT at 200°F! the collagen breaks down, like in a brisket, and you get silky, shreddy meat. I don’t usually ice the breast for spatchcock, no, the geometry of the bird in that shape does the thermal work for me.
What temperature are you looking for in the dark meat, and in what part? If the breast is done before the legs, then what?
I’m hoping for 185°F for the legs—though anything over 175°F is fine—checked in the deepest part of the thigh. I’ve never cooked a spatchcocked bird that didn’t end up with the legs in the right place when the breast is done, but if that were to happen, i’d pull the legs off and toss them back in the oven for a while. But usually when my breasts hit 157°F, my thighs are at 180°F at least
I need to plan for getting the turkey done by 3 pm
If I spatchcock a 13lb organic bird how long should I estimate?
Thanks
I’d estimate about 100 minutes on that bird.
Looking forward to spatchcocking our Thanksgiving turkey this year.
Can I use a conventional roasting pan with a rack instead of the sheet pan? I have a roasting pan, but don’t have a rack for my half sheet pan is why I’m asking.
See other reply.
Looking forward to spatchcocking our Thanksgiving turkey this year.
I’m cooking a 20 pound fresh bird.
Can I use a conventional roasting pan with a rack instead of the sheet pan? I have a roasting pan, but don’t have a rack for my half sheet pan is why I’m asking.
I’d still use the sheet pan (it’s a better thermal situation for the bird), just omit the rack. In fact, if you’re using the bed of veggies underneath, they act as a rack.
I’ll be spatchcocking a 20 lb fresh turkey this year (ordered before I read your blog). I don’t have a half-sheet baking sheet and rack. I do have a fairly low-sided roasting pan with a substantial rack which I’m planning to use.
The turkey will be dry-brined.
Am I setting myself up for problems, or just a longer cook time?
Decrease the cook temp to 400°F. A little longer time, but the very slightly gentler heat will help keep things juicy.
Superb results, THANKS Martin! 13# heritage bird, 1hr22 minutes to 158f. Plus 10 minutes was 169f and leg joint 178f. Absolutely terrific and impossible without that ChefAlarm baby! Mounded cornbread/bread stuffing at both ends of the pan. Use slugs of DAIKON to keep the bird UP. Daikon is a great trick for all roasted meats.
Thanks to ThermoTeam and very much appreciation for the video.
Great turkey in Reno
Martin
I tried the spatchcock method on a 14 lb turkey 2 years ago and loved it. This year I am going to spatchcock a 20 lb bird. What’s your best oven temperature recommendation for a bird this size?
1. to roast at 400° for the entire time?
2. to roast at 425° initially and then lower the temp to 325° for the remainder?
Spatchcocking a bird of this size actually requires a LOWER temperature. I’d go 375°F to prevent drying the outside of the breasts too much.
If the turkey is pulled from the oven at 157. °F breast temperature, I would want to check a few minutes later to make sure the breast meat has risen to 165°F. Correct?
Yes and no. First, it will continue to rise, but even if it doesn’t get up to 165°F, it will be safe because it will have spent enough time in the slower bacterial kill zones. At 157°F you get the same safety in 50.4 seconds as you get instantly at 165. That being said, you will probably hit 165°F without difficulty because of the carryover cooking.
Love this method for roasting turkey! The butcher will actually spatchcock the bird for you. Just make sure to have them save the backbone, giblets etc. for making your turkey stock. The turkey browns beautifully and roasts fast. Delicious and juicy!
For those like me who are charcoal grill fanatics, this method can also be used with tremendous success on a standard 22 in Weber Grill using GrillGrates. The drippings drip down onto the coals and the results are just like that of perfectly grilled chicken halves, but with a bbq/charcoal taste that an oven can’t produce. The GrillGrates are a must, however, to control the overall temp and prevent any flareups.
Used this recipe and it turned out great. However, I’ve gotten into the habit of raising the turkey, so the bottom of the turkey (meat side) is above the rim of the pan. Basically I want more airflow under the turkey. I was wondering if you had any thoughts on this approach?
I love this approach. Airflow under the bird will help you get hotter thighs more quickly, which is better for the breast. Great thermal thinking!
: pressing down on the breastbone with your palms, and break it (ribs will break too)”
For the squeamish, this is also exactly what happens when one receives CPR!!
Been nominated to make the turkey on both sides of the fam ever since I followed this recipe. Thanks Martin!
Congrats!
Made my second one this Thanksgiving, and it turned out perfect. After resting it temped out at 169 for the breast and 198 for the leg and thigh. Couldn’t ask for anything better. Also the veggies were unbelievably great. Next year I’ll have my RFX, getting it for Christmas, this year.
Wonderful!
I spatchcocked a 14 lb turkey (the smallest I could find) for Thanksgiving, for the first time, this year. I first practiced on a 5.5 lb chicken. I cooked the chicken at 350 degrees F and the turkey at 425 degrees F. Both birds came out of the refrigerator about an hour before putting into the oven, and turned out the same, legs and thighs had to be disassembled when they reached 187 degrees F and the breast was still way under the recommended temperature. I reduced the oven temp to 325 degrees F to finish the turkey breast because the skin was becoming too dark. I took the breasts with both birds out of the oven when they reached 163 degrees F, during they both reached 173 degrees F. Both birds were cooked using the RFX Wireless Probe inserted into the breast and thigh of both birds – I love this probe setup. However, both breasts seemed under-cooked. They were difficult to de bone as were the wings; but they were plenty moist. I spot checked the temps with a several year-old Thermapen. After the open-air rest period, the nice crispy skin that came out of the oven softened considerably – neither bird was tented during the rest. Regardless, the dry brine process and herb butter resulted in really delicious turkey. Any suggestions for improving my process?
I pull my spatchcocked turkeys at home from the oven at 152°F, then let them fest for 5-10 minutes before carving into them. I don’t know if that will help, Maybe leave the bird out for two hours instead of only one before cooking and try icing the legs instead of icing the breast.
How do you get legs and thighs to 180 degrees while breast at 165 degrees
The spatchcocking does it for you! It puts the dark meat more in contact with the hot air than the breasts and they cook more quickly. I’ve never done this method except the thighs got hotter than the breasts.
Do you use all those roasted veggies under the bird, or toss them? If you use them for the gravy, please explain. I think you also mention using the backbone and any innards for the gravy.
Yes, we use them. In, fact, just spooning them and the dripping into a bowl to pass at table is about as good as it gets. To incorporate them into the gravy, I put them in a blender and puree them, then add to the gravy (with more stock or water, if needed.
For the backbone and innards, I brown them hard and fast in a pot with a little butter, then add onion, celery, carrot, parsley, bay leaf, and peppercorns. I let those cook for a few minutes to brown some, then cover it all in water. Boil it for a few minutes, then turn it down to a low boil/high simmer. You might notice that we’re building a stock here! Classic stock making forbids the hard boil, but classic stock making is after a stock of perfect clarity. If our stock is cloudy, it won’t matter, we’re making gravy out of it anyhow. Let it cook the whole time the turkey is in the oven, adding water if it gets too low.
Now make gravy using the fresh turkey stock! One part roux for 10 parts stock is about the right ratio for most gravy. I like to finish my gravy with a small splash of red wine, sherry, or brandy.
Not only extremely informative and helpful, entertaining as well! Thanks for a few good laughs while I learn how to spatchcock my first turkey!
Thank you, and Happy Thanksgiving!