

Homemade Sourdough Bread: Times and Temperatures
There’s nothing like freshly baked bread to make your home smell amazing. Everyone loves a fresh, warm loaf spread with softened butter and maybe some quality jam. But bread is intimidating for many people to make, and so most of us rely on the store-bought stuff. And while I’m not here to criticize sliced bread, I do think that reexamining the ease with which you can make quality artisan-style bread is worthwhile. In this post, we’ll examine the mechanics of sourdough baking, including the need for both time and temperature awareness in making easy, fantastic sourdough bread.


Sourdough basics
Sourdough bread is made in six basic steps:
We will deal with each of these in turn. (Or you can skip straight to the recipe for sourdough bread.)
Preparing the sourdough starter/levain
Suffice it to say that sourdough is made by using a culture of wild yeasts and bacteria that work together to form the gasses and flavoring elements that give sourdough its texture and flavor. That symbiotic colony of microscopic bugs lives in what we call a starter—a mixture of flour, water, and the fungi and bacteria we need for that characteristic sourdough taste.
Keeping a starter alive is much like keeping a pet alive. You need to feed it and make sure it is well groomed. The acids and alcohols that accumulate in a starter can actually kill off the microbes if left alone for too long, so it is important to dilute them with occasional feedings. Adding water and food to the starter brings down the alcohol/vol as well as raises the pH, plus it gives the microbes food to eat and reproduce. If the microbes aren’t properly fed and cared for, they can either die or, if refrigerated, simply go dormant.
That dormancy can be your friend, though! One thing that scares many people off from making sourdough themselves is the relentless feeding schedules prescribed by most books on the subject. But if you have made your sourdough loaf and don’t plan to make more for another week, stick your starter in the fridge: it will go dormant and can be reawakened by feeding it when you need it. The starter is best fed with a mixture of equal parts water and flour as measured by weight and, if you really want it to be happy, make a portion of that flour rye sourdough—microbes just love rye flour!
Technically speaking, though, the starter itself is not what you put in your dough to make sourdough bread. What you really need is a levain made from your starter.
Because [the] natural yeasts may be less concentrated in the starter, a second stage mixture called a levain is prepared to add more yeast food and encourage yeast activity.”
On Baking, by Labensky, Martel, VanDamme, pg 181
A starter can be dormant, but a levain is an awakened, super-charged version of a starter that has new food for the yeast added to it so that it has the metabolic momentum needed to make bread faster. A levain is, in essence, a freshly-fed, fully awakened starter.
To prepare a levain, remove some starter from the refrigerator 3-12 hours before you wish to start making the dough (as little as just a few tablespoons will do, but more is better) and feed it with 100 grams each of flour and water. Leave it on the countertop during this time.
When using the levain for baking, reserve some of it in its container and feed it again before putting it back in the refrigerator. This will keep your starter going.
Autolysing for better sourdough
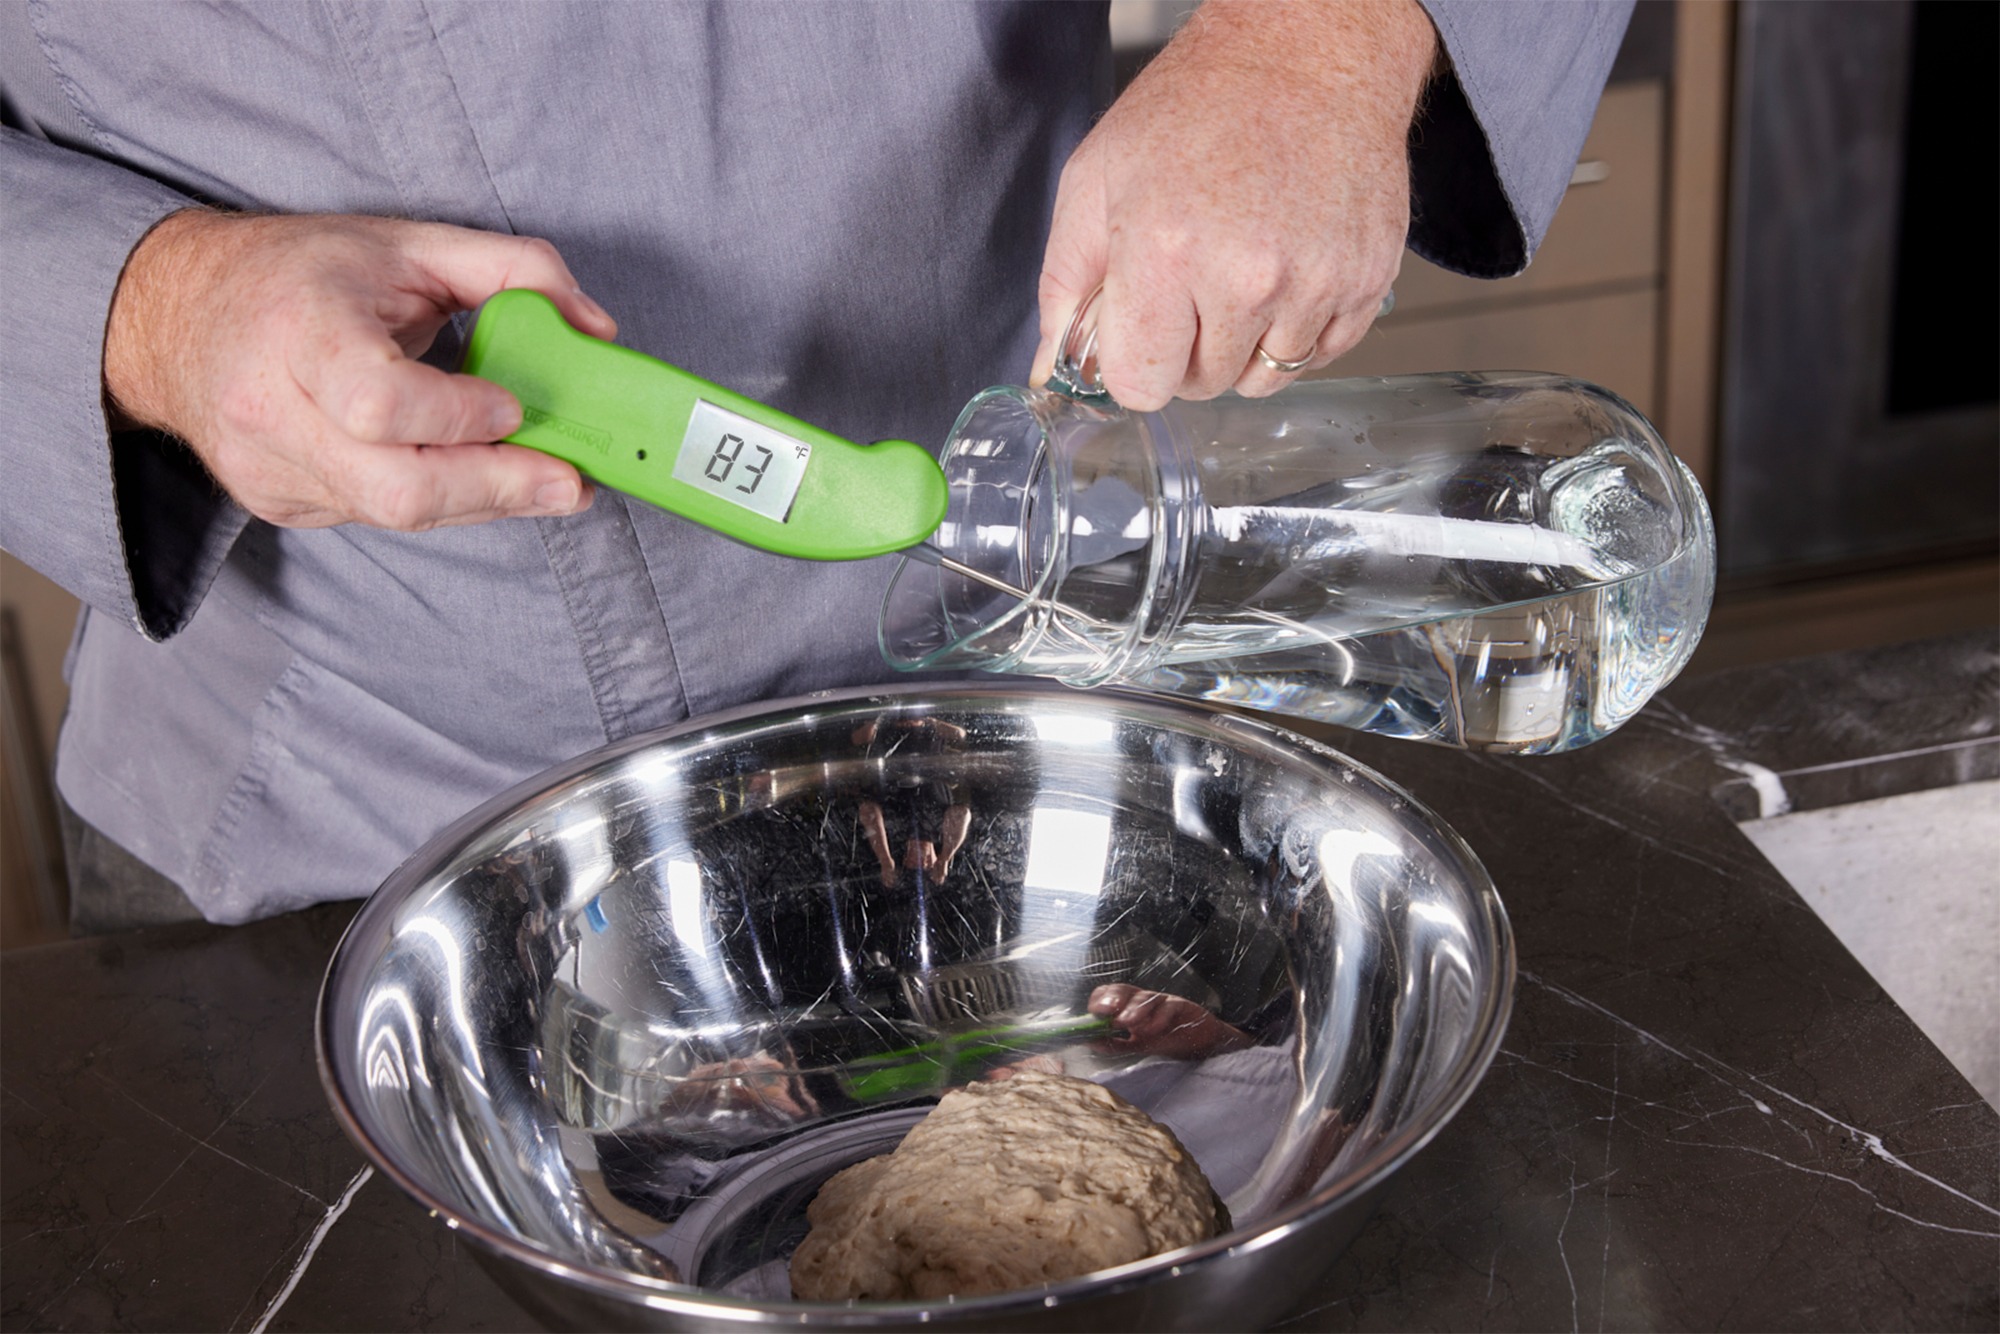
The French baker Raymond Calvel developed a novel addition to the process of bread making that he called autolysis. In this step, the flour is mixed with the water and allowed to sit for a time. This results in a more even hydration in the dough, but it also allows the natural enzymes in the flour to breakdown cells and other structures within the flour granules. (Autolyse comes from the roots “auto,” meaning self, and “-lyse” meaning to break down.) This breakdown makes gluten molecules more readily available in the dough and improves its flavor, texture, and workability.
To improve the autolysis, use water that is between 80° and 85°F (27° and 29°C), the ideal temperature for flour-enzyme activity. Scalding water would destroy the enzymes, while cold water would slow them down. An accurate thermometer, like Thermapen ONE, is perfect for this step, and we recommend using it to improve your sourdough outcomes.
The autolysing step usually lasts for 20 minutes, but it can last longer.
“If the
The Bread Bible, by Rose Levy Beranbaum, pg 55autolyse , or rest, is more than 30 minutes, the yeast is added later so that it doesn’t start to ferment before mixing.”
In this version of sourdough, we mix the levain with the flour and water before the autolyse step, but we keep the resting period to 30 minutes. This allows the yeast to start interacting with the flour earlier in the process, speeding the later fermentation some.
Final mixing and folding your homemade sourdough
Once the autolysis is finished, the salt and the rest of the water are added to the dough and mixed in. For artisan-style bread, this is usually accomplished via a “pinching” motion: using bare hands, you reach into the dough and pinch a large chunk between your thumb and forefinger, cutting through it. This is repeated all through the dough, paying attention to lumpy bits in particular. Once the dough has a uniform-though-sticky texture, mixing is complete.

You may be wondering when the kneading happens. It doesn’t. Rather than kneading the dough to develop the gluten, it is repeatedly stretched and folded. The stretching and folding action pulls the gluten strands and helps them to form the net that will catch the gas bubbles from the yeast to help the loaf rise.
For the folds, set the bowl with the dough in it in front of you. Think of the dough as a map, with north at the ‘top.’ Pull the ‘northern’ most edge away from yourself, stretching it, and fold it back onto the dough lump. Do the same with the southern, eastern, and western edge of the dough ‘map.’ (The first set of folds counts as part of the mixing for the sake of our counting in this step.)
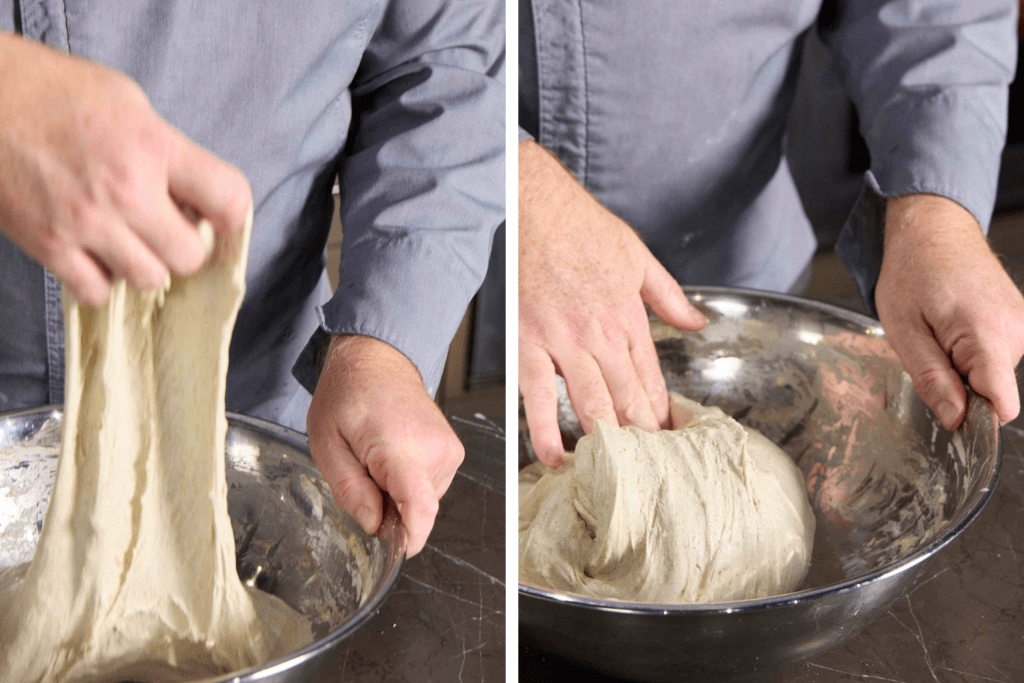
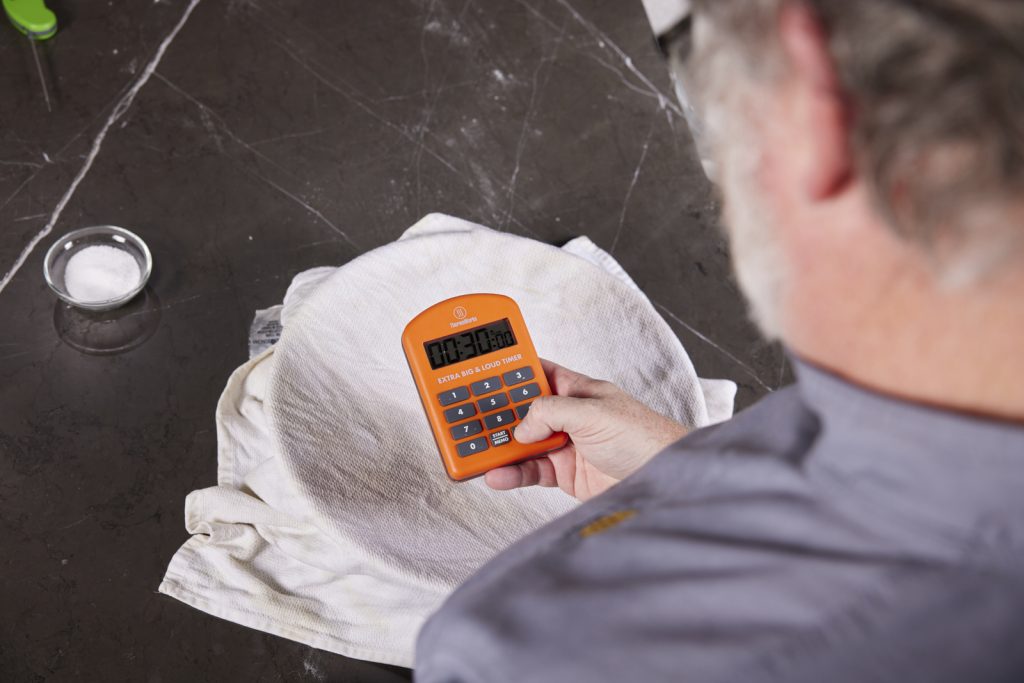
Let the dough rest, covered, for 30 minutes. A loud kitchen timer like our Extra Big and Loud will allow you to move about the house and still hear the timer going off. After 30 minutes, fold the dough again in the same way: north, south, east, west (the order doesn’t matter). Set the timer again and allow it to rest. This folding and resting is performed four times after the mixing—or five times if we count the first folding at the end of mixing. With each fold, you will notice that the lump becomes firmer and less loose. That is because of the gluten development that is happening in the folding process.
After the fourth and last folding, you can go right into the next step without waiting another 30 minutes.
Bulk fermentation
This brings us to the bulk fermentation stage, known popularly as ‘rising.’ In this stage, we allow the bread to rise as a whole lump, hence the ‘bulk’ in the name. In this stage the yeast metabolizes sugars in the dough, producing carbon dioxide, alcohol, and various flavor compounds. The speed and metabolic efficiency of the yeast depend almost entirely on temperature, with the optimal speed of fermentation occurring between 80–90°F (27–32°C).
That temperature is optimal, but you can get a faster rise with warmer temperatures (to a point) or a slower rise with cooler temps. But there is a trade-off. When yeasts are warm and happy, they metabolize efficiently, meaning they convert the sugars well, without many byproducts. But the byproducts of inefficient metabolism taste great. For richer flavor, it can be useful to slow down, or retard, the fermentation. This is often done by putting your dough in the refrigerator for the bulk fermentation, or later on, during the proofing.
The actual fermenting time will depend on temperature and on the activity of your yeast. While you cannot really control the activity of your strain of yeast, you can control its metabolism with temperature. A good idea is to make a batch of bread and let it rise at room temperature, using your ChefAlarm to record the temperature of your kitchen, then base your sped-up or slowed-down rise times on that temperature.
It is helpful to know when estimating rising time according to room temperature that the rate of fermentation, or rising, is about double for every 15°F [8°C] increase in temperature.”
The Bread Bible, pg 62
With your room-temp baseline rate of fermentation established, you can adjust its speed accordingly. Because not only is the rising time twice as fast for every 15°F (8°C) increase in temperature, it is also twice as slow for every comparable decrease in temperature. So if the yeast in your dough takes, say, one hour to rise at 70°F (21°C), it should take two hours at 55°F (13°C), and four hours at 40°F (4°C). Again, your ChefAlarm or one of our dedicated fridge thermometers can tell you the temperature of your refrigerator, so you can better time a slower or faster rise based on your room-temperature rise.
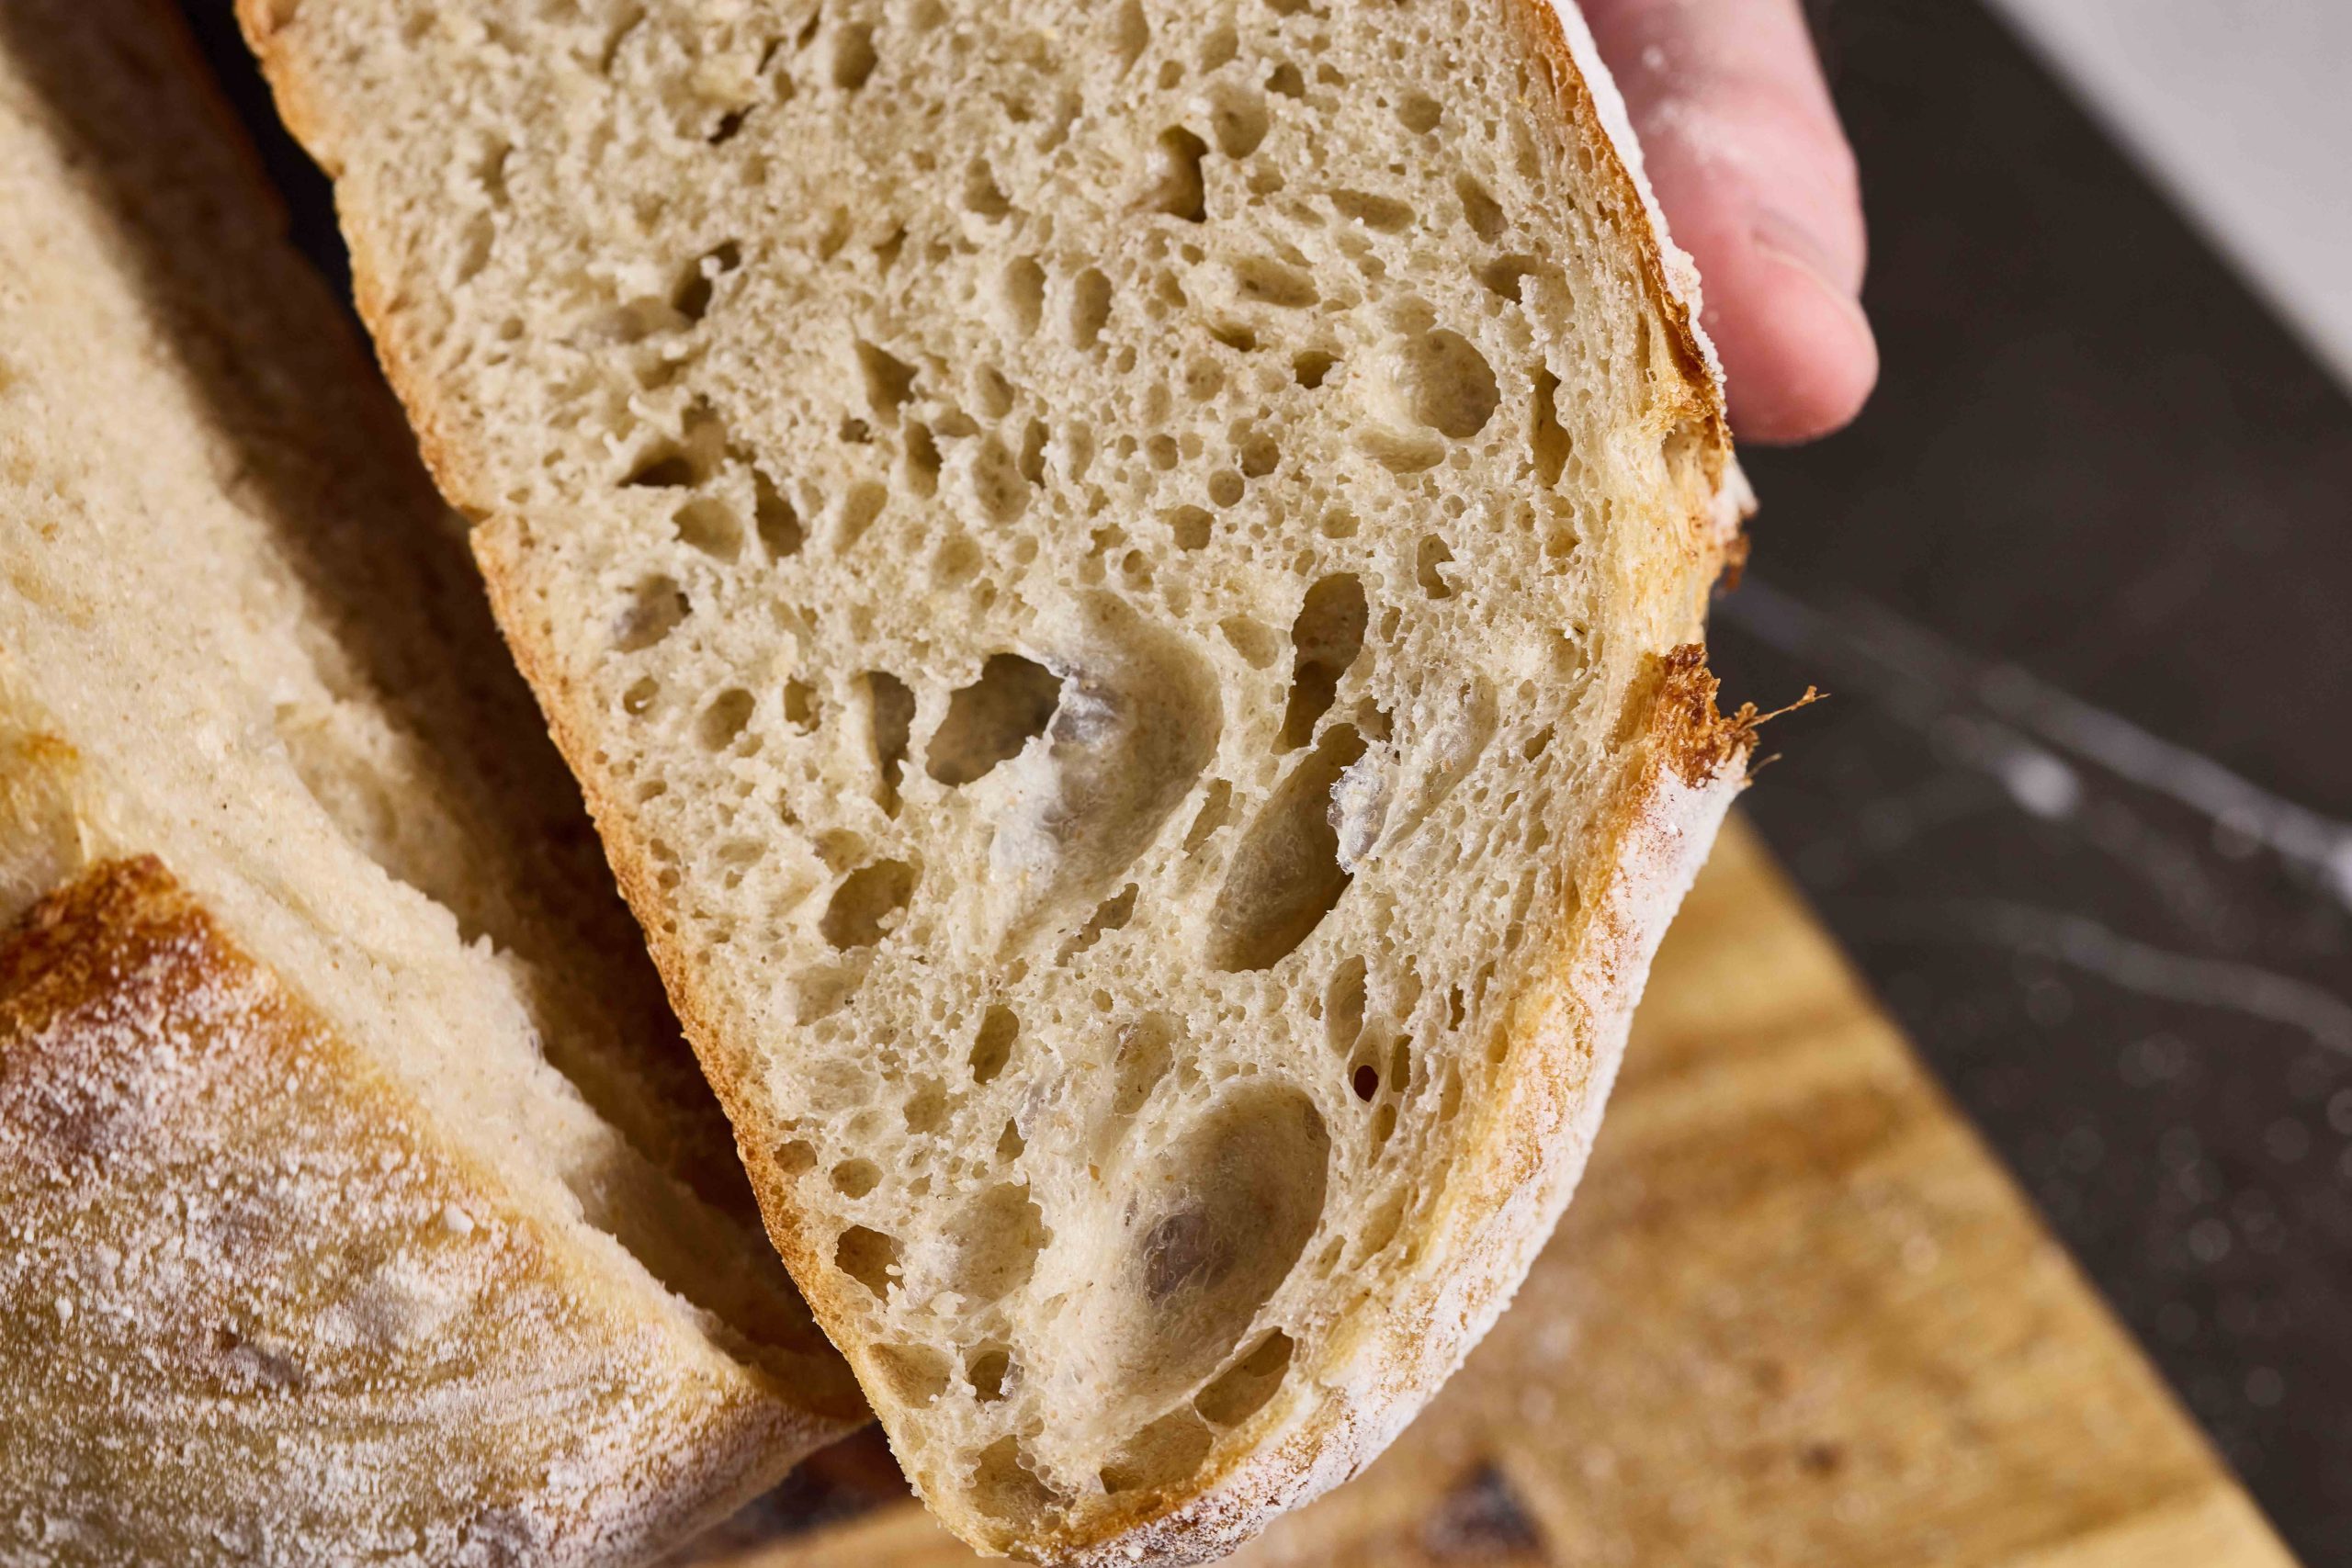
Whether you go for flavor or for speed, your dough should rise until it has increased in bulk by about a third.
Shaping and proofing loaves
Once you have finished the bulk fermentation, it’s time to shape and proof the loaves.
To shape them, flour your work surface and turn your dough out onto it. Release any clingy bits from the sides of the bowl and add them to the lump. The recipe that follows is enough for two large loaves or four small loaves. Once you decide how many loaves you want to make from your recipe, divide the lump into the corresponding number of smaller lumps. To shape them into a classic round shape, place one lump of dough in front of you and basically perform another stretch cycle on it: pull the ‘north’ side away from you and fold it onto the top of the lump, then the ‘east’ and ‘west’ sides, then the bottom or ‘south’ side.
Turn this newly taut loaf so that the seam side is down.
Pick it up and tuck the dough from the bottom edges towards the middle of the bottom, creating tension on the top of the loaf. Then place it back on the floured surface and, using a bench scraper, slide it under the lump, tucking and rotating it to make it round lump and to give the top even more tension.


To prepare it for its final proof—the rise that is done when the dough is shaped—liberally sprinkle some cane baskets or bowls lined in cloth with rice flour. Place your loaves, seam side up, in the baskets/bowls. (The rice flour acts as a barrier to gluten formation and keeps your dough from sticking to the bowl.)


To proof them, let them sit, covered, at room temperature for up to 3–4 hours, or let them proof for a little while at room temperature and then place in the refrigerator for 12–15 hours. Or you can speed the process by using a proof box, warm cooler, or slightly warm oven to speed things up. Again, how long to proof will depend on your yeast strain and your proofing temperature, so try it at your room temperatures and adjust the proofing temperature accordingly. Use a cooler with a few inches of warm (100°F [38°C]—thanks, Thermapen ONE!) water in the bottom and the proofing should take about two hours. Our oven with a proofer worked great.
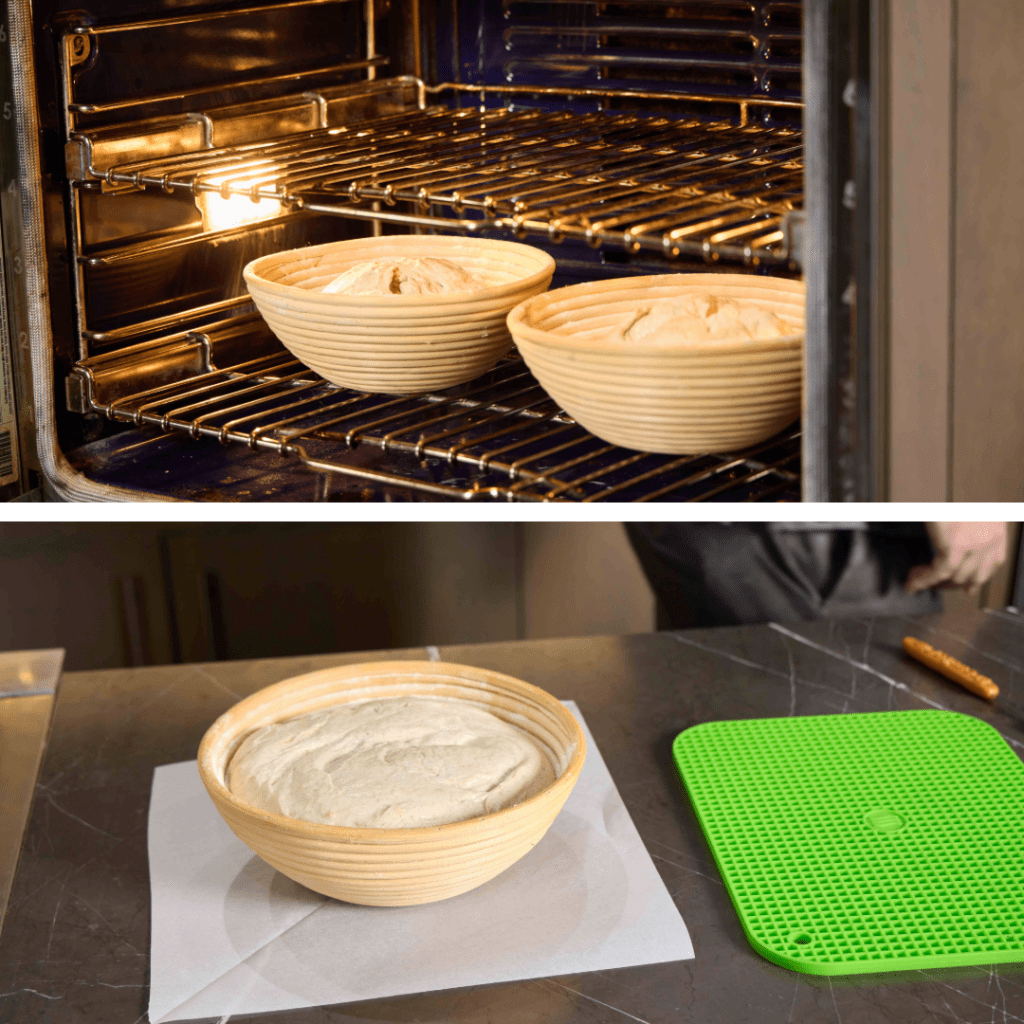
To tell if the proofing is complete, press on the dough with your thumb. The print you make should partially spring back but not completely. If it springs back readily, it needs more time, if it stays completely sunken, the dough is over proofed. It should also be about 30-40% bigger than it was when you started proofing.
Baking sourdough
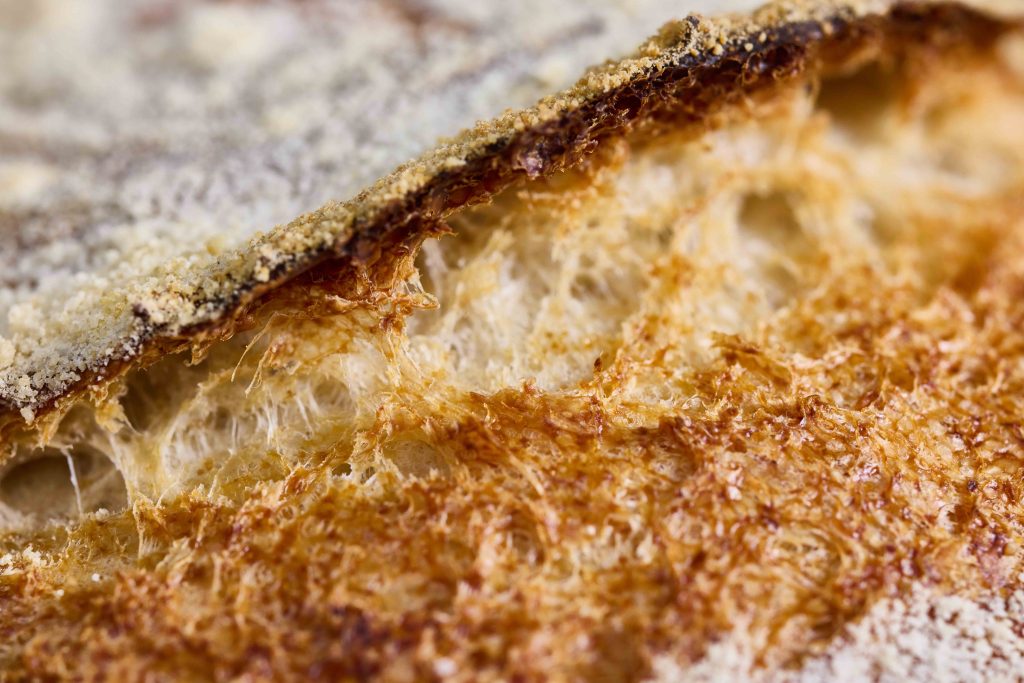
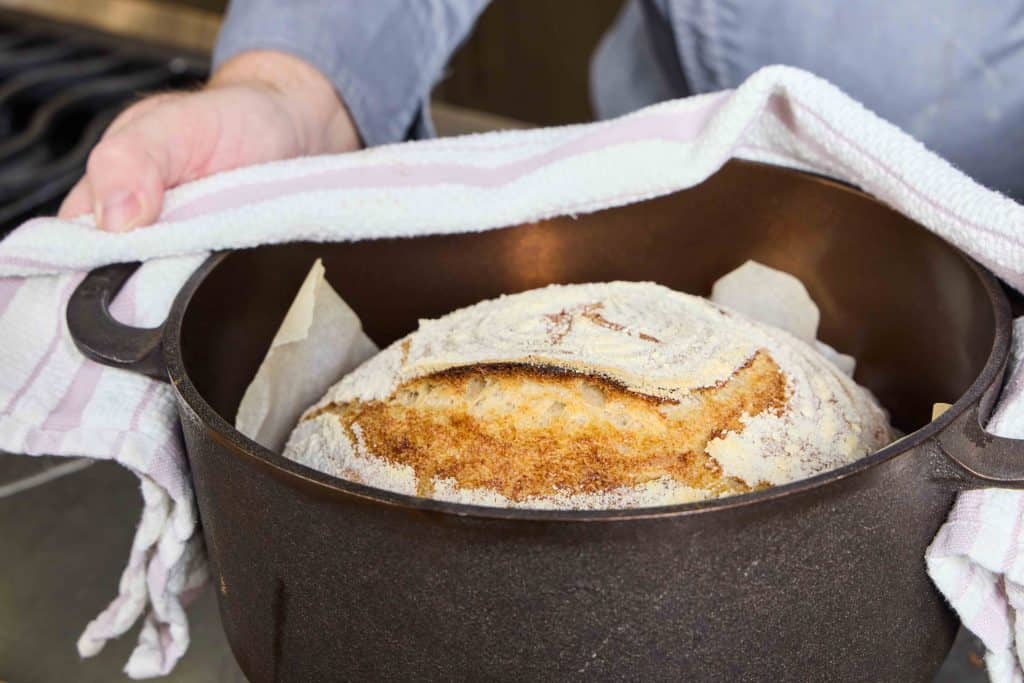
While the bread is proofing, preheat your oven to 500°F (260°C) with a lidded cast iron pot inside of it for an hour. Why the cast iron pot? For steam! Professional bakeries have specialized ovens with steam injectors that keep the baking environment very humid, and that humidity is critical for developing a glossy, golden, crisp crust. Many bread cookbooks try to mimic this by putting a pan of boiling water in the oven with the bread, but most home ovens are vented exactly to prevent steam from building up inside of them. By using a heavy, heat-retaining pot with a lid, you can create a steamy environment for your bread to bake. The water from the dough that turns to steam is captured in the pot, and the all-around heat provided by the hot pot itself is also advantageous to the cooking process.
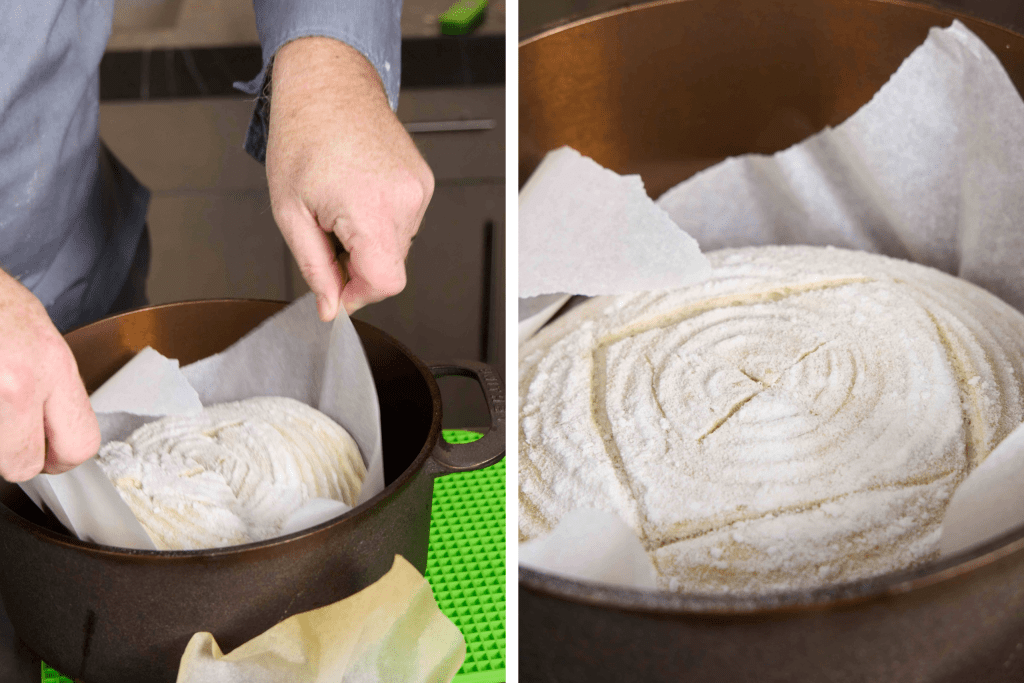
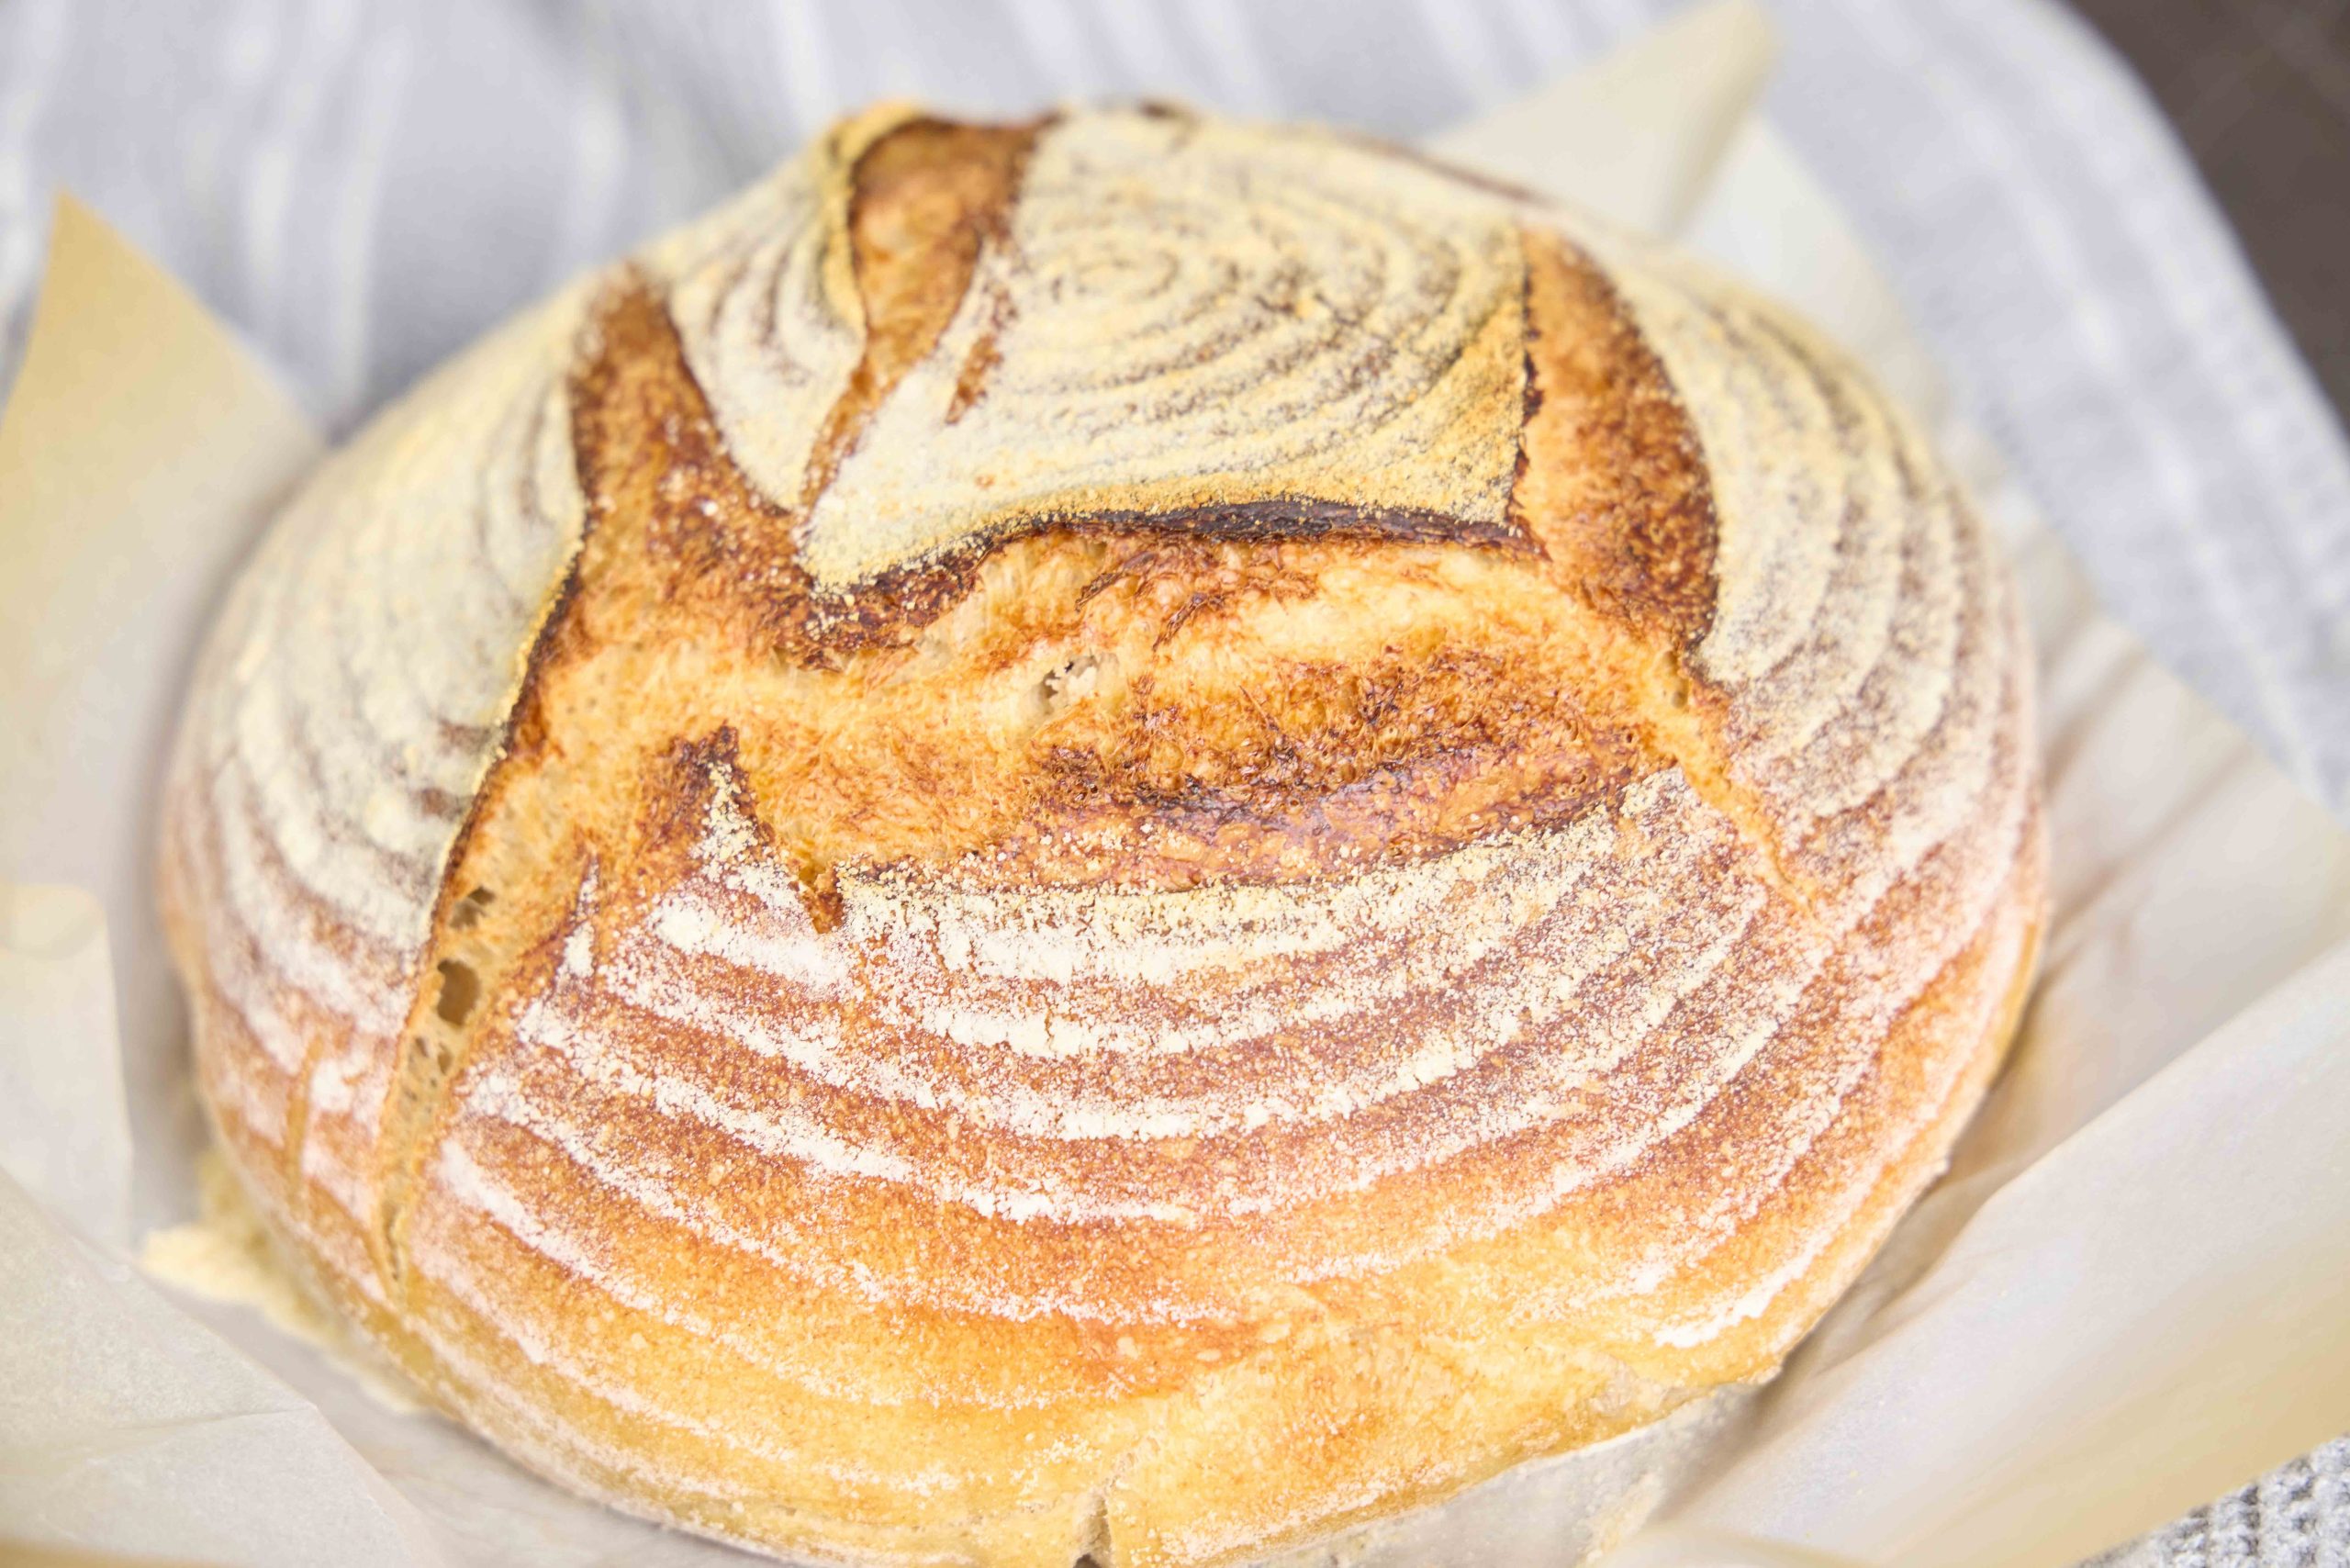
Once the bread is proofed and the oven and pot are well heated, it’s time to bake. Remove a loaf from the proofer and place a sheet of baking parchment paper on top of it. Quickly turn the basket upside down onto the countertop, and lift the basket off the dough. Beautiful!
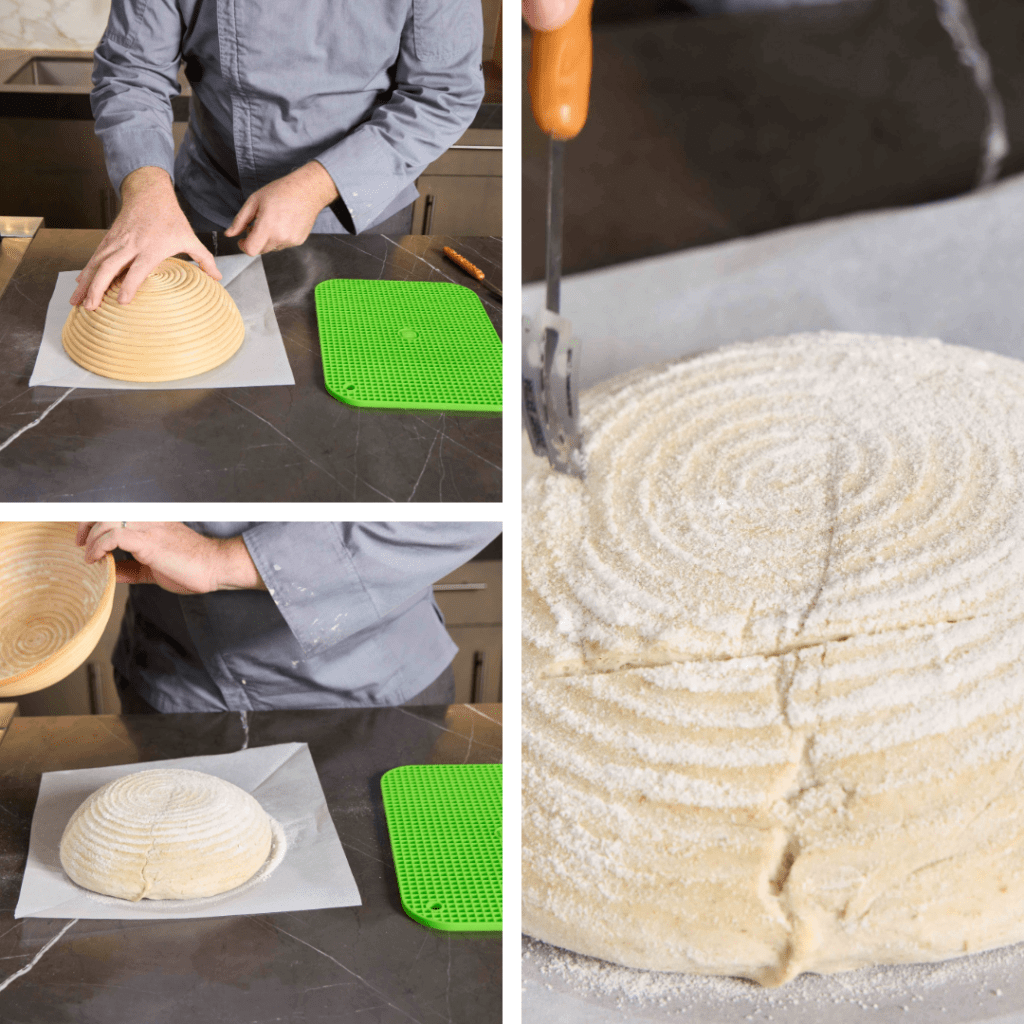
For the loaf to be able to handle the oven spring without tearing itself apart, it needs to be slashed. Use a razor or a very sharp knife to cut slashes into the top of the bread. A slashed square around the crown is a great way to go and will provide nice ‘ears’ on the loaf later. (Ears are the bits of bread that stick out, ledge-like, from the body of the loaf. They are extra crispy and delicious.) Once the dough is slashed, remove the pot from the oven very carefully and place it on a heat-proof trivet or hot pad. Remove the lid, pick up the sheet of parchment by the sides, and lower the loaf, parchment and all, into the pot. Place the lid on the pot and put it back in the oven.
Once the pot is in the oven, turn the heat down to 475°F (246°C) to bake. Set a timer for 20 minutes.
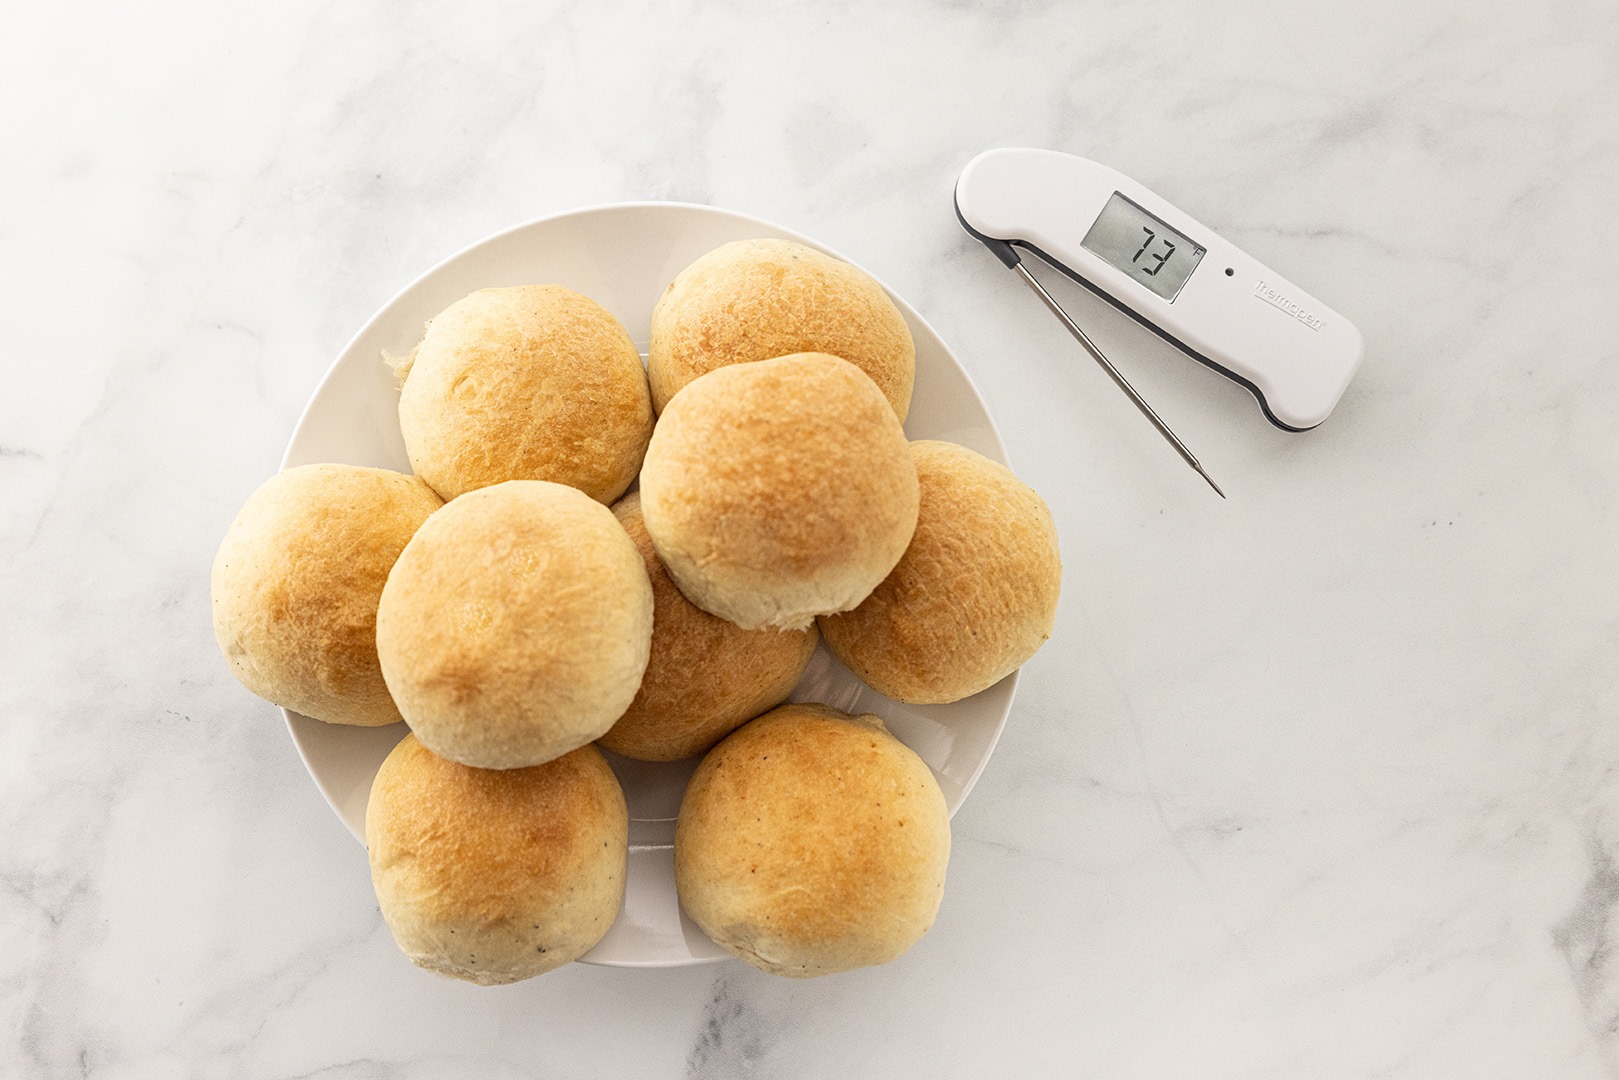
After 20 minutes, get your ChefAlarm and set the high alarm to 200°F (93°C). (Lean dough
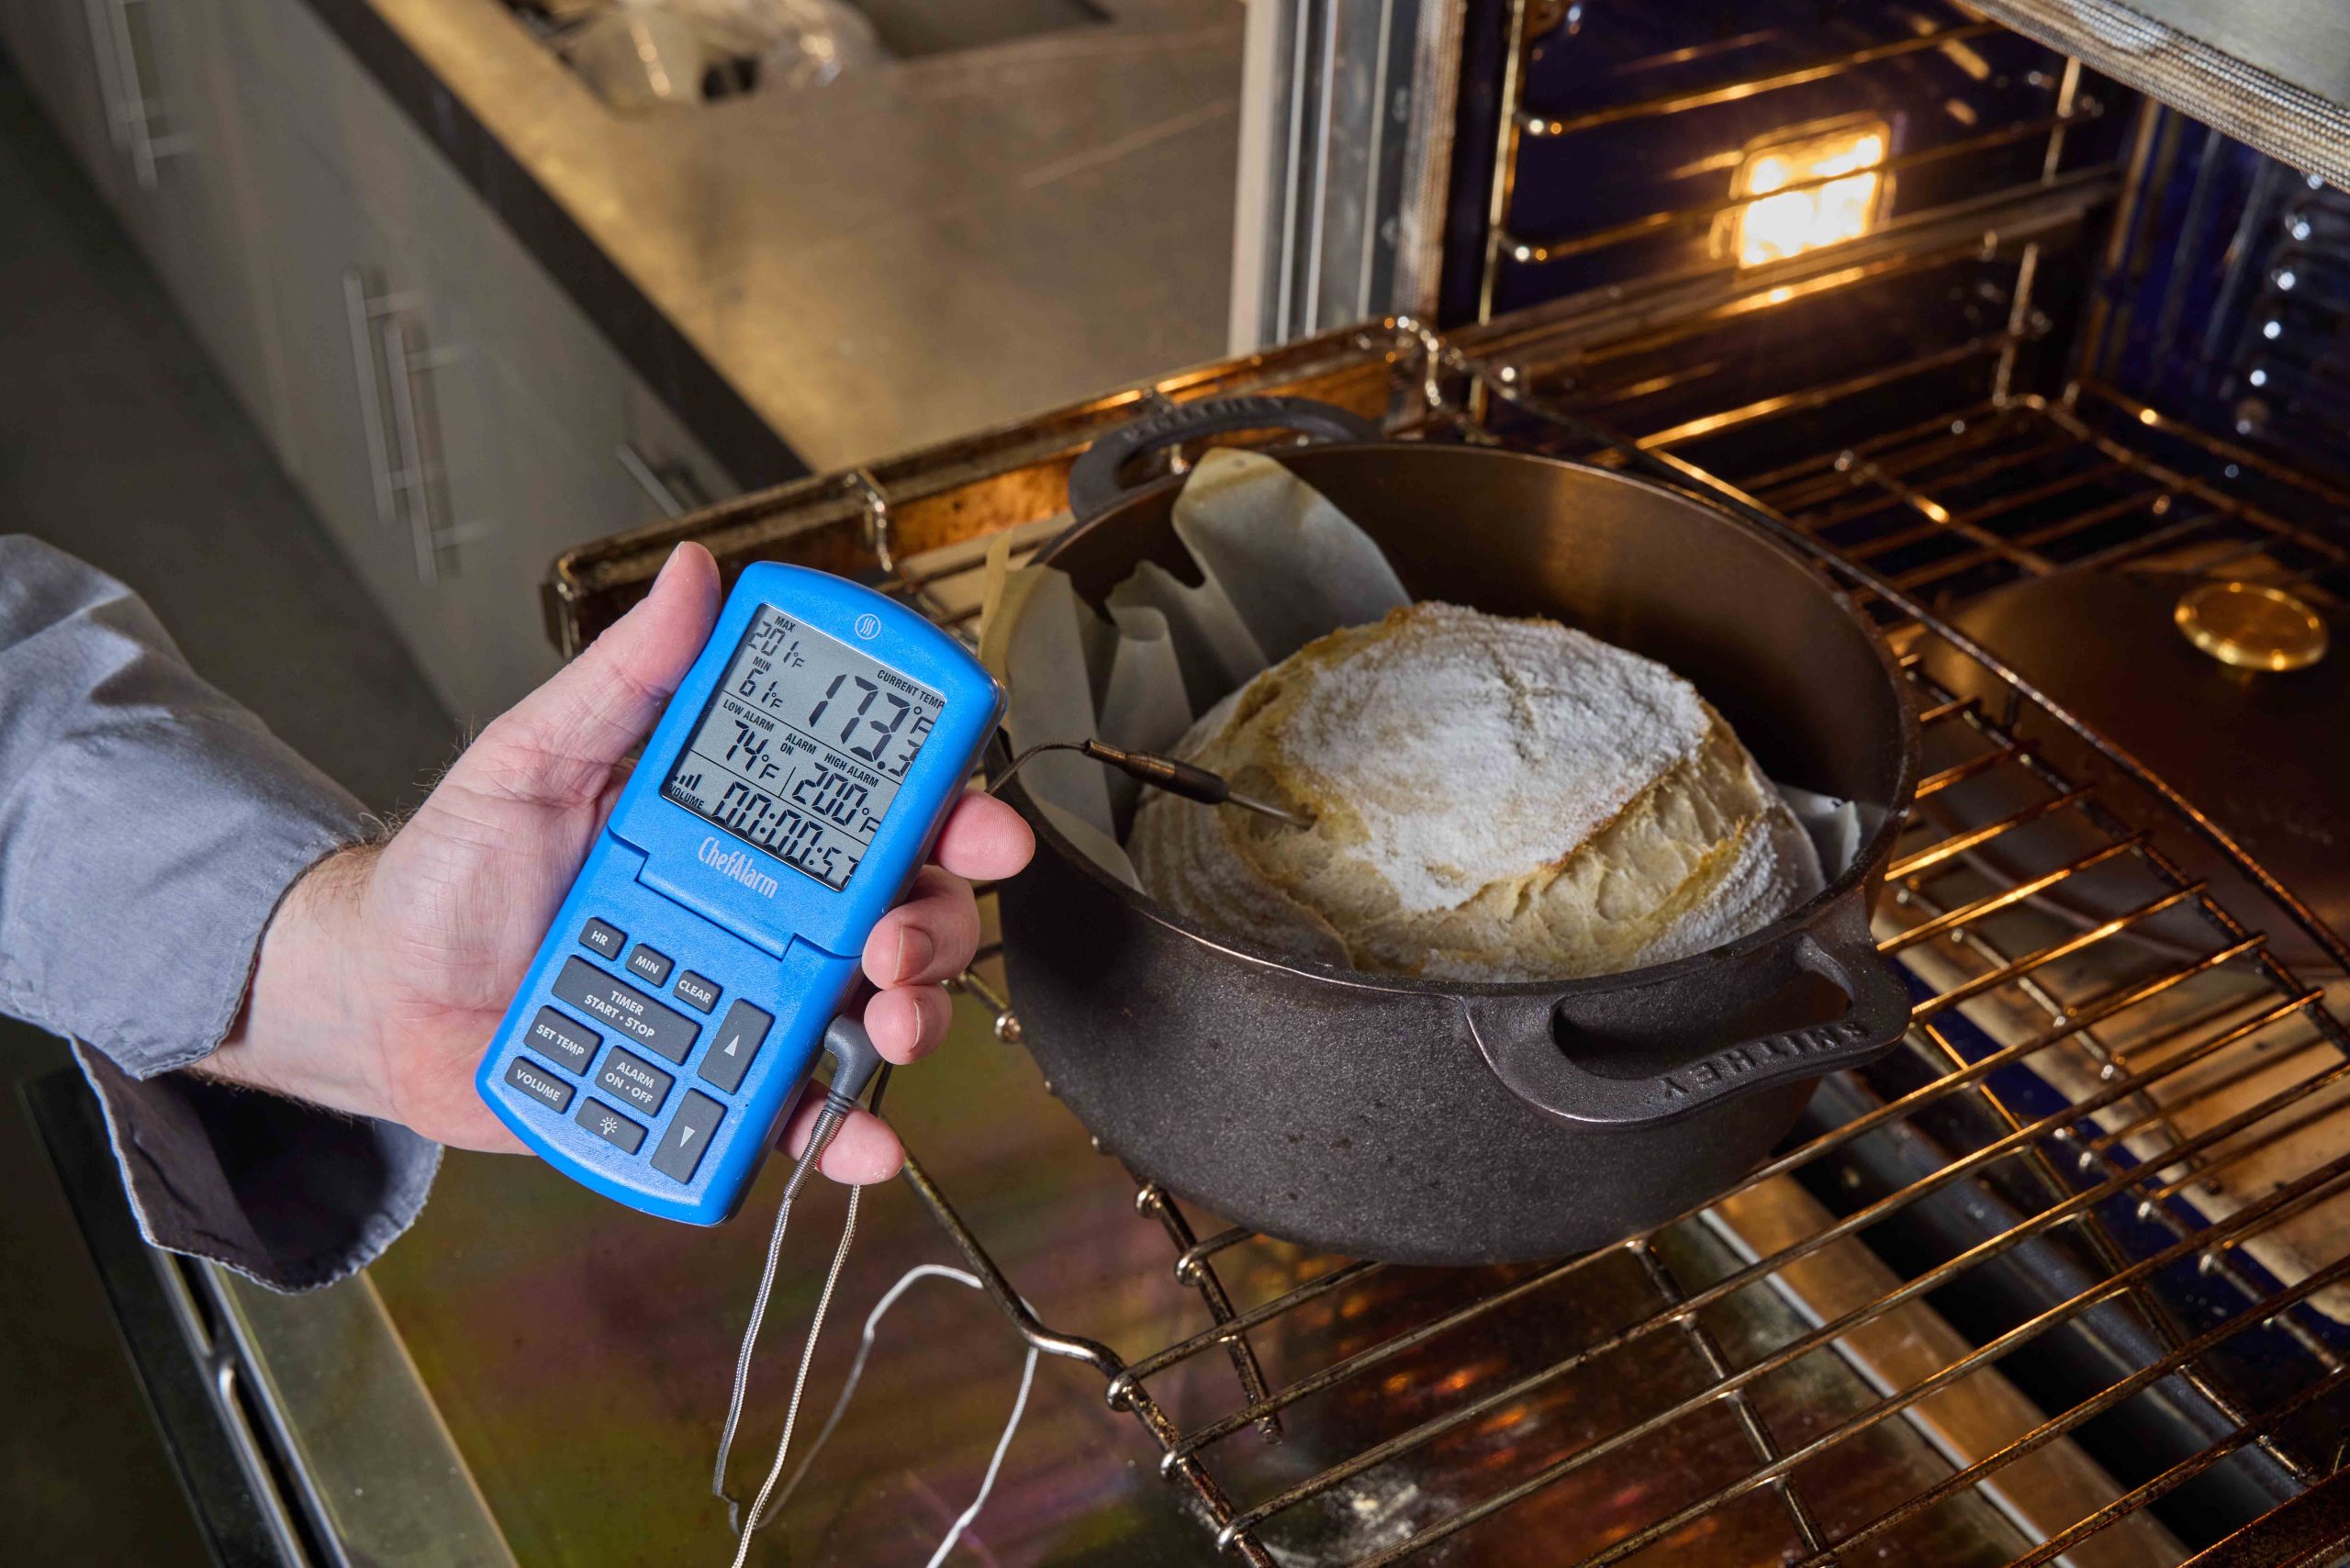
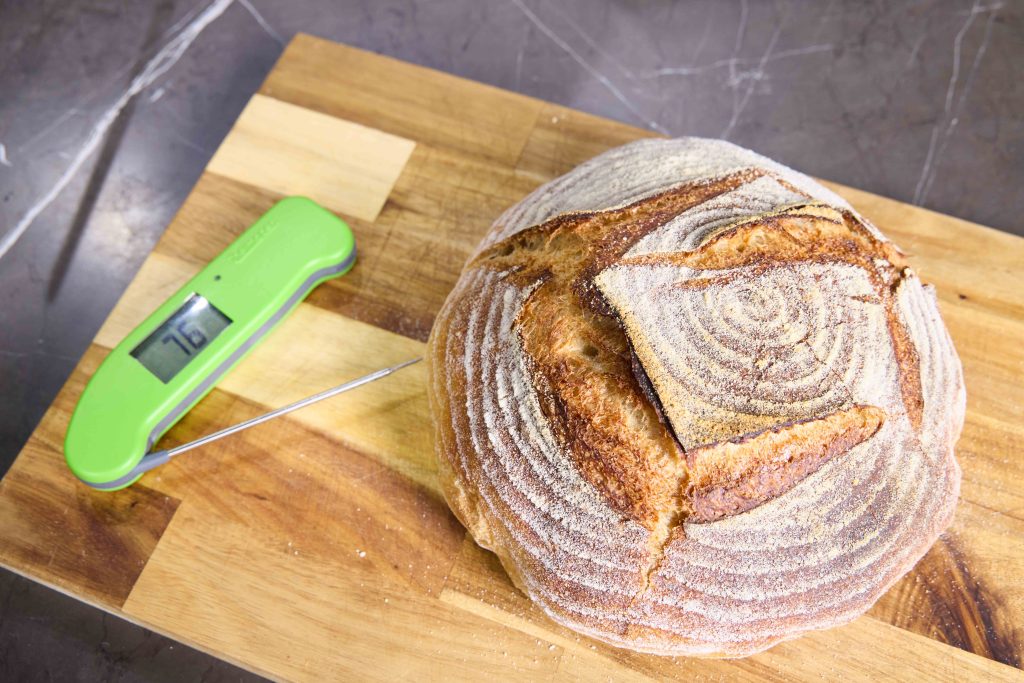
Continue to bake the bread, with the lid off to brown the crust and deepen its flavor. Cook it until your ChefAlarm sounds and verify the temperature in the loaf with your Thermapen ONE to make sure the bread is entirely above 200°F (93°C) throughout.

Note: Unless you have multiple ovens or a very LARGE oven, you will need to cook your bread batch-wise. When you put your first loaf in the oven, take the second loaf out of the proofing box, if you were using one, so that the proofing slows down for the roughly 30 minutes of baking that will occur. When the first loaf is nearly up to temp, prepare the second loaf on a sheet of parchment, etc.
Also, when you remove the lid while baking your first loaf, keep it in the oven so that it’s still hot for the next loaf. You needn’t heat the pot to 500°F (260°C) between loaves, the heat from the previous cook will be enough.
To prevent the bottom of your loaf from overcooking and becoming
This whole process may seem arduous when you first read it, and even when you first try it, but once you’ve done it once or twice, it’s really not that hard. Yes, there are a lot of steps, but none of them are particularly difficult. With some practice, you can find ways to split this process up so that it fits into your schedule, allowing things to ferment overnight or proof overnight, baking in the morning, etc. With a little trial and error, you can start to work perfect, delicious homemade bread into your daily routine.
Sourdough bread needn’t be something to fear or be mystified by. It’s just a matter of times and temperatures—and with The Extra Big and Loud timer, Thermapen ONE, and ChefAlarm, you can be sure that your times and temps are going to be right every time. Skip the line at the bakery and get quality, artisan-style bread in your own kitchen
Basic Country Sourdough Bread Recipe


Ingredients
- 740 plus 50 g water between 80° and 85°F 27° and 29°C
- 200 g levain active sourdough starter
- 700 g bread flour
- 200 g all-purpose flour
- 100 g whole-wheat flour
- 20 g salt
Instructions
Autolyse
- Combine the levain and the 740 grams of water. Use a Thermapen ONE to make sure the water is between 80° and 85°F (27° and 29°C).
- Add half of each of the flours to the levain-water mixture and combine to form a smooth batter.
- Add the rest of the flour to the batter and mix it until it is a shaggy mass with no dry lumps visible.
- Allow the dough to rest, covered, on the countertop for 30 minutes. This will allow the natural enzymes in the flour to create a more easily workable and shapeable dough that will have a better texture.
- Mix final dough
- Uncover the dough and sprinkle the salt evenly over the surface.
- Add the remaining 50 grams of water, also around 85°F (29°C), wetting all the salt.
- Mix the dough by squeezing and pinching it between your thumbs and fingers. Continue until you feel no lumps in the dough.
Stretch and fold the dough
- Fold the dough by pulling the back or furthest part of it away from you, then folding the stretched part back onto the lump.
- Do this a total of four times, pulling and folding the dough in each of the four directions. Cover the dough and set a timer like the Extra Big & Loud Timer for 30 minutes.
- After 30 minutes, uncover the dough and perform another set of folds, one forward, one back, one left, one right on the dough. (This is made easier by first wetting your dough-handling hand. Less dough will stick to you this way.) You should notice that it makes a slightly more defined lump. This counts as your first fold.
- Repeat this process three more times, stretching and folding the dough every 30 minutes. Not counting the initial fold after mixing, that makes four folds.
- Bulk ferment
- Cover the dough and let it rest in a warm place (80–90°F [27–32°C]) for 1 hour, until it has risen by about 30%.
- Divide and shape
- Flour a work surface.
- Tip your dough out onto the surface and scrape as many bits free from the bowl as possible.
- With a bench scraper or sharp knife cut the dough into two equal halves.
- Working with one lump, created the shape and some surface tension on the bread by basically doing another fold: pull the part that is farthest from you out away from you and then fold it in onto the top of the lump.
- Do the same for the sides and the part nearest you.
- Turn the dough over and pull and tuck the edges in under the loaf, creating tension on the surface of the loaf.
- Repeat with the other loaf.
- If you have proofing baskets, sprinkle them with rice flour. If not, line two bowls with cloths (such as a cotton or linen napkin) and sprinkle the cloths with rice flour.
- Place the loaves seam-side up in the bowls/baskets.
- Proof the loaves
- Place the loaves in a warm place to proof for as little as one hour in an oven with a proof setting or a cooler with a few inches of hot water in the bottom of it. Your proof-box should be between 75° and 85°F (24° and 29°C). They should rise and feel airier, but not be completely inflated. They can also proof in the refrigerator overnight. (See section on proofing times above.)
- Score and bake
- While the bread is proofing, preheat your oven to 500°F (260°C) with a lidded cast-iron pan inside.
- (Note: your bread will bake better if you have a baking stone on the oven rack below your bread. It will act as a buffer against the heating elements in the bottom of your oven.)
- Once the bread is proofed, turn it out onto a piece of parchment paper.
- Score the top of the loaf with a sharp knife or a razor blade, cutting a square around the crown of the bread.Remove the cast-iron pot from the oven.
- Lift the parchment paper with the bread on it and lower it carefully into the cast iron pot.
- Place the lid on the pot, put it in the oven, and lower the oven temperature to 475°F (246°C).
- Set a timer for 20 minutes and bake.
- Once 20 minutes has elapsed, set your ChefAlarm to 200°F (93°C), remove the lid from the pot and insert a probe into the center of your bread.
- When the alarm sounds on your ChefAlarm, verify the temperature with your Thermapen ONE.
- Remove the bread from the oven and place the new, uncooked loaf in the pot, following the same method for cooking it.
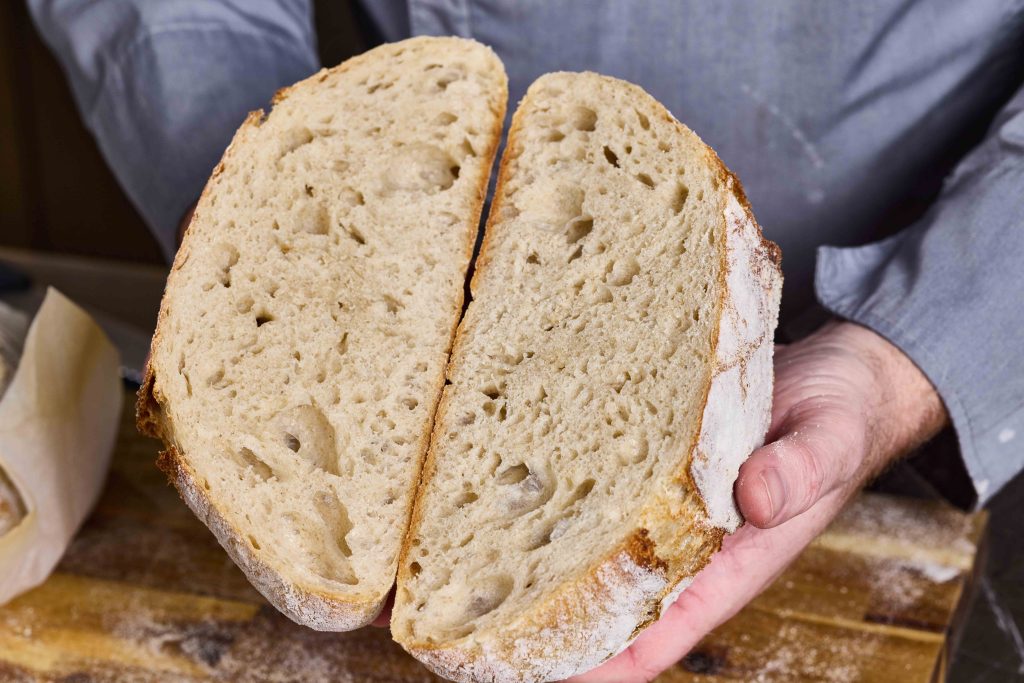
- Allow the bread to cool on the countertop for at least an hour.
- Slice, or just tear the bread into chunks, eating it with plenty of good, salted butter and jam.


Well, in an effort to clear up what continues to be a source of confusion for new bakers doing research.
Folks, starter and levain, are exactly the same thing. Both are sourdough (typically, at least in my world!). The difference is what you’re doing with them.
Typically the starter (also referred to the mother, or chef) is the established starter that you maintain, typically in the refrigerator. I maintain 60 grams (g) and feed once a week if not baking. Throw at least half out, feed back 15g of water and 15g of flour to build it back up to 60g total weight (making this a 100% hydration starter) and put it back in the fridge. Voila. This is the continuing maintained sourdough starter/mother/chef.
The levain (sometimes called a sponge as well) is made by taking a portion of the starter/mother/chef, feeding it with more water and flour to build it’s volume and get the yeast active and multiplying. Then the entire levain/sponge is consumed when mixed into the recipe being prepared.
If you use all of your starter/mother/chef to build your levain, before you mix your dough you need to make sure to reserve a portion of the levain to put back into the fridge as your new mother culture.
Bakers, especially authors, toss those two words around interchangeably, and it confuses the bejeebers out of new folks. Relax and have fun. It’s bread, it’s cheap to make more.
After you take the lid off, how long back in the oven and temperature please
I leave in without the lid about 15 minutes
Terminology sometimes further confused the process. For example, autolyse simply means mixing flour and water, and leaving it for few hours to break down starch into sugars.
So, my question is when should the starter be added to the dough? Before it is re-fed or after it is being refreshed with feedings? Or perhaps it does not matter to refresh the starter (known as levain) but add them to the autolysed dough as there are ‘food’ in the dough to feed the hungry starter, isn’t it?
Add the starter (levain) to the autolysed flour. The point in the feeding regimen at which you add it will determine things like rising time and some flavor characteristics. Experimentation is key, here!
I’m still confused. It is said that autolyse is letting the flour / water mixture rest and saturate prior to adding levain. The very first step in this recipe’s “autolyse” instruction is to mix the levain into the water and start adding flour?
By the way, I baked two loaves today using this recipe and they have turned out beautifully. One was simply based on this recipe and the other had added jalapeño / cheddar.
The autolyse step can be done prior to adding levain, but if you’re keeping that step at or below 30 minutes, you can certainly add the levain prior to the step. That’s what we say to do here—add it with the water, then add half the flour to make a “batter” then add the rest of the flour, mix, and let it sit for 30. If you wanted to push the autolyse longer, I’d add the levain after the “soaking” step. I made 2 loaves of it yesterday also, and loved the results…it’s so fun to make bread like this at home!
Excellent article! I used to bake sourdough frequently, but now find maintaining the starter to be too much of a hassle. Love the taste, though.
You actually don’t have to continue to feed it. I learned by accident. I keep my starter in a glass jar in the back of my refrigerator and forgot about it for about 3 months because I wasn’t making any bread. It will build up lactic acid on the top (clear liquid), dump that out… do not stir it…
Pour out the starter into a glass bowl 50g starter, 50g flour, 100g water… mix, and take 100g and put it back in the the glass jar and place it back into the refrigerator.
Take the rest of the 100g starter and cover it with plastic over the bowl. 2nd day add 50g flour / 50g water… 3rd day 50g of each… and 4th day I add my final 50 g flour plus 25g spouted wheat or rye and 100g of water..
And the following day I make my bread with the 400g of leaven.
No need to throw away starter. Only make the minimum you need and keep scrapings on the side of the pot in the fridge. The scrapings will dry out. Then take it out if the fridge when you need to make a bread. Add the necessary water for just the amount of starter you want, For exemple add 50 g water and clean your pot with it until scrapings on the sides are washed then add 50g of flour I add rye as I find the starter is the most active. Let the pot overnight and wait untill end of morning or lunch time and when the starter us double size or more use 44 g or even 50 g , keep the scraping and put your starter pot back in the fridge. The starter will dry out and keep weeks after weeks. You do not need to add more flour than you need for the starter so you have no discard and no loss of flour. Too expensive to throw away good starter. Dry it on a piece of flexipan and store it dry. Or make pancakes or waffles for breakfast.
Great advice!
Thank you, Therese! Once I found the “no discard” method, I was all in. I do not waste anything – unnecessary! If I do have some “discard” because I wanted to feed my sourdough pups, I simply store the “discard” in the fridge and when I get enough, I use it for recipes that all for it. Again, no waste.
THANK YOU!
Too much pretentious baking terminology and way too complicated. I use a ceramic tagine in a 240 degree (fan) oven and the dough simply gets turned out in that, lid put back on, and bakes for 40 mins. No fiddling with temperatures and perfect results every time.
I’m glad that works so well for you! It is true that experienced bakers might not need to rely on thermometry as much for doneness, but pro bakers certainly rely on it for the pre-baking process. Your technique sounds great, but might work differently for someone with a less reliable oven, etc.
Some say to use All Purpose Flour and others say a more tough flour such as wheat and rye for the daily levin/starter which is better?
Interesting question, because rye is actually not a very tough flour! Rye has a relatively low gluten content. I like to use a 50/50 mix of rye and bread flour. (Rye is particularly beloved by most levain yeasts…they love the stuff and will grow quite healthy on it.) Experiment. Find what gives you the flavor and texture profile you like.
Are you talking about an electric oven when you say to preheat for an hour? Or is it a gas oven?
We can’t understand how the oven will be hotter after an hour when the timer says it is at temperature.
The point is to make sure the cast iron pot is very well heated and that there is plenty of heat put into the walls of the oven. After the preheat cycle finishes, there is still a pretty large temperatrue fluctuation for the first 15 minutes at least, so we’re trying to get well past that.
very useful esp the proofing temperature and how we can adjust the time accordingly. as a beginner i always second proof the bread 1.5-2 hrs and it turns out soggy and moist in the middle. no bubbles form. i saw your pictures and learned that maybe i didn’t proof long enough esp bcoz room temperature is 20 degrees. thanks!
Why make it so complicated? I teach “No Fail Sourdough” at a local university. The goal of the class is KISS “Keep It Simple S… (student, sweetie, stupid). I provide an original San Fransisco Boudin Bakery start. It came from Boudin’s mother bread several years ago. Direction – feed it about every other week or when it gets low. After feeding, leave it at room temp for 8 hours, then store it in the fridge. To bake, use 1/2 cup start from the fridge, 2 cups filtered water (no chlorine), 4 cups any local flour, bread or AP flour. Mix, rest 1/2 hour, add 1 tsp salt, 1Tbsp water, mix, rest 30 minutes, turn and fold 6 folds every 30 minutes for 2 hours (4 turn and folds). Divide into 2 loaves, shape, oil and flour 2 stainless steel 8″ dia x 3.5” deep, $1.30 bowls. Put the raw loaves in the bowl, cover with a 2nd bowl. Put them in the fridge for 8-24 hours. Take from fridge and proof room temp 1-2 hours. Heat oven 475 F, put bowls with bread in 20 minutes covered. Remove cover and bake 8 minutes until brown. Cool 30 minutes +. Done. This is simple and inexpensive.
Thank you!
Thank you for the simple recipe
Thank you for your comment! I was actually wondering if I could bulk ferment in the refrigerator because of having no contact with the dough for about 19 hours due to my work schedule. I did it once and the loaves turned out beautifully! But everywhere that I read says not to bulk ferment in the refrigerator.
The information and photos here were very helpful to me while making my much-awaited first rye sourdough starter and good rye bread loaf. It turned out beautifully.
Wonderful!
I appreciated the exactness of your information. As a new sourdough mama I am very happy saving my discard and trying to use it up in everything from cookies to pasta rather than throwing in the garbage as you instruct. Thanks again for all this great info on temperatures for my sourdough adventure. : )
You left out the last crucial temp step! What is the best temperature to
slice freshly baked sourdough?
And if you are in a warm environment, is there a minimum amount of time?
Your article says: “Allow the bread to cool on the countertop for at
least an hour.” Other advice on the ‘net is to let it sit until it
reaches room temperature.
I’ve never seen a loaf get anywhere near room temperature for a number
of hours so it seems “more scientific” to be given a specific temp. (And
might make the waiting a little easier.)
Good question! I’d say getting down to 105°F should be fine. To hat, and you loose moisture to steam, and the bread hasn’t “set up” fully yet. But we all want melty butter on a fresh slice! Also, to be frank, I often ignore that advice and slice a floppy, hot slab to slather with butter and jam well before I SHOULD.
Do you recommend any changes for altitude? I am at 5800 feet, just below the 6000 foot I see in much information on altitude adjustments.
I especially appreciate not only the “what’s” and “how’s” of making sourdough bread, but the “whys”. Great article.
Thank you for the compliment. No, I don’t recommend any elevation changes, but some people say their breads do beater at higher elevation with a slightly reduced hydration. If yours isn’t lifitng the way you want, maybe try cutting the water a little.
I’ve been successfully baking sourdough loaves for a few years now, and mostly do things the way you explain. I’ll share the minor differences in case people want to incorporate them. First, let me say that I did a *lot* of research before attempting this the first time. I also invested in some equipment that made sense to me and could be useful for other cooking/baking. We used to have a baking stone that got broken; that was one thing – but I bake on parchment directly on mine. I also bought a large, deep “lasagna” pan that is fantastic as a roasting pan for whole chicken. I use it over top of my loaf, to catch the steam from a cast iron pan with boiling water on the floor of the oven. In other words, I don’t use any type of container for the bread. I also bought a really good scale so I can weigh my ingredients – so much more accurate than US cup measurements.
Even with all the articles and how-to’s I read, my first few loaves were definitely trial and error! But once I hit on a method that reliably produced what my family loves, I’ve done it ever since. As you say, it seems like a lot of steps – and it is – but they are second nature now. I bought my starter from a company that took theirs directly from San Francisco to their home base in Toronto, Canada. I do my feeding similar to what Therese shared, although I like to leave about 20g of moist starter in the jar, not just the side scrapings.
I am going to incorporate one specific step in your method: reserving a bit of filtered water to sprinkle over the salt when I add it. I can see how it will make it so much easier to blend in the salt! Thanks for a good article.
I just put the salt in with the flour water and starter. Works every time.
I just baked two loaves of sourdough at 475 F and had trouble with the parchment paper sticking quite badly to the loaves. One was baked in a cast iron Dutch oven and the other one in a glazed clay pot.
The parchment paper says that it is good up to 400 and I see that some are rated to 450.
Would using the 450 paper work at 475?
Any other suggestion on how to avoid having the paper stuck to the crust?
Interesting, I’ve never had this problem before. I would try the higher-rated stuff first, but if that’s not working either, you may consider dipping the bottom of the bread in cornmeal before baking (not an easy task, I know). That should form a crunchy, (mostly) nonstick surface on hte bread itself. You could also lower your bake temp to 450°F, which is still plenty hot to give you the nige crust you want.
Sprinkle the cornmeal on the bottom of the loaf before turning it out. of. the baton
A lot of very welcome information.
So from the figures, one COULD potentially bulk ferment in the fridge, but would take roughly 4 times as long?
Absolutely. I have bulk fermented in the fridge when I started baking too late in the evening, and it turned out great.
So, would you then take the bulk ferment directly out of the refrigerator and shape it, or let it rise to room temp before shaping?
Shape right out of the fridge, let it rise in its new form.
Thanks for all your details. I have made sourdough a few times and had questions about if I was doing it right. I appreciated your explanations as to why and what is happening. I feel like I understand the process better now. thanks
I had been feeding at 1:1:1 ratio.
So for your example of 30g starter, I was adding 30g water and 30g flour, (rather than your method of 15g and 15g).
Was I misunderstanding the concept?
Yes, you were, it seems. By 30 g starter, we mean the starter itself, not the value of its components. By 30g we mean 15g water and 15g flour.
Great recipe. I have used it for a few years and appreciate its specificity and explanatory nature, but I have a question. After coming back to the recipe after a break, I see the folding method is in the recipe description, but no longer in the recipe itself. Is this a change? I would love to know more.
How odd that that section got left out in a revision! I have found it and added it back in. Happy cooking!
Great to hear all the tips. I make bread once a week and pull the starter out of the fridge in the a.m., put equal parts water and flour in it, mix it up and set it in a bowl of warm water. A couple hours later I mix up 3 cups bread flour, 1 cup whole wheat, and 2tsp salt, then add a cup or so of starter to 1 cup + 5 oz water, and dollup of olive oil, then mix that up with the flour/salt and let sit covered for 30minutes to an hour. The remaining starter goes back into the fridge. Then I do the stretch and folds haphazardly throughout the day and form into a nice round ball – 3 – 5 times, then in the evening I put smooth side down into a bowl in a floured towel, cover and seal with a small trash bag and put in fridge. In the morning I put it top down onto parchment and maybe shape a bit with a bench scraper to create more surface tension, but its so cold it doesn’t move much. I heat the oven to 475 with dutch oven. Once the oven is hot, I score the bread and lower it into the dutch oven, put on the lid and bake for 55 minutes or until temp is about 200. Always get good oven spring and decent results. Sometimes instead I bake as a big bat on a cookie sheet at 450. I know its a bit seat of the pants, but works well enough for daily bread. I often freeze half for later in the week. I get a medium crumb, not that super chewy big holed style. Anyone see any no-no’s or have suggestions?
Under “Instructions” you add the salt in the “Mix Final Dough” step. Not so in the step by step procedure preceding the “Instructions” set, and following “Tartine” instructions.
Somehow parts of my instructions got disordered, thanks for the catch, I’ve fixed it.