ThermoWorks RFX GATEWAY™ and RFX MEAT™
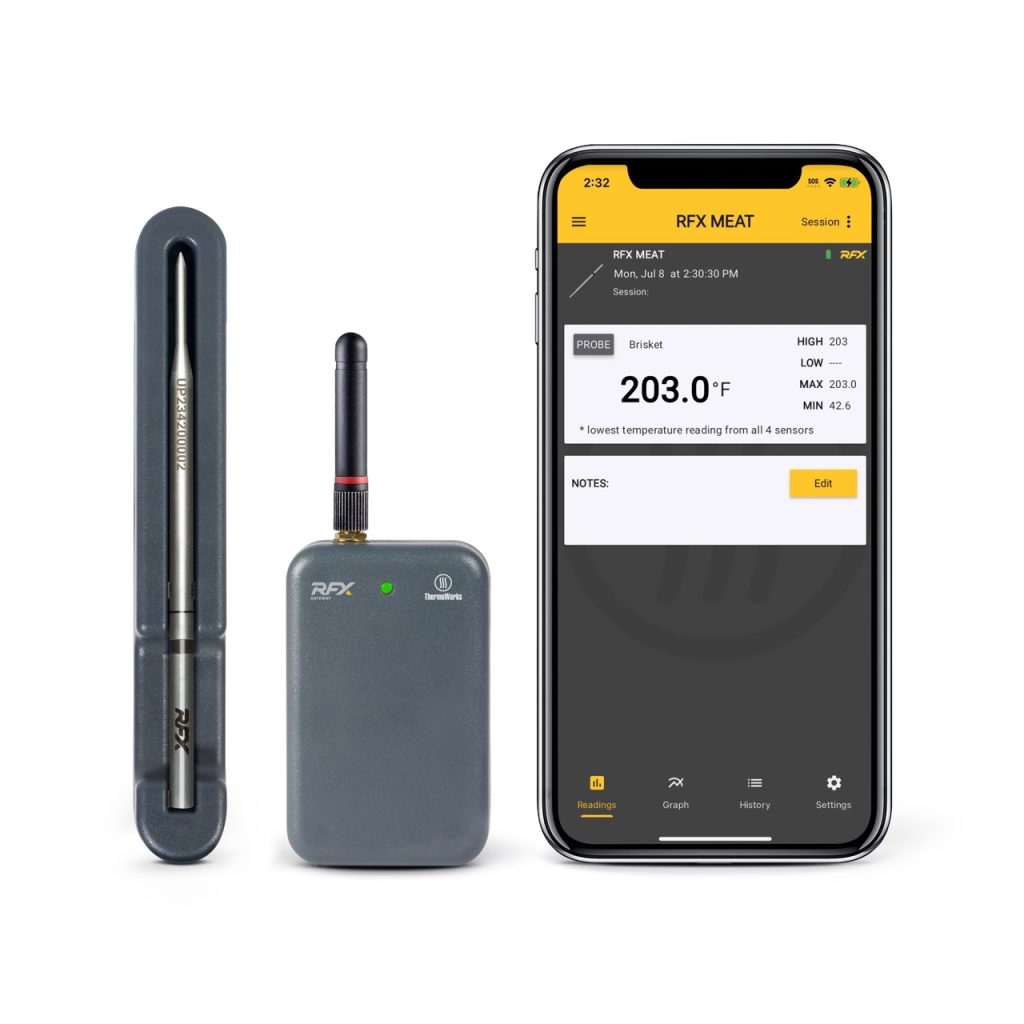
Operating Instructions
RFX Starter Kit Operating Instructions PDF
RFX GATEWAY Operating Instructions PDF
RFX MEAT Operating Instructions PDF
Before You Begin
Connect to Wi-Fi
A 2.4GHz Wi-Fi Network is required to use RFX Wireless. This frequency provides the longest range and best penetration through walls and obstacles.
Download the App
RFX Wireless requires the use of the ThermoWorks App (available through the Google Play Store or the Apple App Store). A free basic account allows for use of up to 10 cloud-connected devices. The RFX GATEWAY and each individual RFX MEAT probe count as single devices. Paid plans are available for additional features and higher device limits.
Protect Your Probes
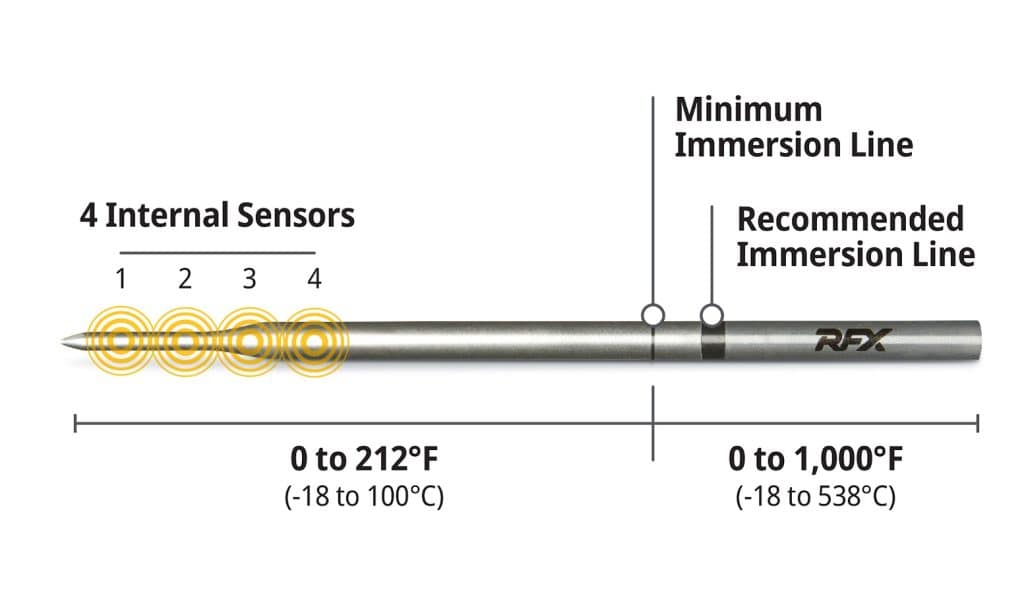
Before cooking, RFX MEAT must be properly inserted in the meat to the immersion line marked on the wireless probe. (This protects the internal components.) Failure to do so may result in irreversible damage to the probe that is not covered under the warranty. Once properly inserted to the immersion line, RFX MEAT is safe to use in cooking environments up to 1,000°F (538°C). Do not use RFX MEAT for any cooking applications where the insertion end below the probe’s immersion line is exposed to temperatures beyond 212°F (100°C).
Using Billows

If you plan to use RFX Wireless with Billows, you need to use the 12-volt power adapter that comes with Billows. The 5-volt adapter included with RFX GATEWAY will not provide sufficient power to run Billows. For additional information on running Billows with RFX, see the Using RFX with Billows® section.
Adding RFX to your ThermoWorks App
The ThermoWorks App is required to use RFX. This section will guide you through the process of adding RFX to your account.
- Install or update to the latest version of the ThermoWorks App (Google Play Store or Apple App Store)
- Make sure Bluetooth® is enabled on your smart device
- Confirm Location Services are enabled on your smart device
- Turn RFX GATEWAY on and ensure it’s next to your smart device
- Check that RFX GATEWAY is within range of your 2.4GHz network
- Have your 2.4GHz Wi-Fi network’s name and password, including the correct letter case and punctuation. (RFX GATEWAY will also operate on an open network.)
- Upon opening the app, you will be on the Device Dashboard. If you find yourself on any other page, you can select the Menu in the top left hand corner and then choose choose Devices.
- Click on the + Device button.
- Select RFX GATEWAY from the menu.
- A list of any available RFX GATEWAY units will appear. If multiple units appear, choose the RFX GATEWAY with the corresponding Device ID, found on the right-hand side of RFX GATEWAY by the USB port.
- RFX GATEWAY will use a Bluetooth connection to send Wi-Fi credentials. After the Bluetooth connection is made, a Setup Network Info dialogue will appear. Click → Continue.
- Enter your 2.4 GHz network’s name and password. Leave the password field empty if using an open network.
- After the network connection is established, RFX GATEWAY is ready to use. You will be directed to a page to name the RFX GATEWAY and select the Transmission Interval Rate for the Pro-Series probe port.
- The next page allows you to change the channel settings of the Pro-Series probe and set the high and low alarms. This can be updated anytime in the device settings.
- Have RFX GATEWAY set up on your ThermoWorks Cloud account and be sure the device is nearby, turned on, and within range of your 2.4GHz Wi-Fi network. RFX GATEWAY is required for RFX MEAT to connect to ThermoWorks Cloud.
- Ensure RFX MEAT is charged and placed inside the charging block.
- Upon opening the app, you will be on the Device Dashboard. If you find yourself on any other page, you can select the Menu in the top left hand corner and then choose Devices.
- Click on the + Device button.
- Select RFX MEAT from the menu.
- Verify that your RFX GATEWAY is turned on and connected to Wi-Fi. The LED should be solid green.
- Remove the RFX MEAT from the charging block. Touch RFX MEAT to the RFX GATEWAY antenna to add it to your account. This process may take up to 2 minutes.
- The next page will allow you to change device settings. These settings can be changed at any time by selecting the device from your dashboard.
Before Your First Cook
To get accurate readings and protect your RFX MEAT, it is essential to understand proper probe placement. RFX MEAT has four sensors near the tip of the probe and will display the lowest temperature reading. This can help you ensure that you are seeing the coldest temperature while also meeting the minimum immersion required to protect your probe.

- Hold RFX MEAT against the side of the piece of meat to visualize where the sensors will be when fully inserted to the immersion line.
- Insert the probe from whatever angle helps you to reach the thermal center (the thickest part of the meat) and meet the minimum immersion line.

RFX GATEWAY and RFX MEAT have no physical alarm and are reliant on notifications from the app to alert you of temperature changes. The default settings (if you allow notification) will ensure you receive alerts. You can also double check your Notification Settings.
From any screen, select the hamburger menu in the top left hand corner and select “User Notifications.”
Device and Channel Settings
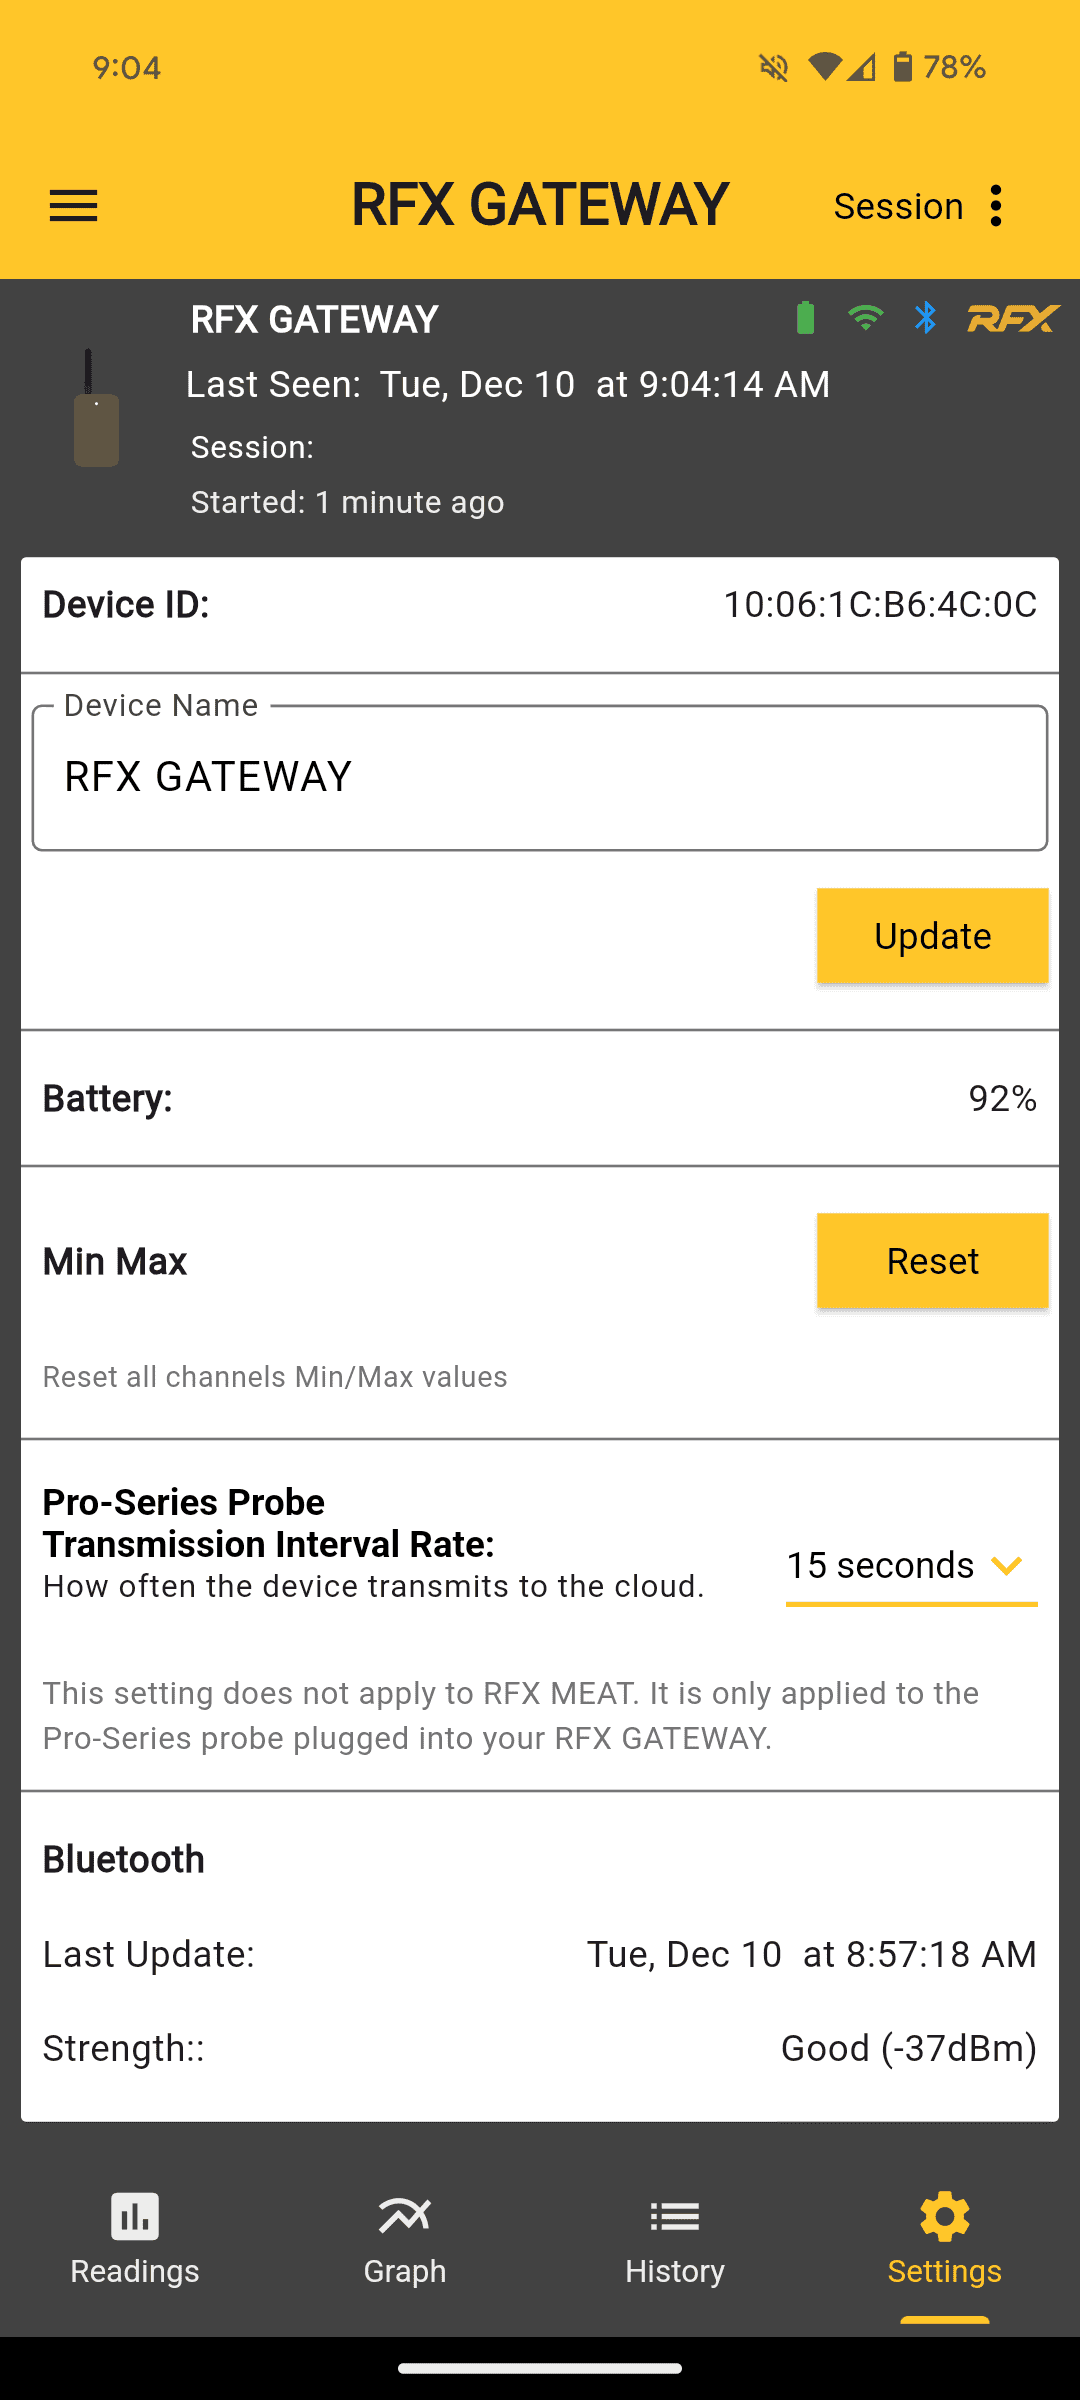
- Device ID: This will match the Device ID printed on the side of the unit by the USB-C port.
- Device Name: By default, the Device Name will show as RFX GATEWAY. If you’d like to change the device name, type in a name in the field and press the “Update” button.
- Battery: Current battery percentage will display if your RFX GATEWAY is turned on and connected to Wi-Fi. When RFX GATEWAY is turned on and charging, this area will simply display “charging”. If your RFX GATEWAY is turned off or not connected, the percentage will display the last known percentage. Your RFX GATEWAY will still charge when plugged in, even if it is turned off.
- Min Max: When plugged in, your Pro-Series Probe reads the highest and lowest temperatures throughout a cook. To clear this data, tap the reset button. This does not affect High and Low alarms.
- Pro-Series Probe Transmission Interval Rate: This refers to how frequently the RFX GATEWAY will transmit data from the Pro-Series Probe. Intervals include 15, 30, and 60 seconds. This transmission interval does not affect RFX MEAT transmissions.
- Bluetooth:
- Last Update: Shows the most recent Bluetooth connection.
- Strength: Indicates the strength of the Bluetooth signal.
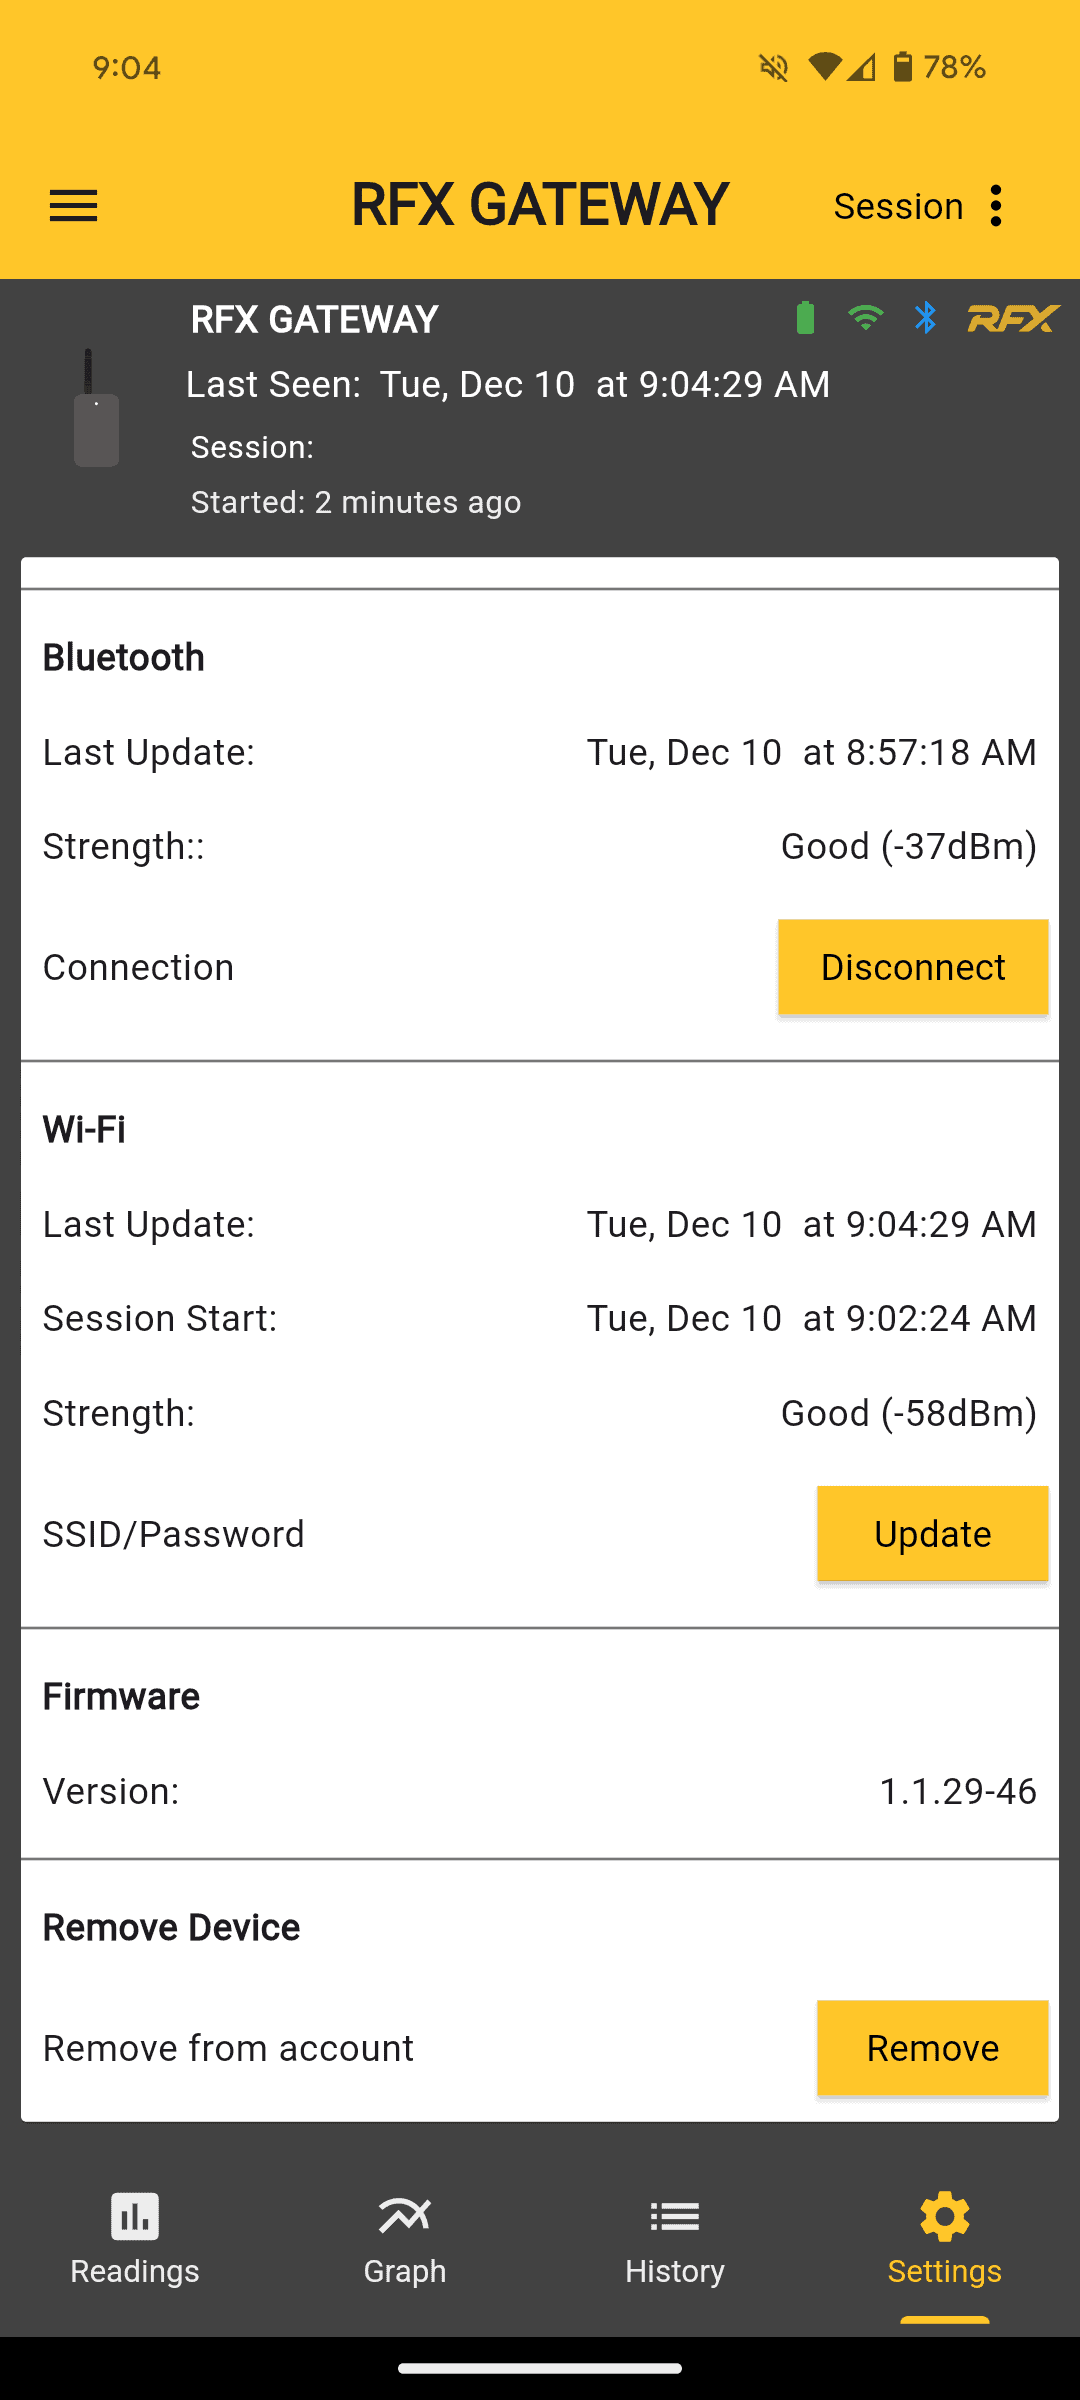
- Button: If a bluetooth connection is currently established, the yellow button will indicate “Disconnect” to remove the current Bluetooth connection. If no Bluetooth connection is established, this button will read “Connect” and prompt a bluetooth connection to your smart device if the RFX GATEWAY is within range.
- Wi-Fi:
- Last Update: Shows the most recent Wi-Fi connection.
- Strength: Indicates the strength of the Wi-Fi signal.
- SSID/Password: If a Wi-Fi connection is currently established, the yellow button will indicate “Update” to change the Wi-Fi the device is connected to.
- Firmware: This displays the version of firmware on the RFX GATEWAY.
- Remove Device: This button will remove the device from your account.
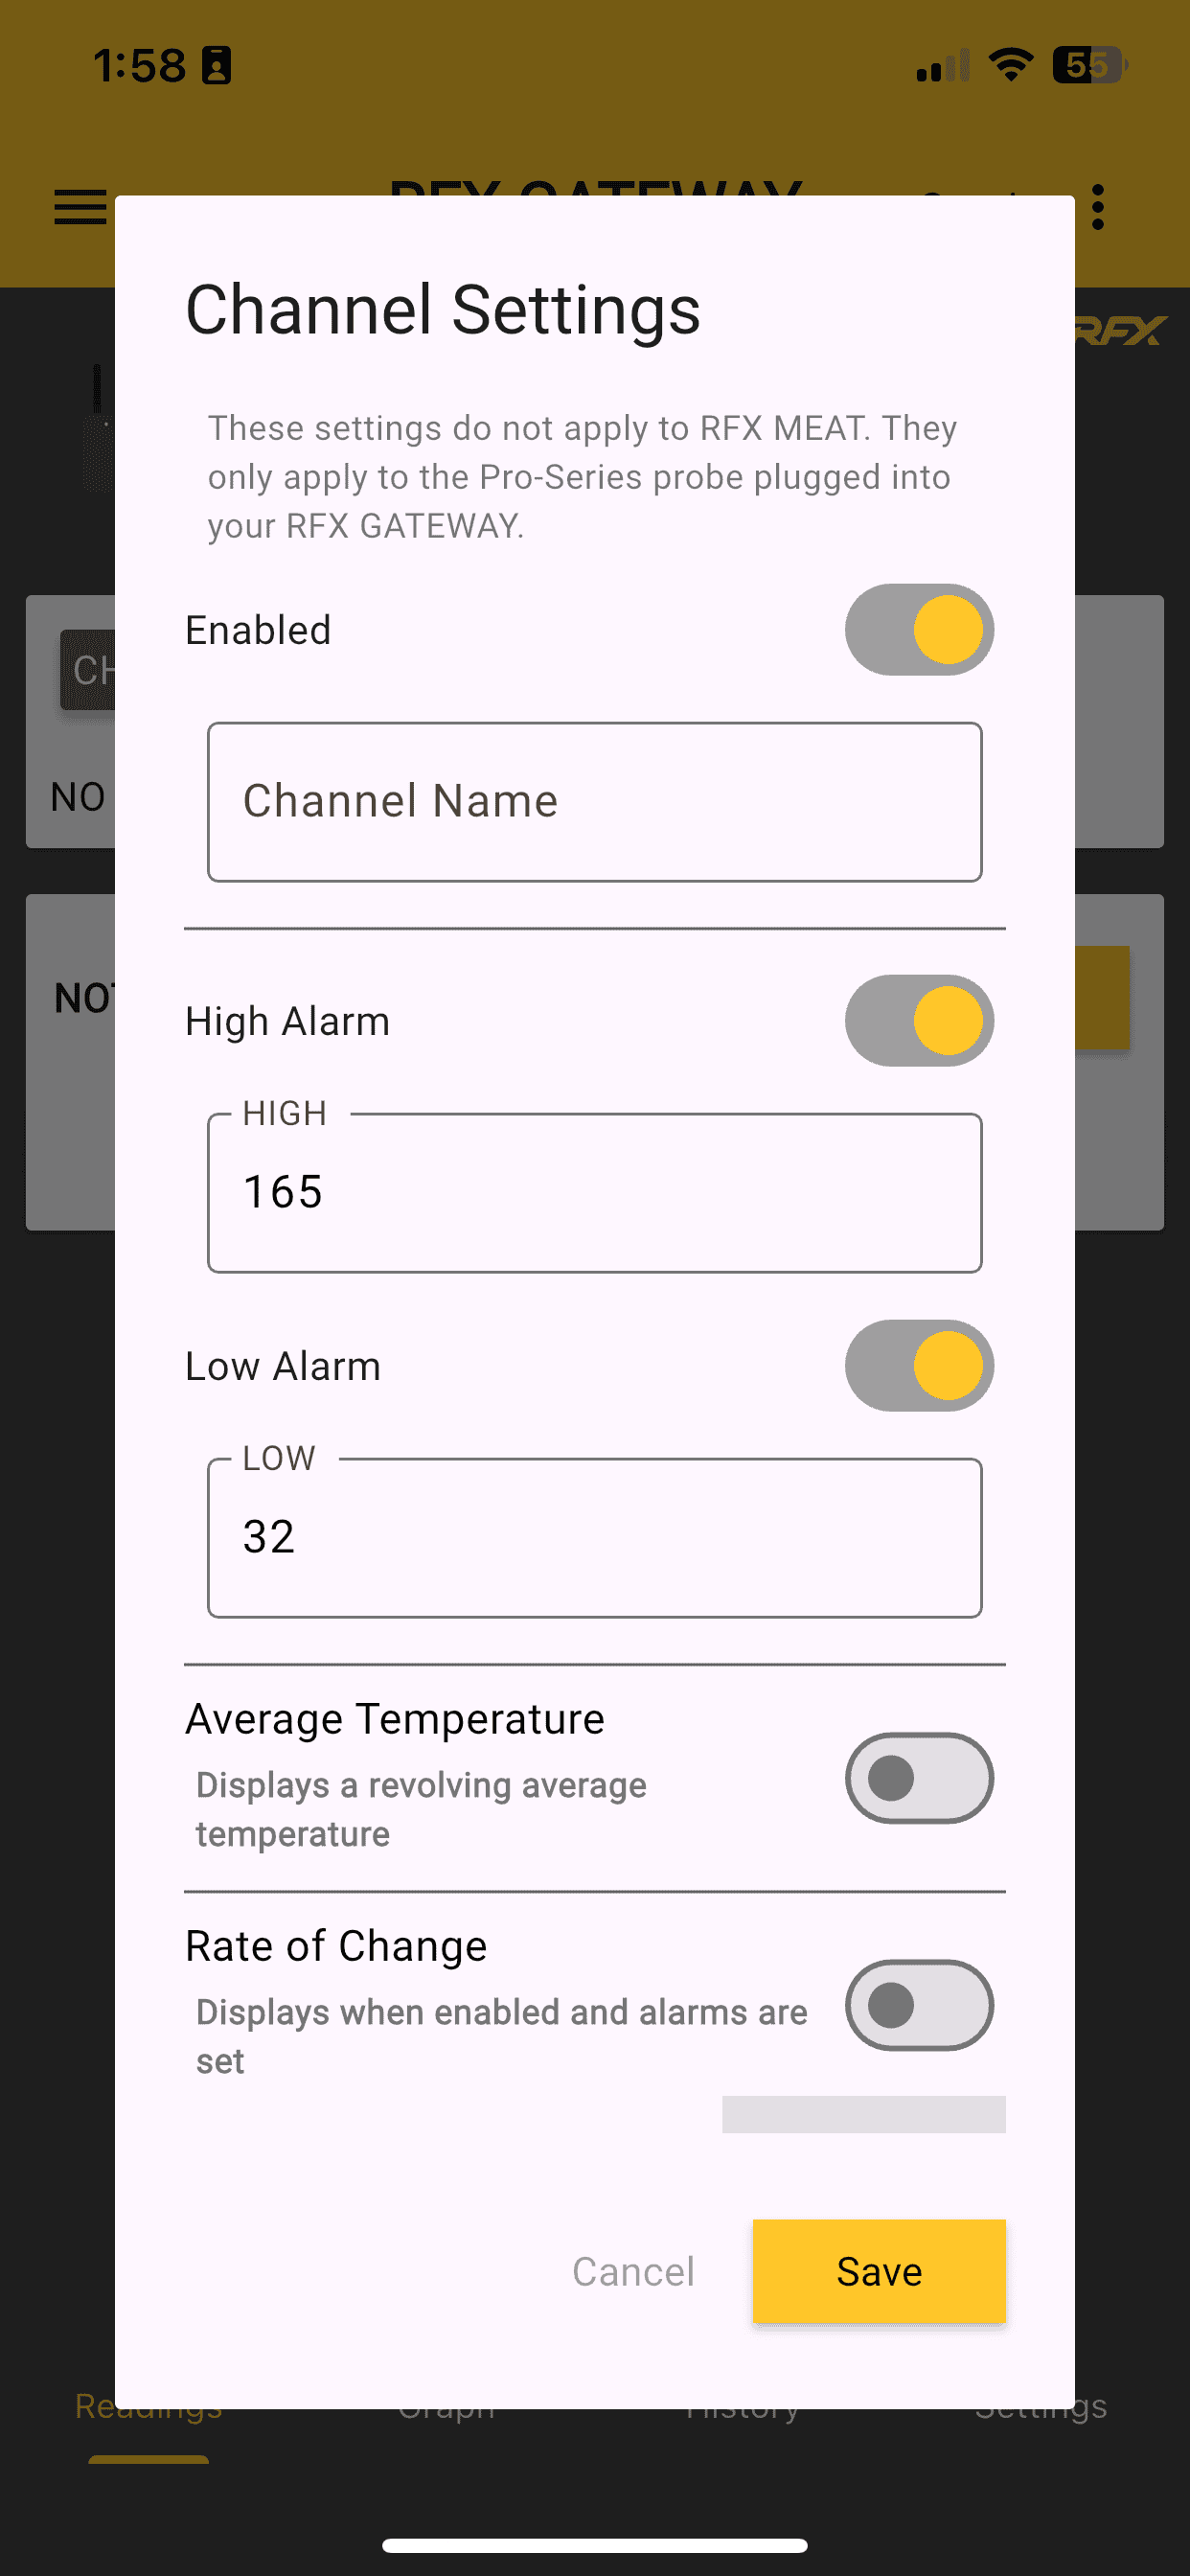
- Enabled: The channel must be enabled for alarm notifications to be sent regarding the Pro-Series Probe. If you have an active session, the data will still be recorded in the session history even while the probe is disabled.
- Channel Name: By default there is no channel name. Channel names are limited to 40 characters. To save a channel name, you must select the save button at the bottom of the screen which will save all channel settings.
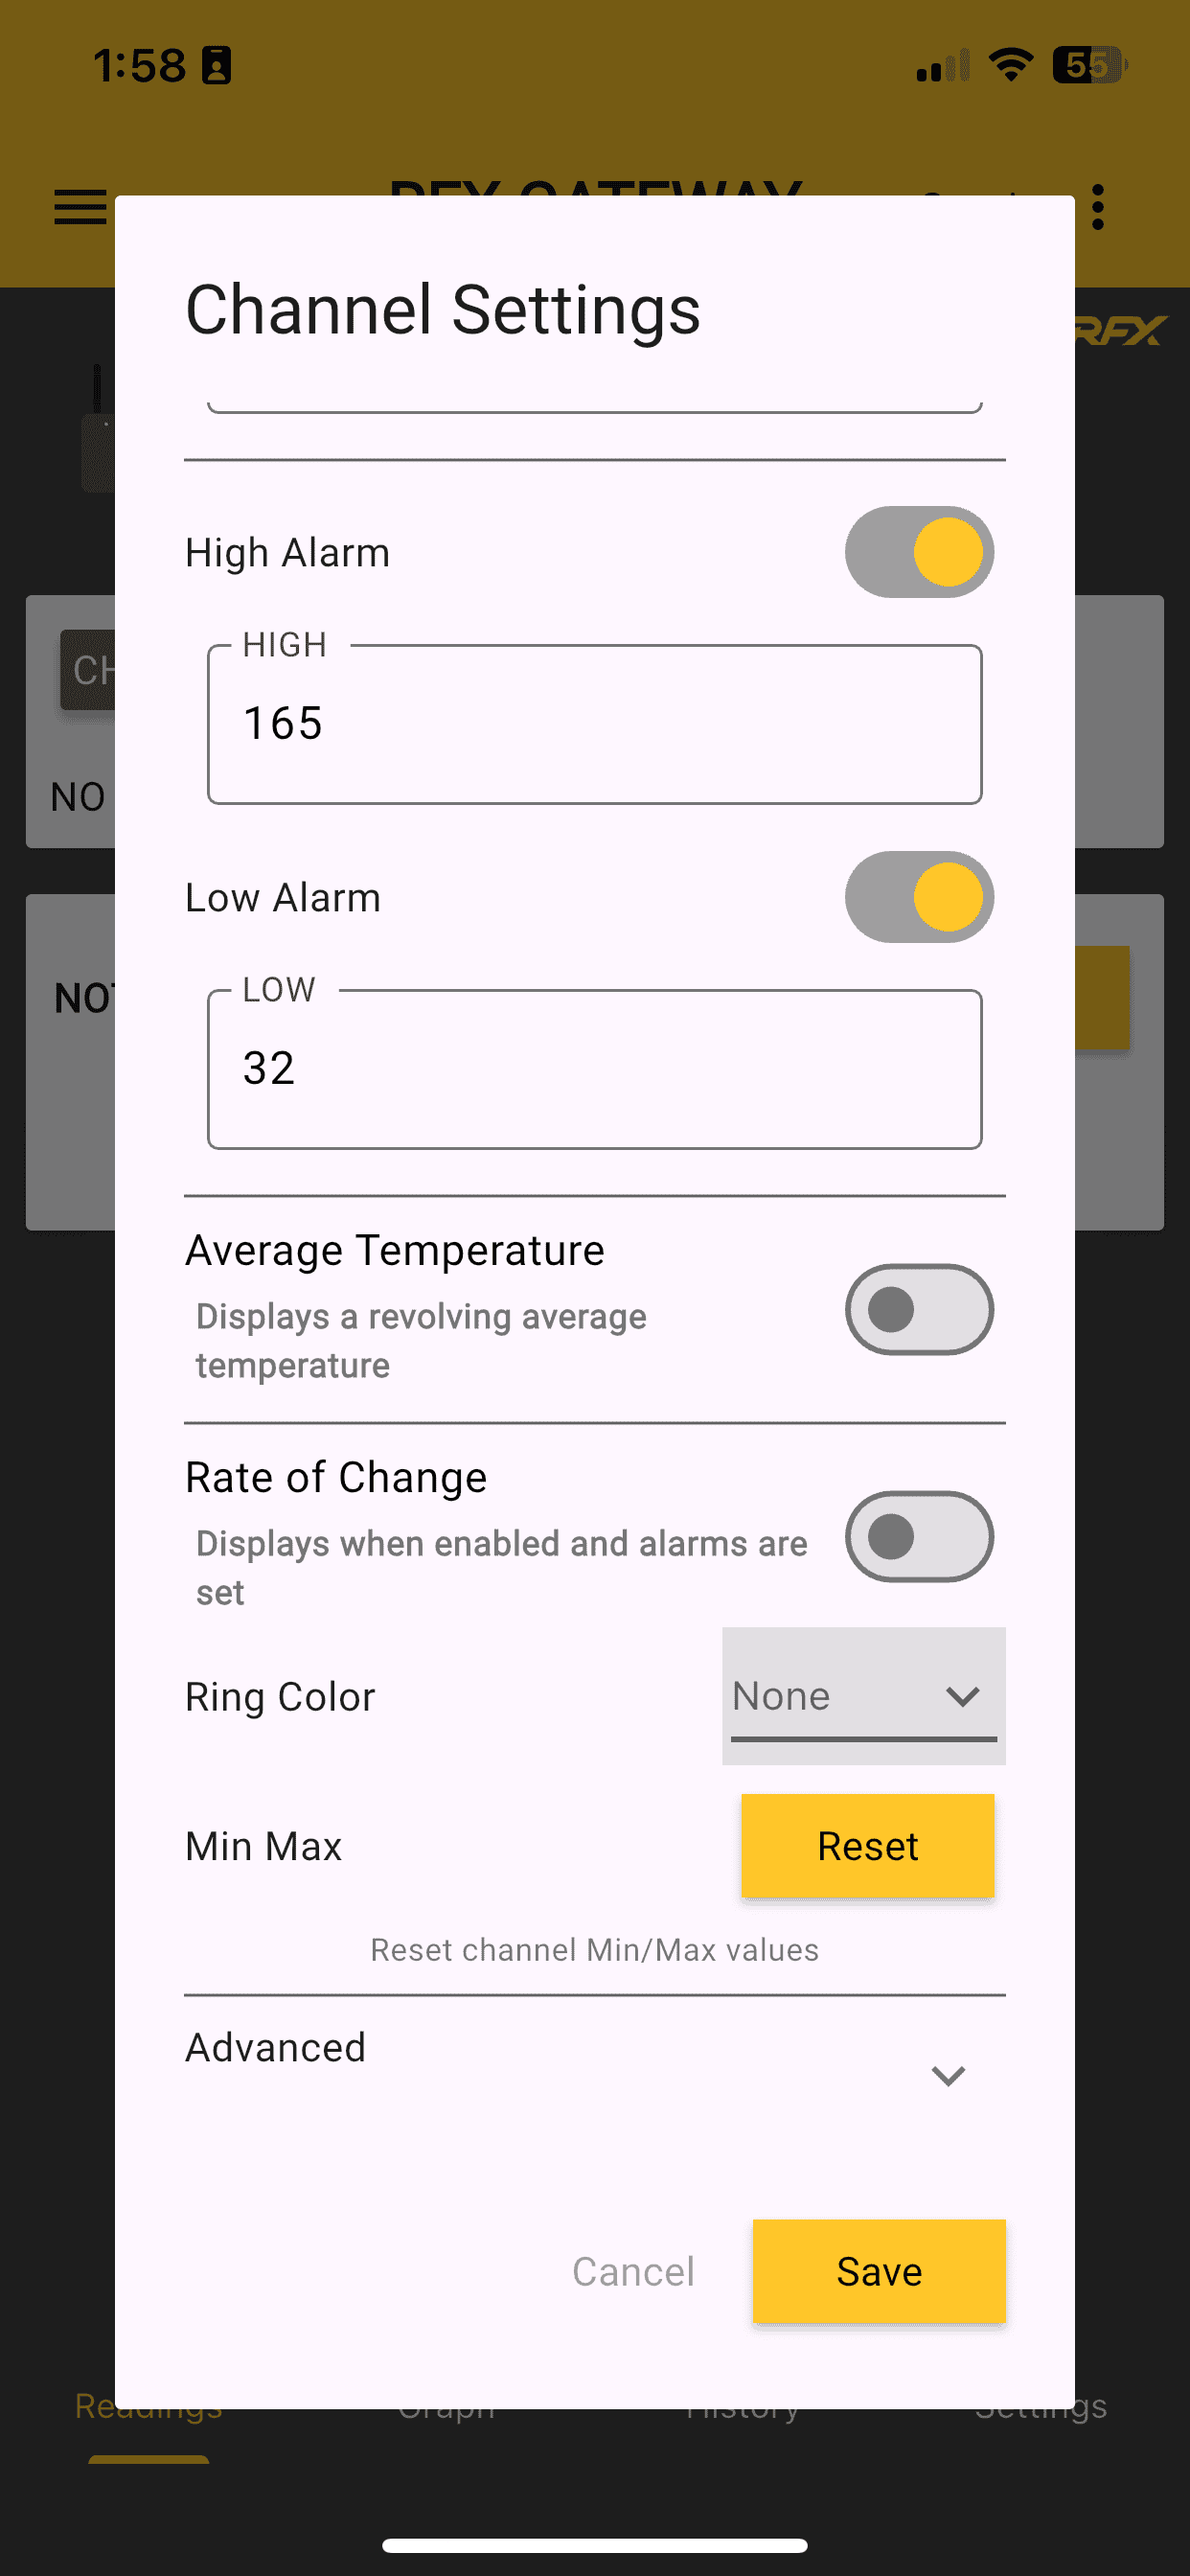
- High Alarm: This alarm will sound from your smart device when the temperature ascends above the temperature selected. For the alarm to sound, this setting must be enabled.
- Low Alarm: This alarm will sound from your smart device when the current temperature reading descends below the temperature selected. For the alarm to sound, this setting must be enabled.
- Average Temperature : The average of the last 15 readings from the channel will be displayed on the “readings” portion of the device.
- Rate of Change: This refers to how fast the temperature is changing during a cook. It’s most useful for approximating the finishing time on a long cook.
- Ring Color: These colors correspond to the set of probe rings provided with your RFX GATEWAY. Probe rings allow for you to easily identify your probes if you are using multiple probes at one time.
- Min Max: Your Pro-Series Probe reads the highest and lowest temperatures throughout a cook. To clear this data, tap the reset button. This does not affect High and Low alarms.
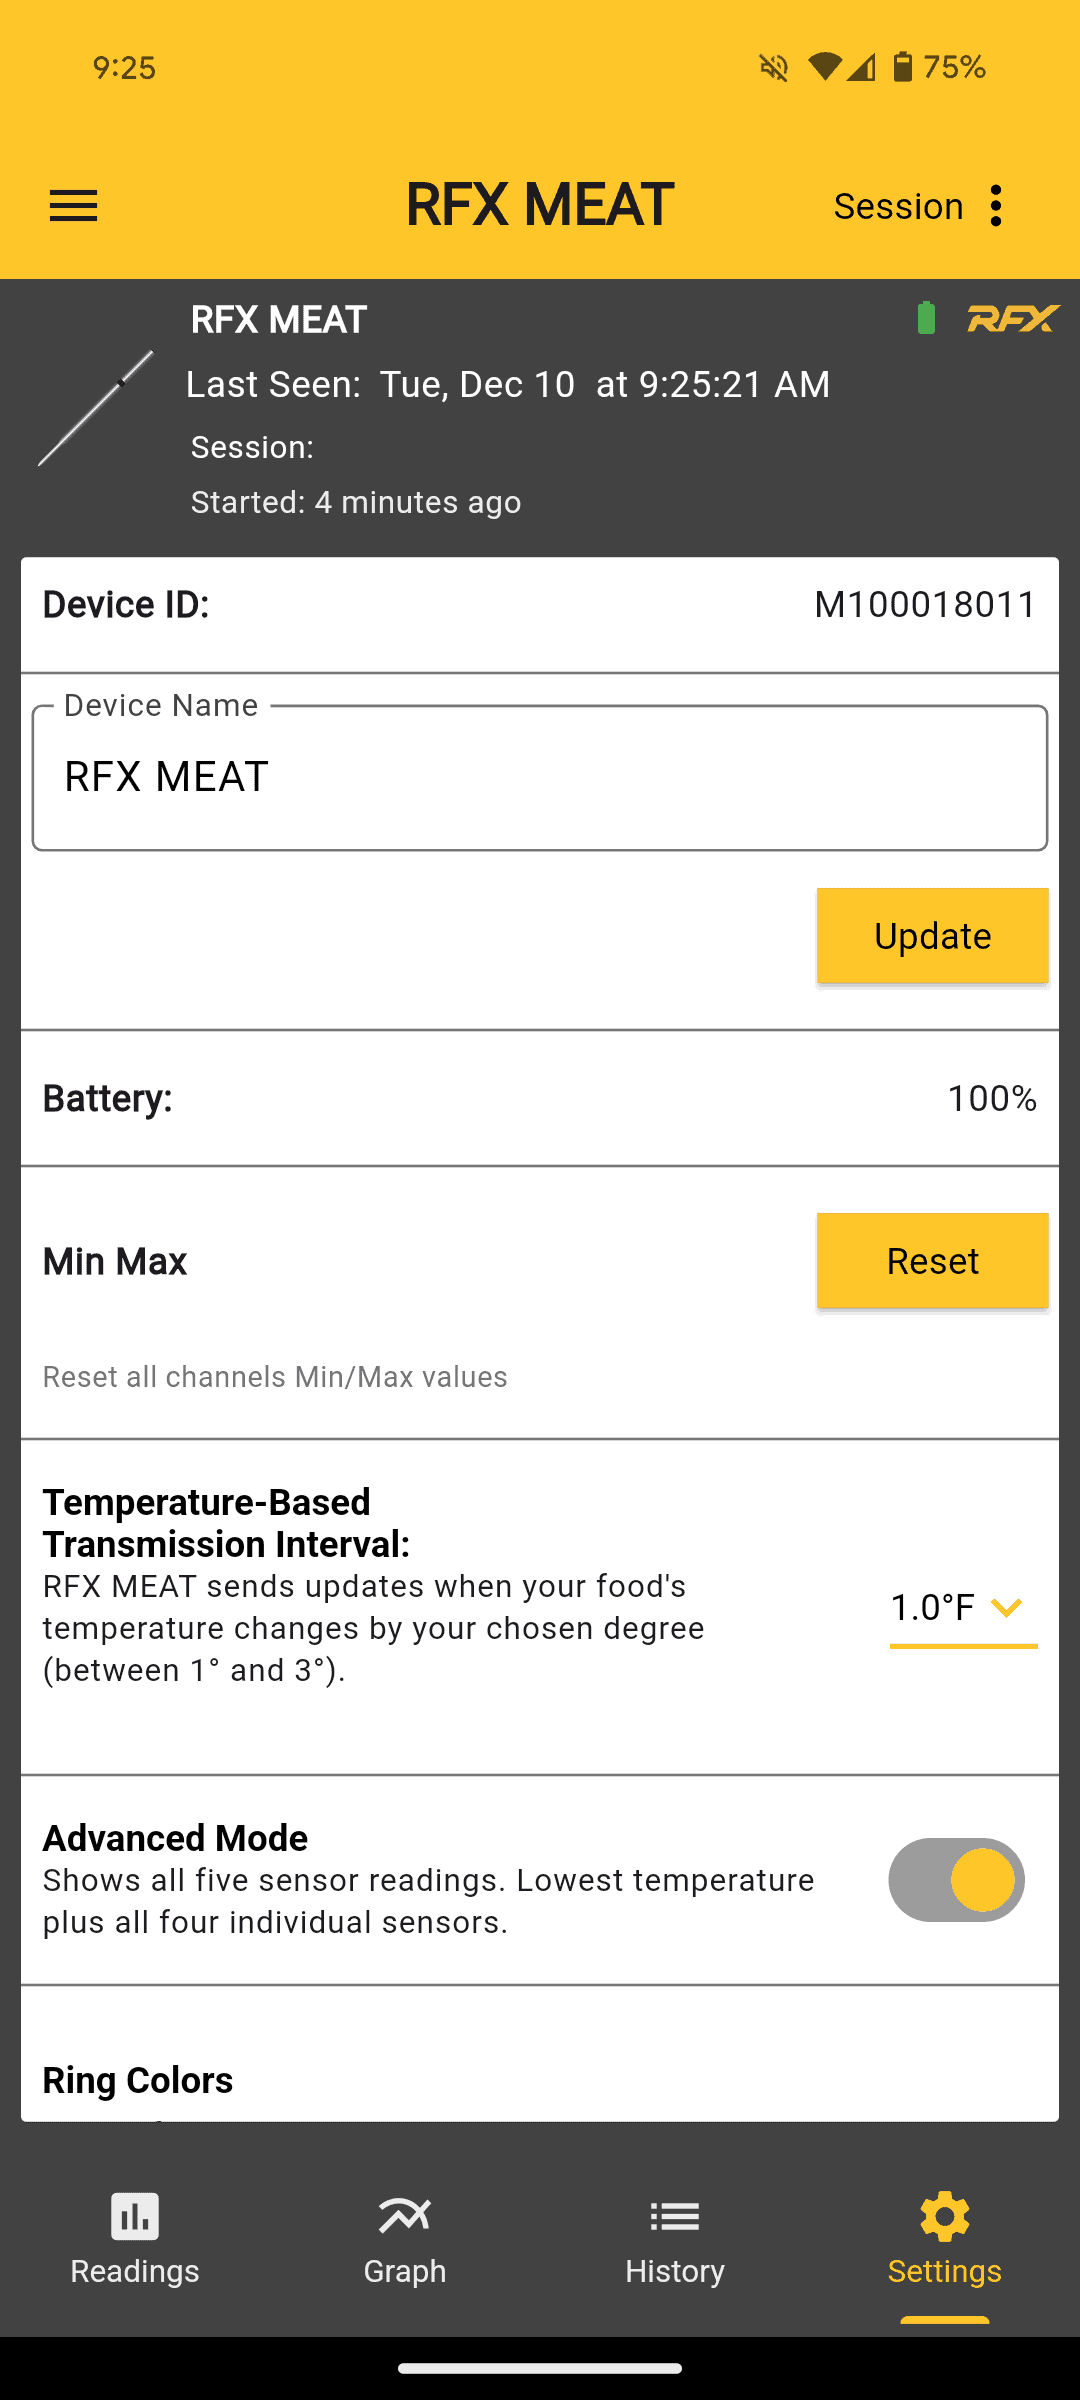
- Device ID: This will match the Device ID printed on the side of the unit by the USB-C port.
- Device Name: By default, the Device Name will show as RFX MEAT. If you’d like to change the device name, type in a name in the field and press the “Update” button.
- Battery: Current battery percentage will display if your RFX MEAT is turned on and transmitting data. If your RFX MEAT is in the charging block or not transmitting data, the percentage will display the last known percentage.
- Min Max: RFX MEAT reads the highest and lowest temperatures throughout a cook. To clear this data, tap the reset button. This does not affect High and Low alarms.
- Temperature-Based Transmission Interval: RFX transmits data based on the change in temperature of your food, meaning you can alternate between rapid transmissions for a high-heat steak sear (1°), and slow-and-steady transmissions (3°) for an all-day brisket cook.
- Advanced Mode: RFX MEAT has 4 internal sensors to help you confidently find the thermal center. The default channel displayed will show you the lowest reading from any of the 4 sensors. By enabling Advanced Mode, you will be able to view all 5 channels. These channels show each individual sensor in addition to a channel dedicated to the lowest temperature reading at each transmission interval. This setting is disabled by default.
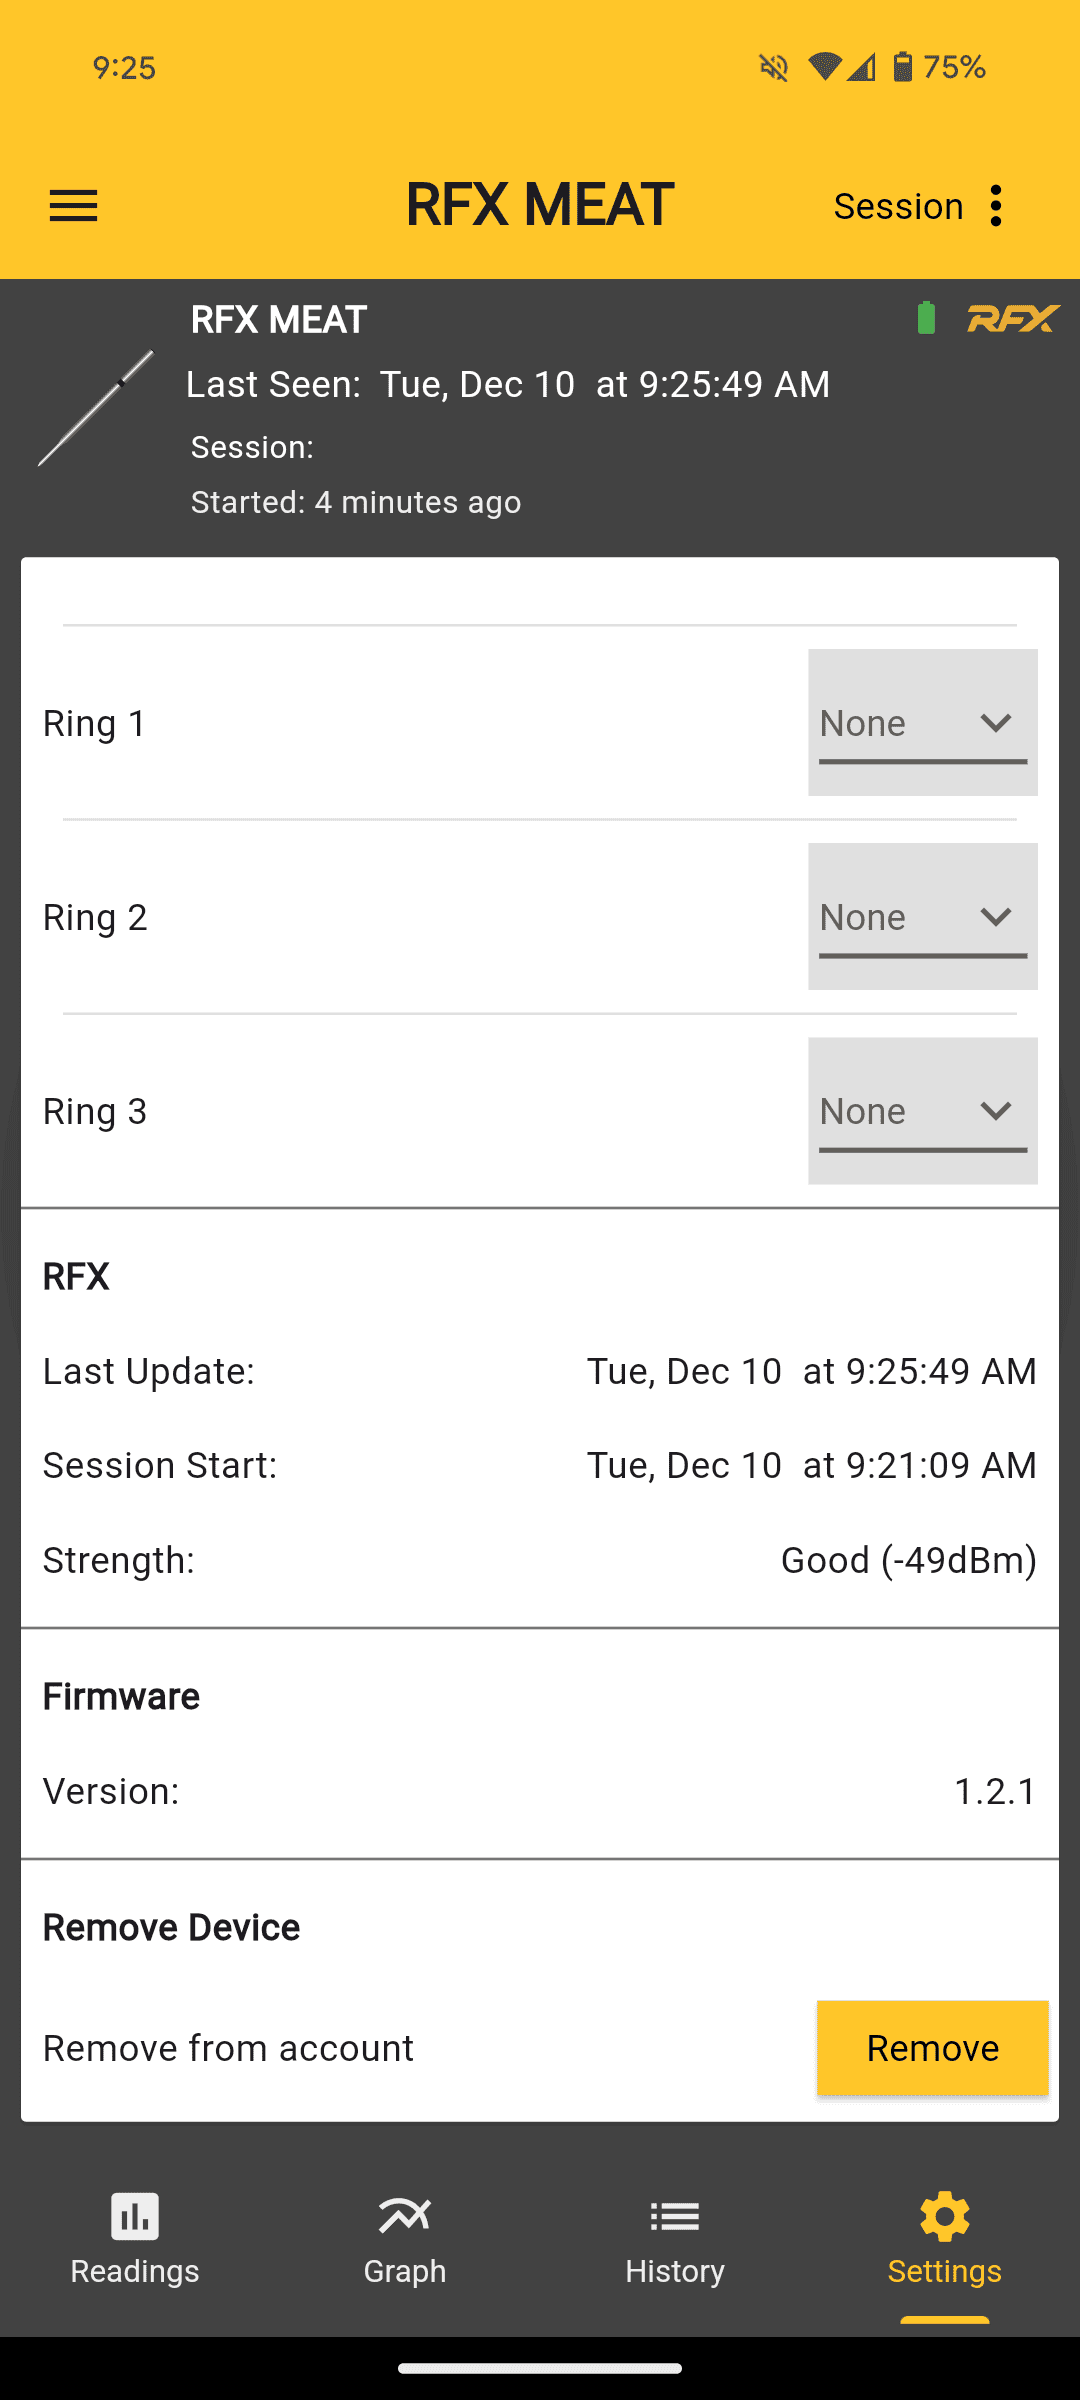
- Ring Colors: You can select up to three probe ring colors to create unique color combinations for your RFX MEAT. These colors correspond to the set of probe rings provided with your RFX MEAT.
- Firmware: This displays the version of firmware on the RFX MEAT.
- Remove Device: This button will remove the device from your account.
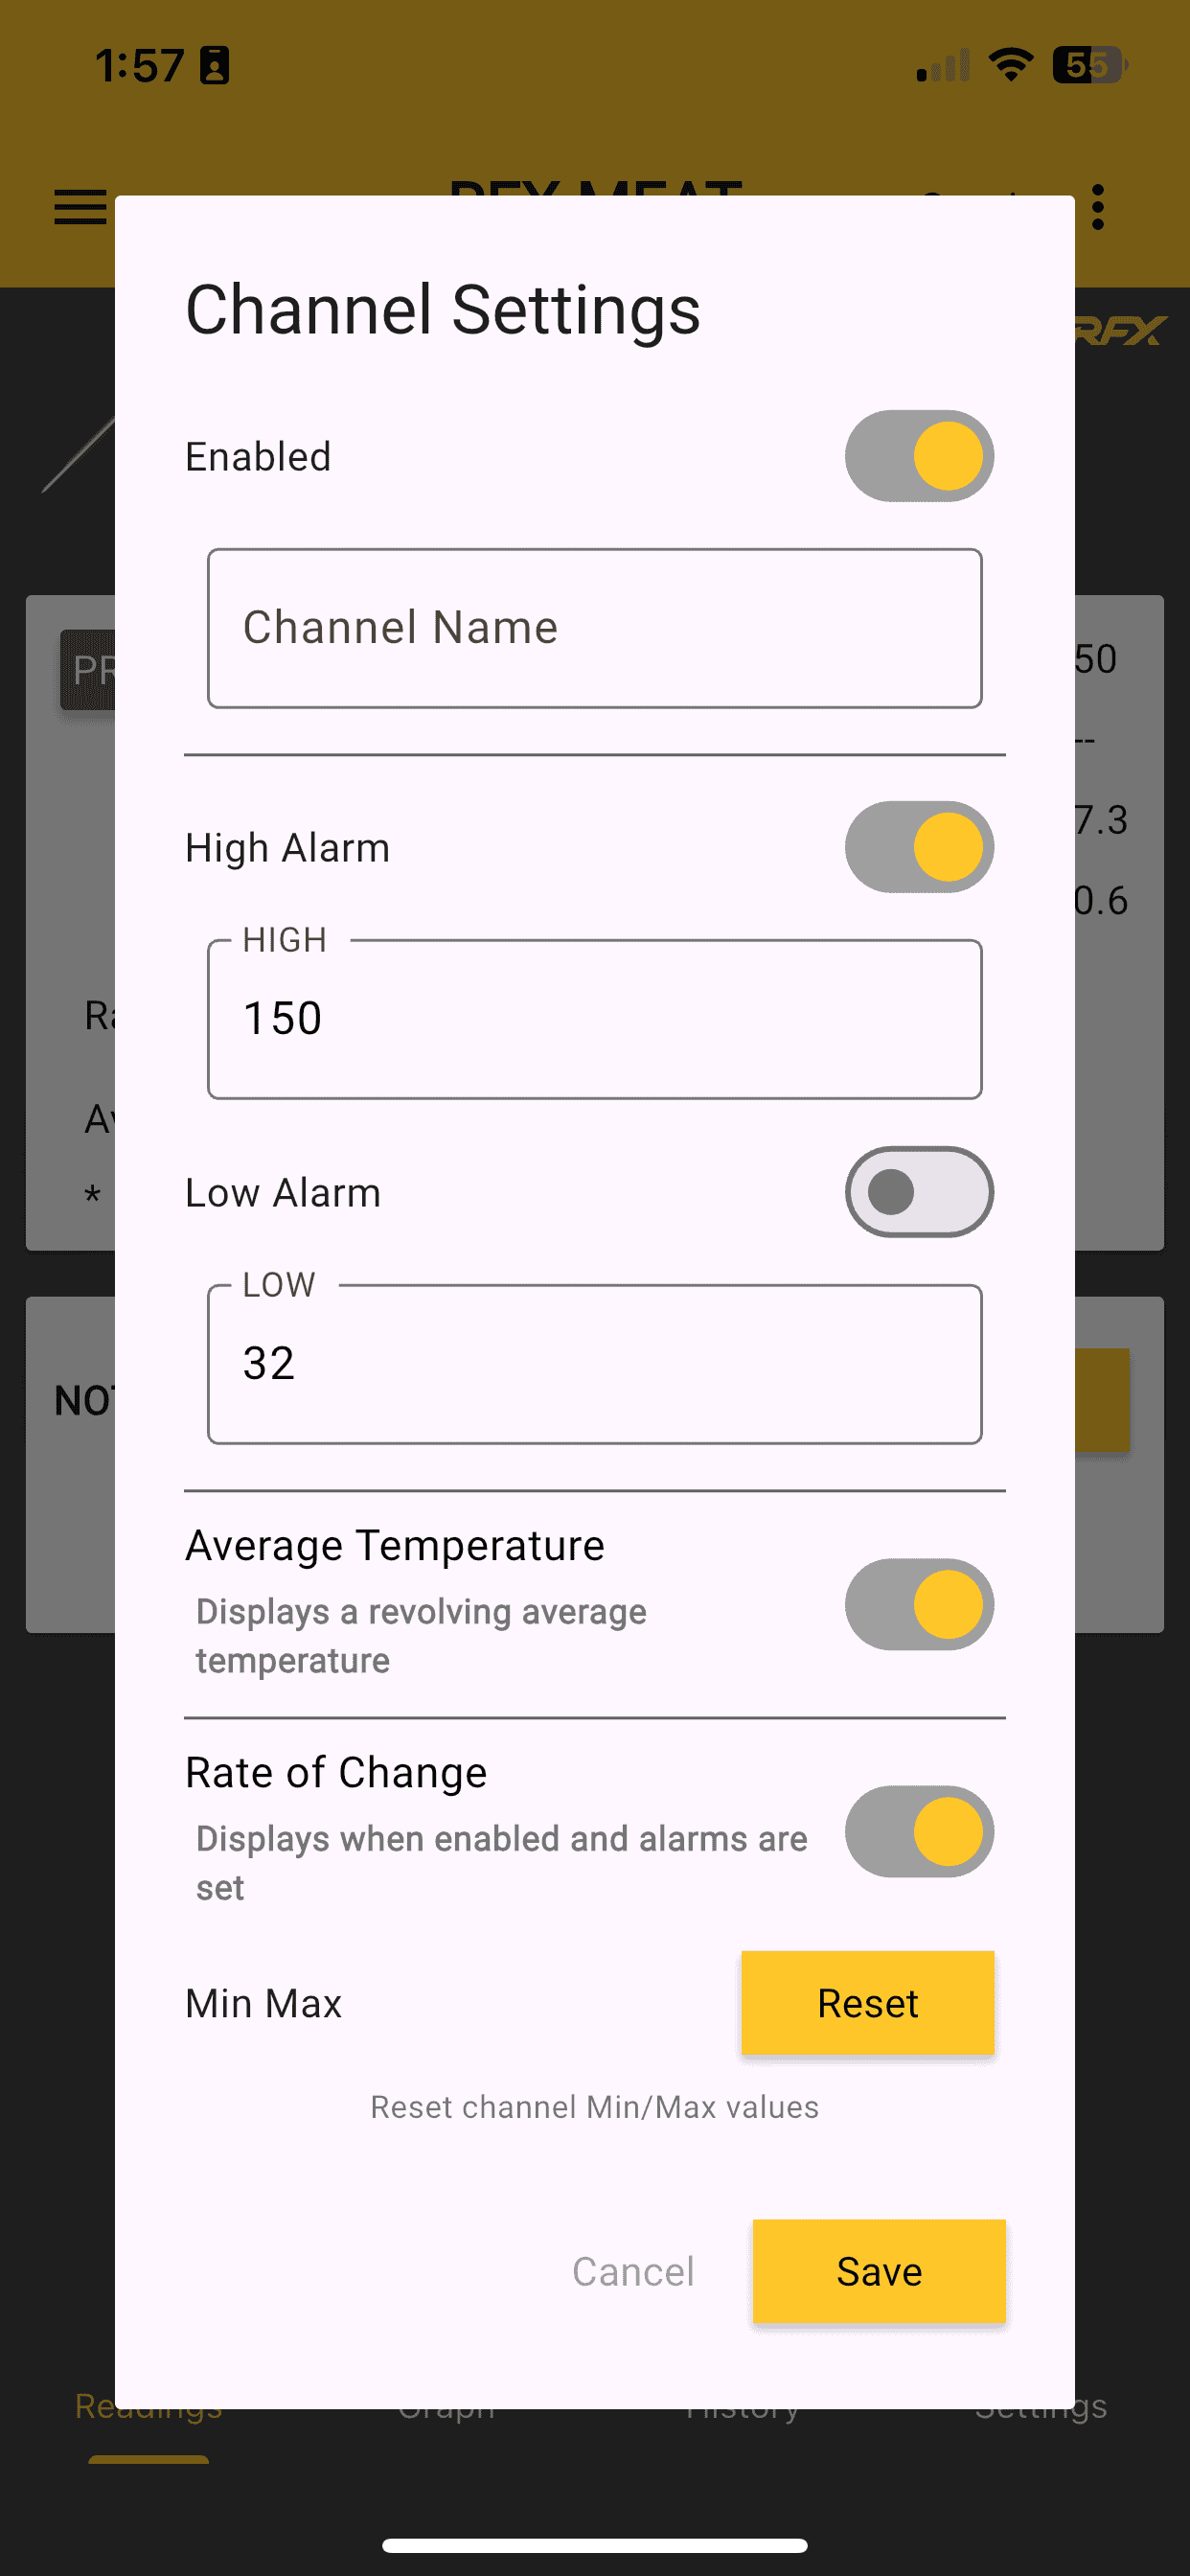
- Enabled: The channel must be enabled for alarm notifications to be sent. If you have an active session, the data will still be recorded in the session history
- Channel Name: By default there is no channel name. Channel names are limited to 40 characters. To save a channel name, you must select the save button at the bottom of the screen which will save all channel settings.
- High Alarm: This alarm will sound from your smart device when the temperature ascends above the temperature selected. For the alarm to sound, this setting must be enabled.
- Low Alarm: This alarm will sound from your smart device when the current temperature reading descends below the temperature selected. For the alarm to sound, this setting must be enabled.
- Rate of Change: This refers to how fast the temperature is changing during a cook. It’s most useful for approximating the finishing time on a long cook.
- Min Max: Your RFX MEAT reads the highest and lowest temperatures throughout a cook. To clear this data, tap the reset button. This does not affect High and Low alarms.
Using with Billows®
Supplemental power is needed to operate Billows®. A 12-volt AC adapter (included with Billows or purchased separately here) or a Billows® 12V Battery Bank is required. Using the included 5-volt AC adapter included with RFX GATEWAY will not provide sufficient power to run Billows.
Inlet Vents
Begin by closing all inlet vents not used by the fan. Use the included flue tape to seal any unwanted inlet openings. The fan will provide the oxygen needed to properly control the fire.
Exhaust Vent
Start with the exhaust vent ⅛ of the way open. This can be adjusted later if necessary.
Installing Billows on Your Smoker
1. Begin by pinching Billows’ spring arms and inserting them through the vent hole. Be sure to place the fan intake and USB-C port facing down. This prevents liquid from getting into the fan and electronics (which would cause damage).
2. Remove the yellow silicone fan plug before use.
3. Plug one end of the USB-C cable into Billows and the other end into the fan port on the fan adapter.
4. Plug the 12V AC power adapter into the power port on the fan adapter.
Important: AC power supplied by the ThermoWorks 12V power adapter or a Billows® 12V Battery Bank is required to run Billows.
5. Plug the fan adapter into your RFX GATEWAY.
Important: Avoid the side of your smoker when running the USB-C cables. The heat can melt them.
6. Plug your Pro-Series® High Temp Air Probe into your RFX GATEWAY probe port.
Important: Billows will not operate without a probe plugged into the probe port on RFX GATEWAY.
7. Place the air probe in your smoker. For best results, install the air probe in the grate clip and attach it approximately 1-inch away from your food, while keeping it near the center of the cooker.
8. Once connected, RFX GATEWAY will automatically change the display in the ThermoWorks app to indicate that Billows is connected and that your RFX GATEWAY is in fan mode. Billows is preset to establish and maintain a 250°F cooking temperature in your smoker/cooker and will start blowing immediately. You can adjust the Set Temperature in the ThermoWorks app.
NOTE: Many smokers are actually optimized for minimal airflow and fuel supply. Kamado-style smokers, for example, are so efficient that once they are up and running, they require very little oxygen and fuel to stay at a stable temperature. If you find that your temperatures continue to rise above your set temperature, you may consider using less fuel and even adding a Billows® Damper to your Billows fan. Additionally, if it tends to be windy where you are smoking, the Billows Damper can also help prevent unneeded air from entering your smoker.
1. To adjust your set temperature on your RFX GATEWAY, open the ThermoWorks app and click on your RFX GATEWAY.
2. Once in the RFX GATEWAY screen, tap on the current temperature to adjust your target temperature in the Fan Set Temp field. NOTE: You can also rename this channel to help identify which smoker you are connected to. You can also use probe rings to identify which smoker you are monitoring. Just be sure to leave these settings “enabled” at the top of the page when making any changes.
3. Hit “Save” to save the changes you made.
4. RFX GATEWAY automatically sets High and Low alarms to ±25°F of the Set Temp. They cannot be adjusted or disabled in fan mode. They will automatically reset accordingly if the set temperature is adjusted.
For best results, stack your fuel in a mound with a plateau at the top where the lit fuel will be added.
1. Fully light ½ -¾ of a chimney’s worth of fuel (depending on how hot you plan on cooking) and place the lit coals at the top of your unlit mound. Starting with less fully lit fuel will allow Billows to get the fire to temperature instead of beginning with a fire that is too big. Replace the grates, defuser plates, etc., and ensure that the air probe is in the position it will be when you begin adding food to the smoker. Close the lid/fuel door.
2. Let Billows run for 15-30 minutes to preheat your smoker/cooker and to stabilize your fire. Depending on your smoker/cooker, you may need to adjust your exhaust vent to be a little more open or closed. Once you find the optimized opening of your vent, you shouldn’t need to make any more adjustments. Billows will do the rest.
3. If you have a large smoker and find one Billows fan is not enough to hold temperatures steady, you can purchase a Billows Expansion Kit, which will allow you to add another Billows fan to your setup.
In fan mode, RFX Gateway automatically sets High and Low alarms at ±25°F of the Set Temp. These are calculated in the software. They cannot be adjusted in fan mode. For example, if your Set Temp is 225°F, your Low alarm will automatically be set to 200°F, and your High alarm will automatically be set to 250°F.
If the Low alarm sounds, check to see if you need to open your exhaust vent a little or if the smoker/cooker is running out of fuel.
If the High alarm is triggered, adjust the exhaust vent to a more closed position or ensure all other inlet vents are closed.
NOTE: Alarms will be active as long as you have enabled the Fan Set Temp. If you disable that temperature or unplug the supplemental power supply or probe, the fan will stop blowing.
Charging and Battery Life
RFX GATEWAY
For fast charging, use the included USB A-to-C charging cable and 5V adapter. RFX GATEWAY will not charge with a USB-PD or C-to-C cable. RFX GATEWAY should charge fully in approximately 4 hours with 5V and approximately 12 hours with 12V charging. You may also use our 12V Battery Bank, however it will not be fast charging due to the specific design of the charging circuitry. Battery life is approximately 24 hours unplugged. You can permanently power your RFX GATEWAY with the included 5V adapter and USB-C cable.
RFX MEAT
Place the RFX MEAT probe into the charging base with the blunt antenna end near the top of the charging base.

The charging base will indicate that RFX MEAT is charging by blinking red near the top of the probe. If there is no blinking, RFX MEAT is fully charged or is not properly seated in the charging base. It will take approximately 10 minutes to obtain 80% charge and 20 minutes to obtain a full charge from an empty battery.
RFX GATEWAY
It takes approximately 4 hours to charge RFX GATEWAY. On a full charge, it can run for approximately 24 hours. The Battery Bank or AC power is required to operate Billows.
RFX MEAT
Battery life is dependent upon transmission frequency and signal strength. At the 3-degree transmission interval, you can expect 52 hours with a 10-minute charge (80%) and 65+ hours with 20-minute charge (full battery). RFX MEAT will continue transmitting temperature data while outside of the charging block and must be reinserted in the charging block to turn off the probe.
To ensure RFX MEAT will last through your cook, consider the approximate length of the cook and adjust your temperature interval rate accordingly:
1° Interval: Quick cooks up to 5 hours
1.5° Interval: Medium cooks up to 15 hours
3° Interval: Long cooks up to 65 hour
NOTE: RFX MEAT is turned off by inserting the probe into the charging block. While the probe is in the charging block, it cannot send transmissions, including any updates to battery percentage while charging. If you would like to see the battery percentage in the app, you will need to remove RFX MEAT from the charging block. This allows RFX MEAT to sent a transmission with the updated battery percentage.
RFX MEAT Charging block
The charging block for RFX MEAT contains a 1.5V AAA Battery and will provide 175+ full charges per AAA battery. Your ThermoWorks App will let you know when your AAA battery is getting low and it’s time to change the battery.
Connection
- Ensure that your probe is fully charged. To charge the battery, simply insert the probe into the charging block and let it charge for 10-20 minutes.
- Ensure that your RFX GATEWAY is on, showing a green light (connected to the network), and within range of your probe. If it doesn’t turn on, try plugging it into power and trying again. If your RFX meat probe still isn’t showing a temperature, check the transmission interval on your RFX MEAT probe. You may need to change the temperature of the probe for it to send a transmission. Be sure to give it enough time to transmit data. If it remains inactive, try to improve the connection between the two devices by:
- Having both the probe and the antenna on the RFX GATEWAY pointing up toward the sky
- Bringing the two devices closer together
- After the RFX GATEWAY is fully charged, unplug the external power source. RFX GATEWAY is optimized to run on the internal battery and will transmit the furthest when unplugged.
For maximum signal reach between RFX MEAT and RFX GATEWAY, RFX GATEWAY should be unplugged, powered by the internal battery. AC power or a battery bank is necessary to power Billows but will impact the strength of the signal between the two devices. Typically, signal strength isn’t an issue when using Billows as the RFX GATEWAY and RFX MEAT are in close proximity to each other.
RFX GATEWAY RSSI
RSSI stands for Received Signal Strength Indicator and this indicates how well a device can receive a wireless signal from a router or access point. This value can be found on your device settings page as “Strength.” For RFX GATEWAY, this value indicates the signal strength to Wi-Fi through your router. You can use the chart below to determine your Wi-Fi strength:

|
RSSI |
Description |
Explanation |
|---|---|---|
|
-30 dBm |
Amazing |
Max achievable signal strength. |
|
-67 dBm |
Very Good |
It works as expected. |
|
-70 dBm |
Okay |
Minimum signal strength for reliable packet delivery. |
|
-80 dBm |
Not Good |
Minimum signal strength for basic connectivity. Packet delivery may be unreliable. |
|
-90 dBm |
Unusable |
Approaching or drowning in the noise floor. Any functionality is highly unlikely, move the TW device Rcloser to the Access Point or Router. |
RFX MEAT RSSI
RSSI stands for Received Signal Strength Indicator and this indicates how well a device can receive a wireless signal from a router or access point. This value can be found on your device settings page as “Strength.” For RFX MEAT, this value indicates the strength of the Radio Frequency signal to the nearest RFX GATEWAY.

|
RSSI |
Description |
Explanation |
|---|---|---|
|
-30 dBm |
Amazing |
Max achievable signal strength, RFX MEAT touching the antenna of RFX GATEWAY during setup. |
|
-40 dBm |
Pairing |
Minimum value where account pairing is accepted. |
|
-70 dBm |
Very Good |
It works as expected. |
|
-90 dBm |
Good |
It works as expected. |
|
-95 dBm |
Fair |
Minimum signal strength for reliable packet delivery. Battery life may be impacted. |
|
-100 dBm |
Poor |
Approaching the noise floor. Some packets will be lost, but occasional data loss is expected. Retransmissions of packets will increase the battery consumption, leading to shorter battery life. |
|
-120 |
Minimum |
Wireless noise floor. Packet delivery is highly sporadic, with multiple consecutive missing data points and significant battery life reduction. Move the devices closer together or remove obstacles. |
A note on foil: While RFX MEAT™ Wireless Probes are designed to maintain strong connections even through thick smokers and grills, aluminum foil can act as an RF barrier or Faraday cage. A small crinkle or fold in the foil can change and disrupt the signal. To avoid any interruptions, we recommend gently pushing the probe through the foil once your protein is wrapped. This keeps the connection strong while still sealing in all those delicious juices. If you have multiple aluminum wrapped items in a single smoker, consider orienting the transmission end of the RFX MEAT probe to the side of the smoker closest to the RFX GATEWAY.
Read more about Transmission Distance Specifications here.
Warranty Information and Technical Support
RFX MEAT probes come with a 1-year warranty, and RFX GATEWAY has a 2-year warranty. Pro-Series probes come with a 6-month warranty. You can read more about the warranty terms here.
If you have any additional questions or concerns, please contact our Tech Support team by calling 1-385-330-0591 or by emailing techsupport@thermoworks.com.


Can my husband and I both have the app in our phones and monitor the temp with the RFX meat/gateway?
It’s telling us we aren’t able to both have it in our individual accounts. Am I doing something wrong?
Thank you!
Each RFX GATEWAY or RFX MEAT can only appear on one account. But you can have one account logged in on multiple phones/devices. So you can certainly have the thermometers communicating with both of you, but only if you are both logged into the same account on the app. If you don’t want to do that, you can have the person with the gear attached to their account go to cloud.thermoworks.com and sign in, then share the session so that the other one can watch it from the cloud. If you’re having more troubles, our tech support team is waiting to help!
Hi Martin.
My wife would like to use the RFX MEAT in our kitchen oven and I would like to use it on my smoker outside (not both at the same time nor on the same day). We each have our own iPhones connected to the same home network, each with our own email addresses. How do we log into the same account? The account is currently under my email address and I am automatically logged-in when I open the app.
Love the ThermoWorks product line!
Thanks for your help on this one.
Just have her use your login info for her version of the app on her own iPhone. We do this here at the office all the time, so multiple people can keep track of cooks for various purposes (our social person uses an instance, I use an instance, etc.). YOu’ll both have the “same” app on it, with the same devices attached. She can use it on hers inside when she wants to, and you can use it outside when you want to. You may both get push notifications of alarm states, but otherwise it works fine to share one account.
Hi is there a way to store settings for different proteins to avoid having to adjust temps manually on each probe please?
Sadly not—or at least not at this time. I’ve told the development team about the idea and they are mulling it over. I can’t say it’ll happen in the future, but it is at least a possibility.
When using the RFX to deep fry where should the air temp sensor be placed? Is it to be submerged in the oil or left out?
I’d use a different Pro-Series probe instead of the air probe and put the sensor tip in the oil.The oil temp will then be sent to the app through RFX at whatever time interval you’ve set up in the RFX settings in the app.
I am wanting to use this at a steak comp with no wifi. Will I need to make a hot spot on my phone, in order to use the probe?
Yes, for now you will need to do exactly that, but keep you eye on your emails, we do have plans for an offline option for the probe’s operation. We’re working on it!
Hi, can this be submerged in buffet chafing dishes to monitor the temperature of the food being served? Thanks!
In theory, yes, it could. But I don’t think I’d recommend it. You don’t want someone to find it in their salad and throw it away or keep it. If you need buffet monitoring tools, get in touch with out commercial sales team, they have a number of interesting solutions!
I cannot connect to my wifi, and I’ve tried over and over.
My wifi shows to be both 2.5 GHz and 5 GHZ, and I notice I have some devices connected to the 2.5 and other devices connected to the 5 GHz.
I have been reentering network IDs and passwords for the past 1-1/2 hours and no joy. All I get is error messages and a red LED light on my Gateway.
I don’t know what to do next.
Can you help me?
I can’t via this medium, but contact our in-house customer care team, and they’ll get you fixed right up! 800-393-6434
I have two probes. Can I show them both on one graph?
The ability to do that is coming…we’re actively working on some cool features that we hope to have ready soon!
First off, I love my probes and I think the app works really great. However, I would love to be able to setup a cook, and be able to see approximated finish time based off of the readings so far. The whole session thing now is kinda confusing, and it feels like sometimes a new session is started automatically as soon as you take them out, and sometimes it just adds data to an old one. It would feel more intuitive if you took the probes out, put them in the meat, then in the app just hit “new session” and got the options for high and low alarm, targeted temp etc.
Thanks for an awesome system! None of these are deal breakers in any way but just suggestions on making it easier for people to use the app.
Patrick,
Thanks for the feedback! We’re always working to improve our products, so I’ll pass this up the chain. I’m glad you’re enjoying the system as much as I do. Thanks, and happy cooking!
Hi, I’m wondering if I can see the battery percentage as it charges. Thanks!
No, you can’t because it shuts off transmission as it charges. However, a 10-minute charge will get your up to 52 hours of cook time, depending on your transmission rate.