

Pan-Seared Scallops: A How-to With Critical Temperatures
There are few dishes you can make so easily that make you look more like a professional chef than pan-seared scallops. They are pure poetry when prepared properly—sweet but briny, tender and yielding meatiness with a crust browned to a butterscotch perfection. To cook sea scallops correctly doesn’t take years of culinary training; it just takes a little thermal know-how, a fast and accurate thermometer, and a good pan. Add a touch of class to your next family gathering with restaurant-quality seared scallops.


What are scallops?
If this is something you already know, please feel free to skip ahead, but there are a lot of people who don’t know about these little sea creatures. Scallops are ocean-dwelling bivalves that range across the world. They are the only free-swimming bivalves.
They use their large adductor muscles to flap their shells and expel water to propel themselves along the ocean floor. This mode of self-propulsion is great for the sea-food fan, because all that work has given scallops large, juicy muscles that are filled with sweet-tasting glycogen. But it is the free amino acids in the scallop that participate in Maillard browning, helping the meat to sear up so beautifully:
When sautéed, scallops quickly develop a rich brown crust thanks to their combination of free amino acids and sugars, which undergo Maillard reactions.”
—Harold McGee, On Food and Cooking, pg 229
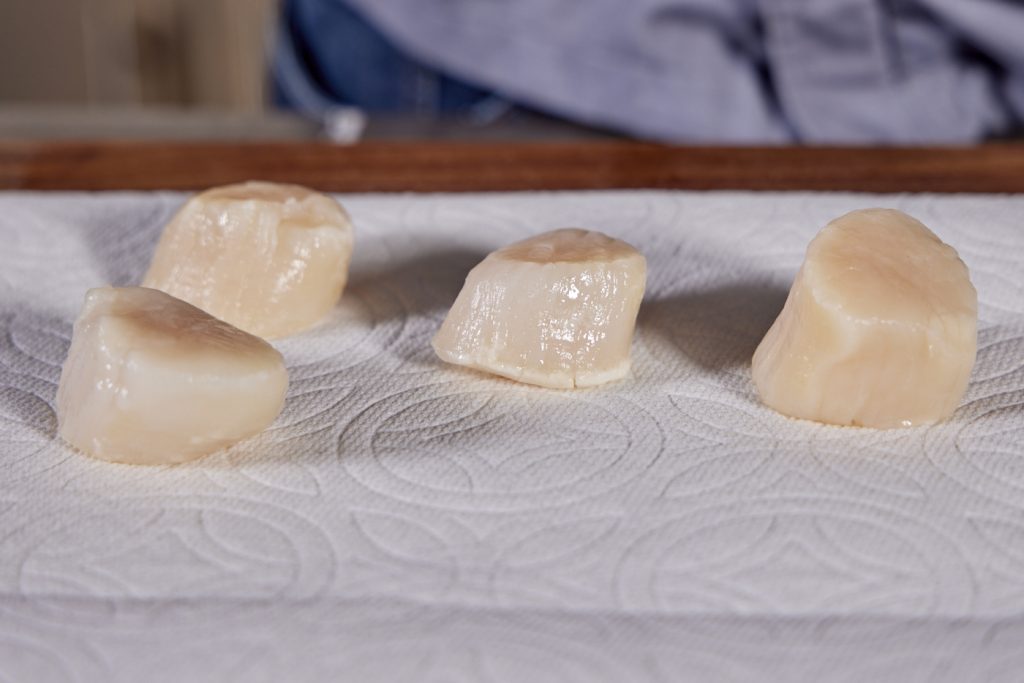
Scallops are sometimes soaked in a solution of polyphosphates to help preserve them and make them look more appealing. These are sold as “wet” scallops. While they are more likely to stand up tall rather than being slouchy with this method, they will have a more diluted flavor and will give off a lot of water in the pan. You should seek out “dry” scallops. They may not stand up quite as nicely and may have a bit of an orange-to-pink tinge to them, but when it comes to taste, they are by far the higher quality scallop.
How to cook scallops
While you can bake scallops or use them in soups or any number of other preparations, the classic—and, really, the best—method for preparing scallops is a high-heat sear. As McGee said, this will give your scallops a crusty Maillard exterior that is a prize on any table. But getting a perfect scallop doesn’t mean just picking one up and tossing it in a pan. There’s a little prep that needs to be done first.
Preparing the scallops
As you are preparing to cook your scallops, sort through them individually and look for any that still have the “foot” attached. This is the “catch” muscle that is used by the scallop to hold its shell closed. It is filled with connective tissue and is quite tough. This muscle should be removed by simply pulling it away from the main adductor muscle. (If it pains you to throw away a piece of meat that you’ve probably paid good money for, keep all the feet and freeze them. Next time you make a fish stock or fish soup you can simmer them with the liquid to extract their flavor. Risotto, anyone?)
Before you put your scallops in the pan, you need to pat them dry. Use paper towels or a lint-free cloth to dab them off, especially on their flat surfaces. You do this to encourage a good sear: if a wet scallop goes into a pan, all the heat will be channeled into evaporating the water before the scallop has a chance to cook. You want that high heat to go toward the Maillard browning. So pat those scallops dry. You can de-foot them all and pat them dry, keeping them on a plate in the refrigerator while you cook them in batches, or dry them individually as you are ready to put them in the pan.
Searing scallops
One key to good scallops is a good pan. By “good pan” we mean a cast-iron or black-steel pan. A high-quality stainless steel pan (with tri-ply construction in the base) will do in a pinch. These pans are important because of their thermal properties. They have high heat capacity, which means they can hold a lot of heat energy in them, and their construction allows for much more even temperatures across the surface of the pan. The high heat capacity of your pan allows you to get a good sear on your scallops. When you put that cold, moist piece of food on the pan, it’s going to start sucking heat out of the pan at an incredible rate. You need high heat capacity in the pan to replace what’s already gone into the cold scallop to keep the sear moving forward. Cast iron and black steel do that best.
Once you have a good pan, you need the right oil. You’re going to be cooking these little beauties at temperatures above 450°F (232°C), so you need an oil that can withstand that kind of heat. Clarified butter is best, but peanut oil or rice-bran oil are good candidates, as well. (Don’t use whole butter. It will burn and smoke like mad. And olive or canola oil will begin to break down at those temperatures.) If your oil is burning—or even flash combusting!—your scallops will not taste good, so pick whichever high-heat oil you like best.
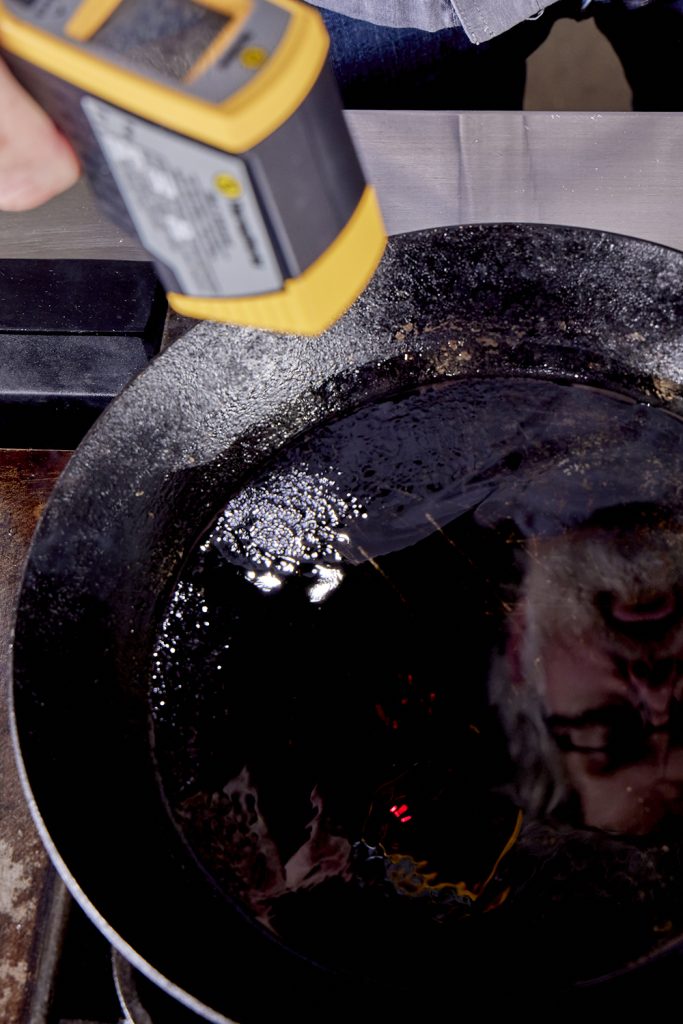
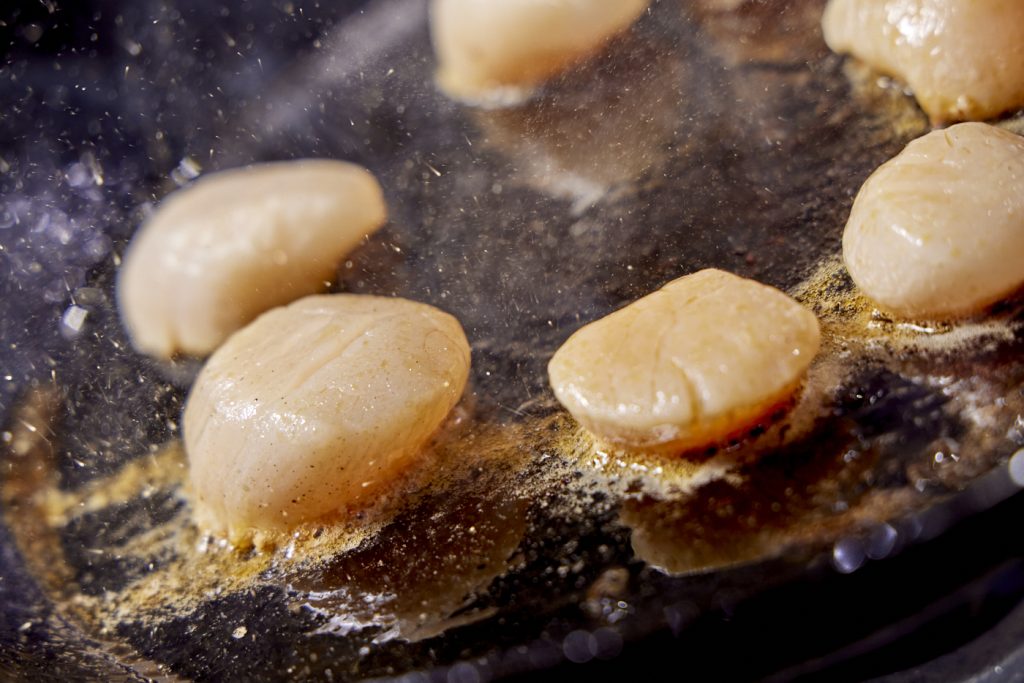
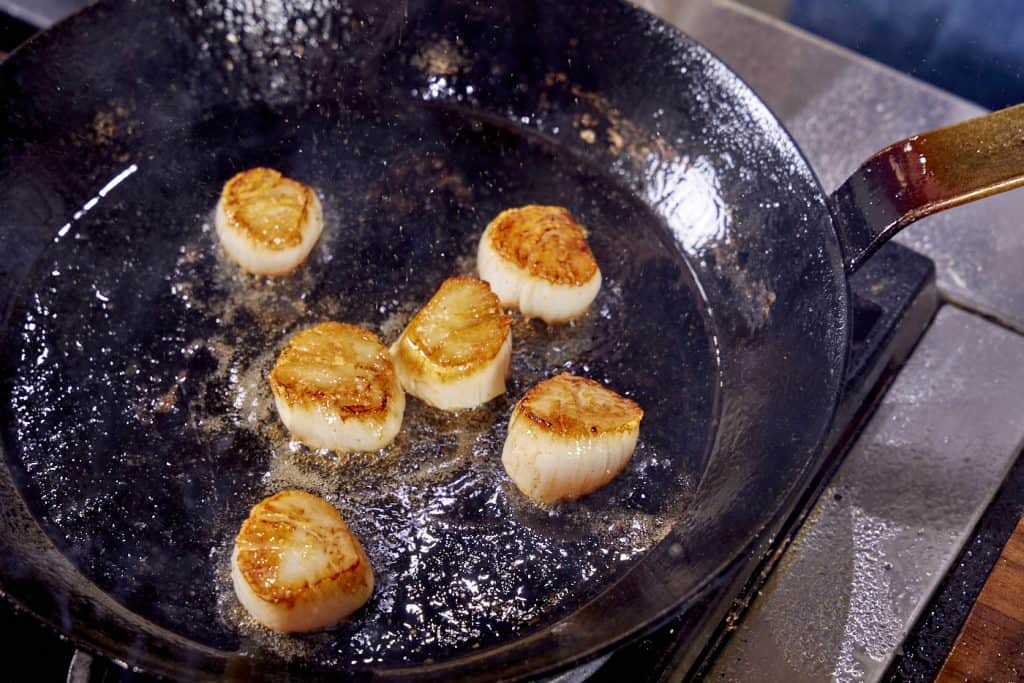
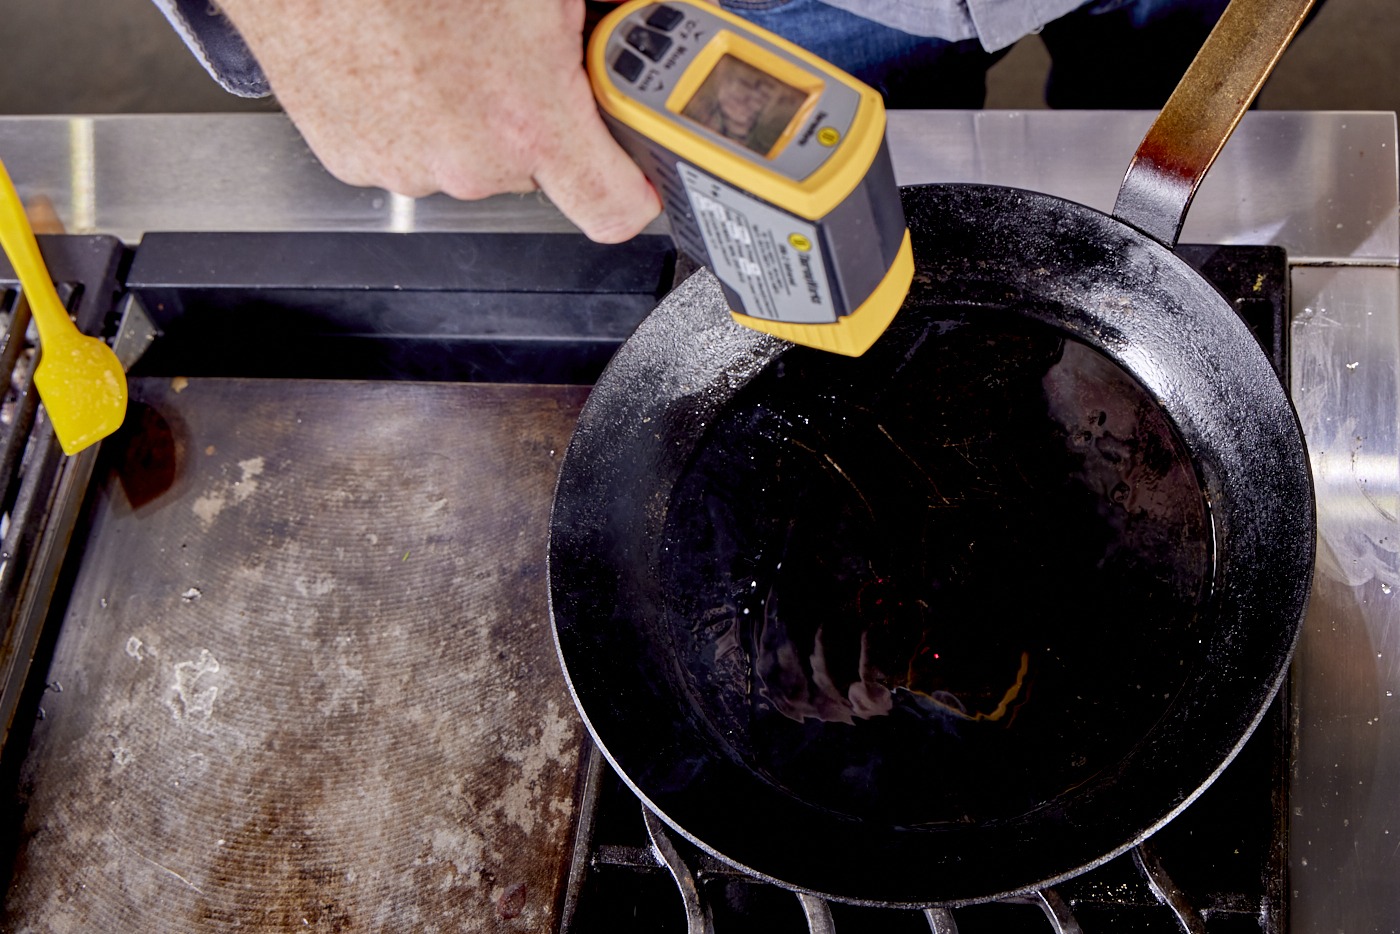
Finally, as hinted above, searing scallops is about high heat. You’ll want to heat your pan to around 450°F (232°C) or higher before you add your scallops. Heat the pan over medium-high heat, adding the oil at the beginning of the heating. Check the temperature of the pan and oil with an infrared thermometer like the Industrial IR with Circle Laser (IRK-2) as the oil turns shimmery. Once you’ve reached a high enough pan temperature, carefully add the scallops to the pan. And let them sit there.
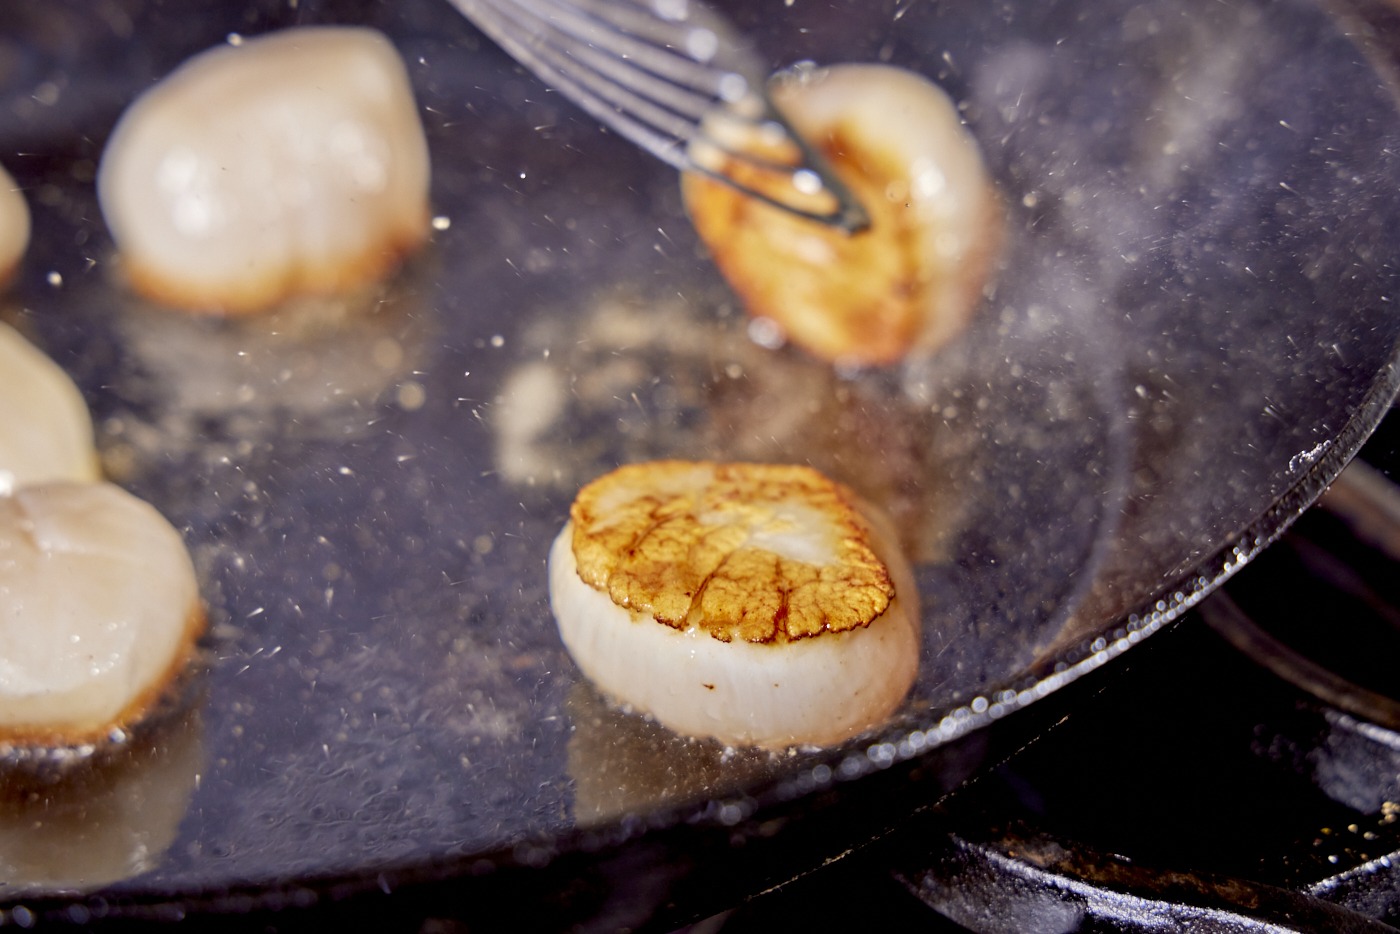
Resist the temptation to check them for browning for at least 1-2 minutes. You want to allow your scallops to come up to temperature and develop good contact with the hot pan. Your scallops may stick to the pan, at first, or they may not. If they do, wait for them to release on their own, as that release will indicate that the proteins have restructured themselves to form a nice crust, rather than trying to cling to the pan. If they don’t stick, tip them to one side briefly to allow more hot oil to run in underneath them before tipping back down flat—the oil will help facilitate the sear. Either way, check them after 1–2 minutes to make sure that they are browning and not scorching. If they are still pale, let them keep cooking until properly seared. If they are golden brown and crusty, flip them over. After flipping, be aware that your pan is getting pretty hot by now. If the oil starts to smoke a lot, turn your heat down some while you finish cooking the scallops.
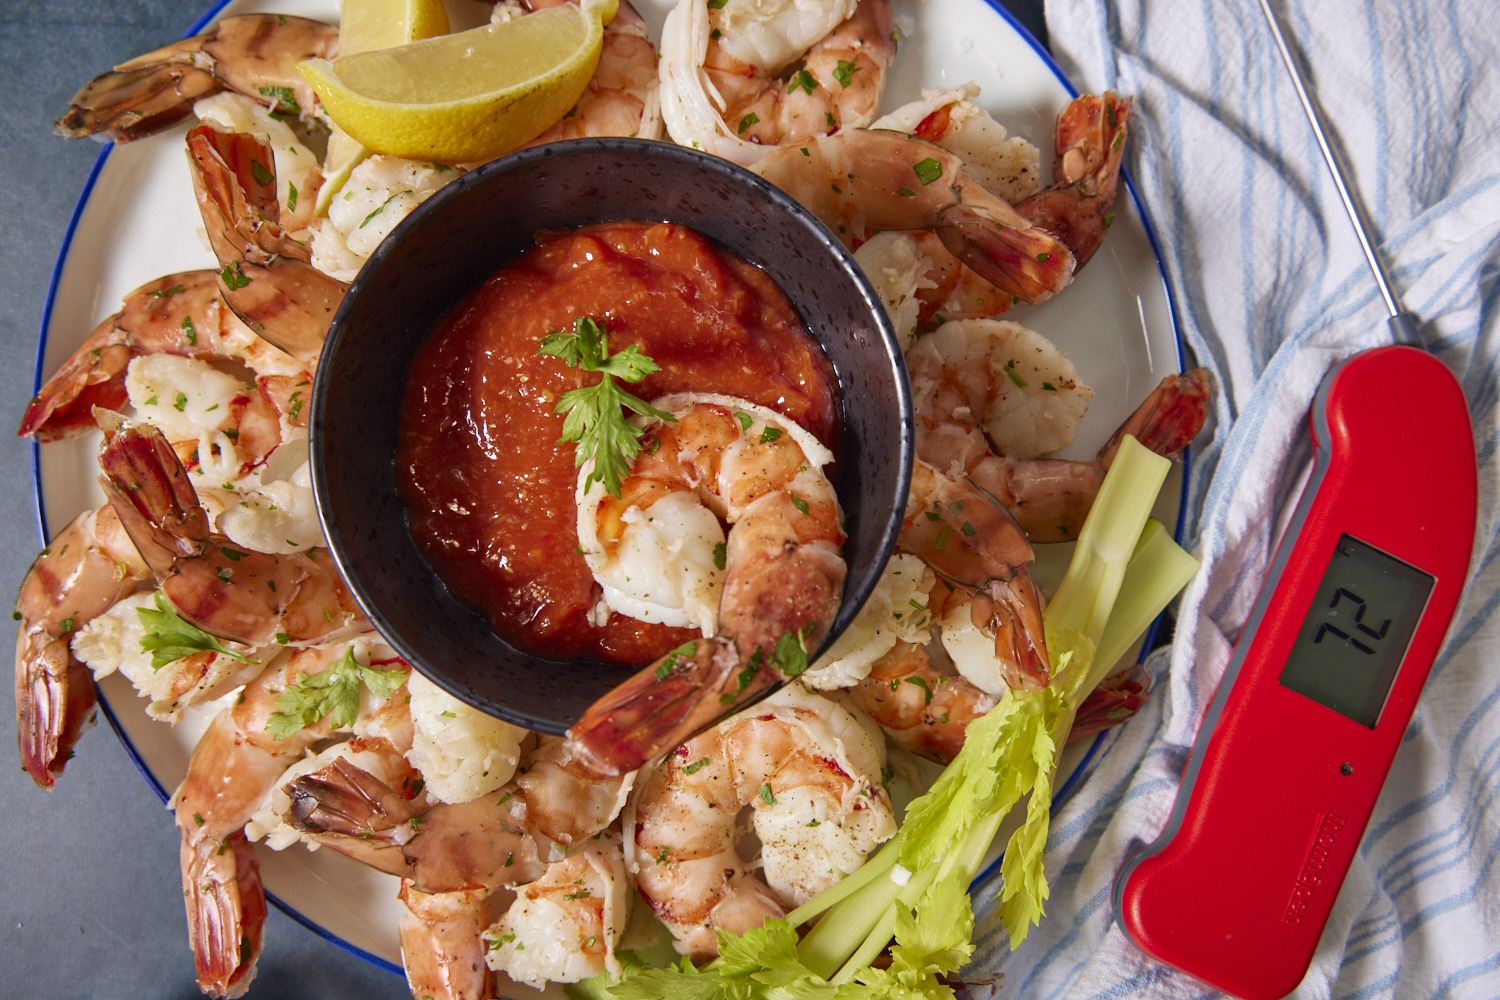
Pull temps for scallops
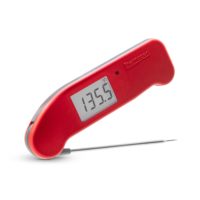
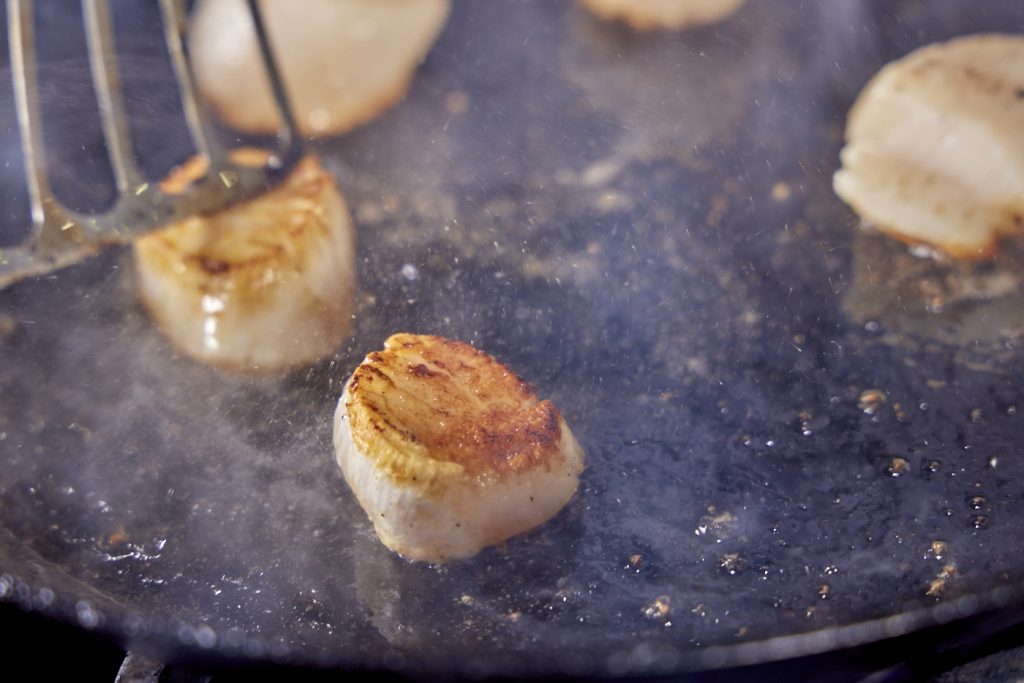
Once you’ve flipped your scallops, it’s Thermapen ONE time! The second side of the scallops will continue to sear, but you should focus on getting the right internal temperature that will be tender, not rubbery to the bite. The critical pull temperature you’re going for in when searing scallops is 115°F (46°C).
After searing a few batches, we determined that scallops are perfectly cooked when their centers reach 115 degrees. Because scallops are so small and are usually cooked over high heat, carryover cooking will add another 10 to 15 degrees, for an ideal final temperature of 125 to 130 degrees.”
—Cook’s Illustrated, Sept., 2011
That degree of carryover may seem extreme in such a small, little muscle, but remember how high a heat you’re cooking over! There’s enough thermal momentum to raise the temp significantly after the scallops leave the pan.
Allow the flipped scallops to sit and cook, and probe them occasionally with your Thermapen. Use the pull-through method, inserting the Mk4 deep into the scallop and slowly withdrawing it while watching the display. You want the lowest reading you see to be 115°F (46°C). Each individual scallop should be checked with your Thermapen ONE and allowed to cook until it reaches that target temp. Thermapen ONE’s speed allows you to cook more scallops without overcooking, as you can check each one’s temperature so quickly.
Once your scallops are done, get them out of the pan and onto a plate as soon as possible. If they overcook, they become rubbery and chewy, in contrast with the tender, almost silky feel they get when they are done right.
Scallops are professional-looking food that you can absolutely master at home, and they literally just take minutes to cook. Make use of the critical pull temperature—115°F (46°C)—to cook them just right. By controlling the temperatures and monitoring them, you’ll quickly develop the skills you need to out-cook even your favorite restaurant!

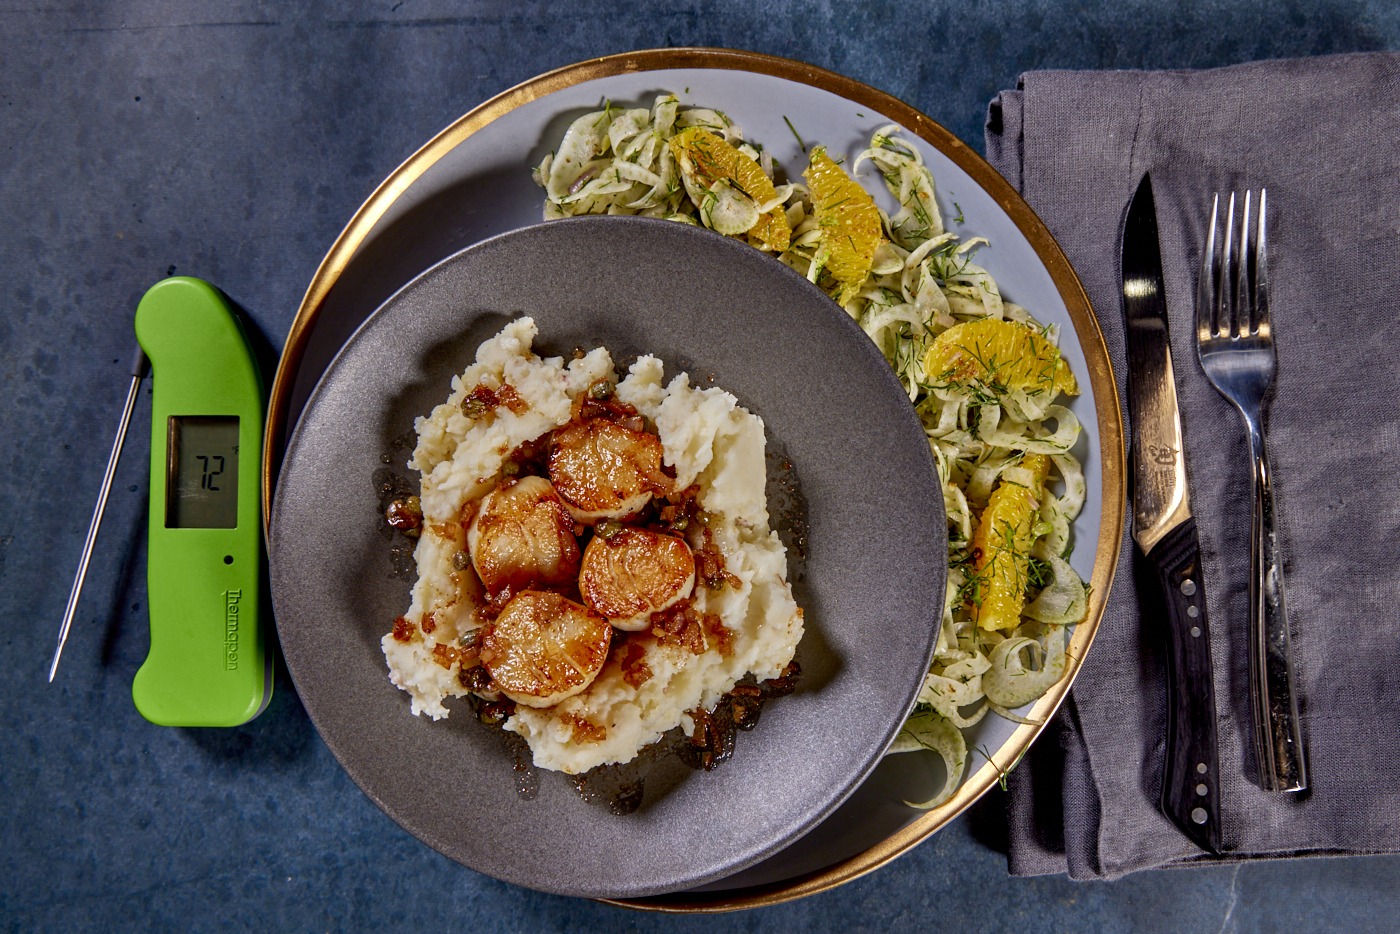
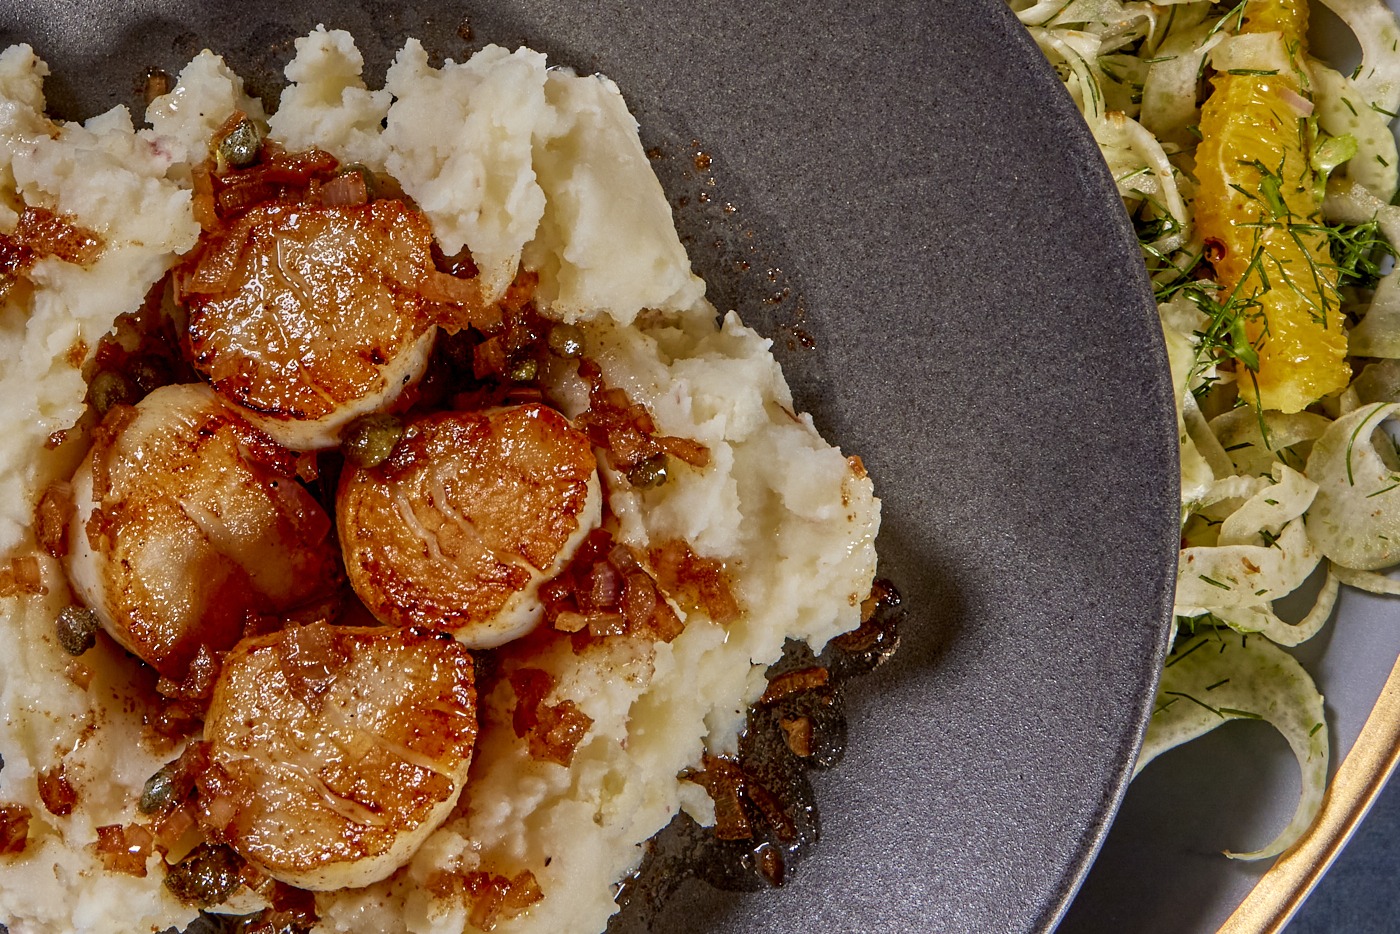
Pan-Seared Scallops Recipe with Brown Butter Caper Sauce


Ingredients
- 6 Tbsp 3 ounces unsalted butter, made into browned butter
- 2 Tbsp clarified butter peanut oil, rice bran oil, or other high smoke point oil
- 1 pound sea scallops about a dozen
- 3/4 cup dry white wine
- 2 Tbsp capers drained
- 1 shallot finely diced
- 1 strip of fresh lemon zest
- Salt and freshly ground black pepper to taste
Instructions
- Prepare the scallops by removing any feet and patting dry.
- Heat the clarified butter/oil in a cast iron or black steel pan over medium-high heat until it reaches 450°F (232°C).

- Add scallops to the pan—as many as you can handle without crowding them. Work in batches if necessary.
- Allow the scallops to cook for 1-2 minutes before checking underneath them to see how brown they have become. If they are not yet well browned, continue cooking.
- When scallops are golden brown on one side, flip them.
- Allow the scallops to cook on the second side while monitoring their temperature with a fast and accurate thermometer like Thermapen ONE.
- Once the lowest measured temperature in each scallop reaches 115°F (46°C), remove it from the pan and set aside on a platter. Repeat until all the scallops are fully cooked, rinsing the pan between batches.
Make the sauce:
- Pour out the excess oil from the pan and place it over heat again.
- Add the fine shallot, the capers, and the lemon zest. Sauté for a few moments to slightly color the shallot.
- Carefully pour the wine into the pan to deglaze it.
- Simmer the wine down to about a tablespoon of liquid
- Add the brown butter, pepper, and salt to taste. Let this cook for just a few moments and pour into a container.
- Plate the scallops and drizzle with the sauces, being sure each dish gets some capers. Serve!
Thank you for the very informative article on Scallops. They are one of my most favorite seafood.
DJC
I really appreciate these blogs I receive from Thermoworks. Great tips.
Regarding the above recipe, I’d like to get it straight:
–Sear and cook a batch of scallops then set aside that batch on a plate.
–Next step is preparing the wine/butter sauce that is put into a container.
–Cook the rest of the scallops.
–Finally, combine all batches of the prepared scallops and drizzle with the sauce.
Just wondering why all scallops aren’t cooked at once.
Thanks so much.
That would be fine, too, but you need to wipe out the pan between batches, otherwise you’ll get burnt scallop dregs.
You can cook them all at once ..depends on the size of your pan…you don’t want to crowed them otherwise your like steaming them.
Too high of a heat! Whenever you see blue smoke the butter/oil is over heated and bitterness occurs. Oh god you never make a sauce with liquid in a steel or cast iron pan…bad flavors of steel will be in the sauce. Too many food channel bad methods are learned by cooks these days!
There is a mistake in either the article or the ingredients list for the “Pan Seared Scallops” . The article says “olive or canola oil will begin to break down at those temperatures.” But then the ingredients list says “2 Tbsp clarified butter, canola oil, rice bran oil, or other high smoke point oil”
So one says don’t use canola oil, the other says use it. I don’t which is correct.
That error has been corrected! Thank you. Don’t use canola oil.
Recipe omits number of servings. I went back to SimplyRecipes.com and the recipe there states “3-4 servings”. Useful information to have.
Thoughts or alterations to this recipe using Frozen Scallops when no fresh are available?
Thank you, very informative!
Dwayne,
I actually used frozen scallops! Thaw them gently under cold running water in a sealed bag so that they don’t absorb extra liquid. They’ll work great!
What is a “black pan”?
Angela,
A black-steel pan. You can find them at many quality cooking stores. They are made of carbon steel and are excellent heatsinks. Treat them like cast iron when it comes to cleaning and storage.
Great technical points for perfect scallops. I’ve always wondered about pan temperature and scallop internal temps. Luckily I just got the IR GUN to go with my Pen. I am surprised that you “dared” to deglaze your carbon steel with wine. Mine are likely not seasoned enough for that yet.
I know deglazing in the black-steel pan is controversial, but that’s where the flavor is! I don’t mind re-seasoning. It’s a tool, not a venerated object, so it better pull its (considerable) weight! Thanks for reading, I hope your scallops turn out great!
It’s been a while. Trying it again in my carbon and >gasp< deglazing
Pictures at 11 😊
Exciting! I hope it went well!
There used to be a theory that wet scallops were difficult if not impossible to brown (mallards reaction) without assistance such as Wonder flour. Is that still a prevailing thought?
I’ve never had a problem browning them.
Downeast Dayboat Scallops are top notch and available for home delivery. Pricey but wonderful!
Excellent “how to properly cook”
Now I will make scallops again!
Thank you!
Thank you for the excellent article.
Would avocado oil be a good alternative oil to use as it has a higher smoke point?
My own personal comment is to never use Canola oil for anything!! Canola oil is the most processed oil available; it was originally made for use on machinery. There are an increasing number of individuals who have a sensitivity/intolerance/allergy to Canola oil. I suspect these people are the “canaries” who sending out the alarm about this food product. There are so many better and healthier oils to use and they are worth the bit more expense.
Again, I learned a lot from this article and thank the author.
Thank you for the compliment, and yes, avocado oil should work fine. We often reach for grape seed oil here, but that’s just a personal preference.
Can I use a Black-Steel pan on my glass top range without scratching it?
If it’s an induction cooktop, you can even put a silicone trivet under the pan and still cook! For a glass top electric coil stove, you can do it without scratching if you are careful, just like with any pot.
What is the best way to keep cooked scallops warm while cooking an additional batch?
Tent them with some foil on a plate. You don’t want to risk the heat of even a warm oven, frankly.
Ummm… There’s something funky with the first part of this article. Glycogen is a large, branched polysaccharide composed of glucose monosaccharides. It doesn’t contain amino acids. Only free mono- and disaccharides and free amino acids (i.e. not ones that are part of polysaccharides or polypeptides, respectively) can participate in the Maillard reaction.
I did my Maillard knowledge was not that strong, obviously! I’ll make an edit that i hope fixes the problem.