

Smoked Brisket: A How-To Primer
In my earlier life, I was a musician and a physicist. Music, science, and food are still my great loves in life, but that initial training has made some things in cooking more difficult. You see, in physics there is a right answer. You can do the math a few different ways, but even within those varied pathways, there are rules that point the way forward. Music was the same: follow the conductor, play the notes as written, remember the rules of harmony and music theory. Jazz was not my forte.
This personal reliance on rules and direction has caused no problem for me with “classical” cuisines in cooking. (Read: “western European cooking.”) But then there is barbecue, which is—more than any other mode of cooking—improvisational jazz.
Line up three expert pitmasters and grill them on technique, temperature, smoke, wood, fuel, wrapping, resting, or bark and you’ll get three different answers. You’ll pick up on themes—chord changes, if you will—but not “right” answers. At first, it was hard for me to adjust to. But now I understand that the placement of the water pan, the time you spritz or wrap, whether you use charcoal or plain wood for heat, or the sugar content of your rub—those are all stylistic differences, flairs and trills on a theme with one persistent beat: low heat plus time, low heat plus time, low heat plus time.
In the end, the most important factor in your barbecue success is the final state of the meat’s collagen/gelatin transformation. Not enough time in the melting-zone and you get tough, chewy, regrettable BBQ—the kind your uncle makes that he’s so proud of and that everybody eats out of politeness. Too much time in the melt zone and you get fall-apart BBQ that can start to dry out and that, while still tasty with a little sauce, isn’t going to win any awards.
In today’s post, we intend to walk you through the whole brisket process, including some of the methods that are used by amateurs and professionals alike to help you navigate your way to some fantastic brisket. After all, May is National BBQ Month (did we mention that?). And you can do this.
Contents
- Brisket Difficulties
- Defining brisket perfection
- How to smoke a brisket
- Cooking results from our trial
- Conclusions
Difficulties of cooking beef brisket
Two muscles: what is brisket?
One of the reasons that brisket is known as the king of BBQ meats—aside from the fact that it’s packed with delicious, almost sweet-tasting fat—is that it’s hard to get right. To make perfect brisket, you have to surrender: you do what it says for 8–16 hours. Not what you planned. Stoke the coals at 3 a.m? Do it. Stay up an extra hour to let the bark set before you wrap? Yes. Put the potato salad back in the fridge and try to think of things to talk about with your brother-in-law for the 2 more hours than you expected to get this thing just right? That’s the price of perfection. Those that master brisket are great pitmasters, indeed. But they have also learned how to be patient.
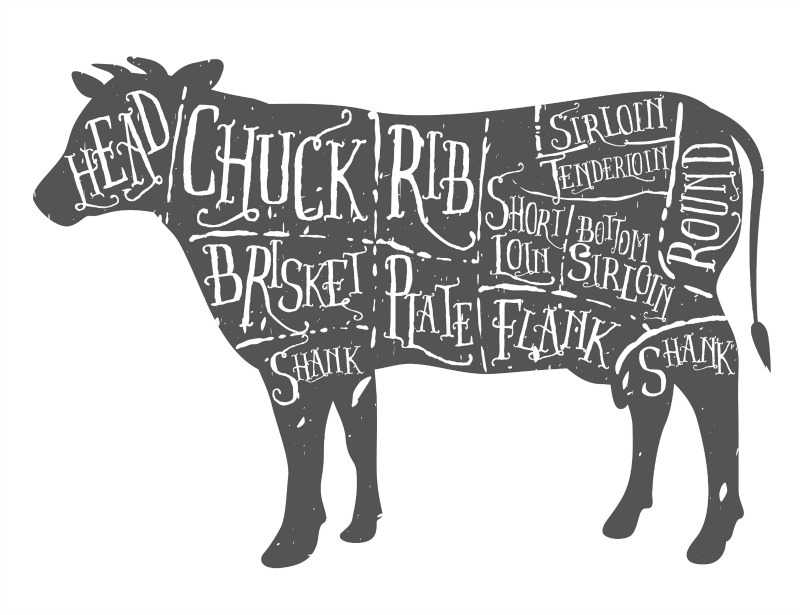
What makes brisket so difficult to cook, though? The very muscle itself. A whole brisket (full packer) is actually composed of two different muscles: the flat and the point. They are separated in the brisket by a thick layer of fat (the deckle) and cook at different temperatures. The flat is relatively lean and prone to overcooking, while the point is marbled with fat, which requires long cooking to render properly. Add to this the fact that the point is stacked on top of the flat—well, really, half the flat—and the thermal conundrum of how to properly cook brisket comes more sharply into focus.
For instance, where should we put the thermometer? If we place it in the true thermal center of the meat (between the point and the flat), we’ll overcook the flat. If we cook the point to the standard BBQ pull temp for tough meats—203°F (95°C)—the flat will likely be toast. (Spoiler: put it in the flat.)
Toughness/tenderness and time
But the two-muscle problem isn’t the only puzzle the brisket demands we solve. Brisket is also—thanks to its active position on the breast of the cow—positively packed with collagen. This connective tissue must be rendered into luscious gelatin so that the meat is tender, not tough and rubbery/chewy.
Collagen dissolution is, sadly, not just a factor of temperature but also of time. Would that we could just stick a thermometer in the meat and blast it at high heat until it reached 203°F (95°C)! But getting there in an hour will only give us a brisket that is so rubbery that you could almost dribble it down the street. This is why our theme of low heat plus time is so important. And it is why brisket cooking often involves late nights with a flashlight. We have to give the collagen time to break down.
Stall
For those of you that don’t remember your protein science, when meat fibers begin to cook, they contract and expel water that is otherwise bound up in them. This is what causes meat to dry up when overcooked. In the case of brisket, as the muscle fibers contract and expel their water, that water acts like perspiration, causing evaporative cooling to take place on the surface of the meat. This cooling literally causes the cooking of the meat to stall. The stall starts at about 150°F (66°C) and runs up through about 180°F (82°C), and those thirty-or-so degrees can take upwards of six hours to get through. For new barbecue cooks, this can be a near-panic inducing time. Why isn’t my brisket cooking?
This stall allows you to practice the art of barbecue patience. As long as you maintain…temperature, your brisket will eventually move beyond this stall, and the meat temperature will rise again”
—Will Fleischmann, southern pitmaster
To make matters worse, the stall starts just below the temperatures where collagen dissolution begins. If only there were some way to get past the stall and into collagen dissolution!
There is. In fact, most of the rest of this post will be devoted to defeating the stall—and the costs of such a victory. But there are a few more things to consider first.
Parameters of brisket perfection
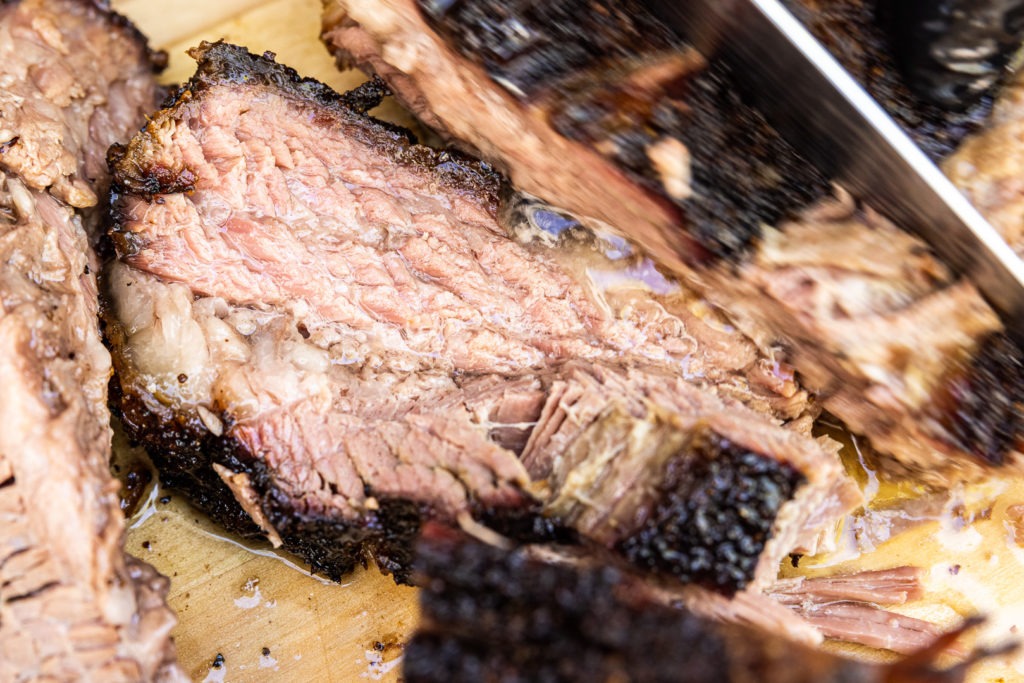
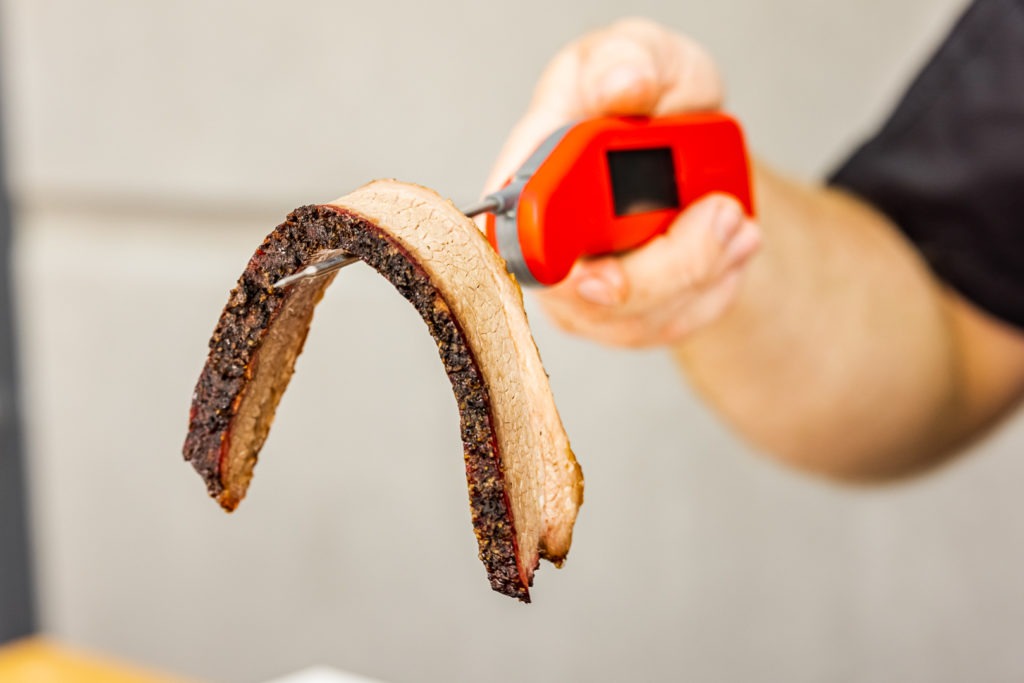
Perfect brisket means different things to everyone, but judges for the Kansas City Barbecue Society look for a very particular brisket doneness. They use what is called the pull test to check for over/undercooking of brisket. For the pull test, a slice of brisket is held up. It should be able to support its own weight without breaking and crumbling, but should be easily pulled apart with a slight tug. To the KCBS judges, if it falls apart on its own then it is overcooked. If it can’t easily be pulled apart, it is undercooked.
To you, that may or may not sound delicious. Perhaps you want absolutely fall-apart brisket. If so, that’s fine, and you can get what you want by simply leaving your meat to cook a little longer—just don’t take it to a KCBS event!
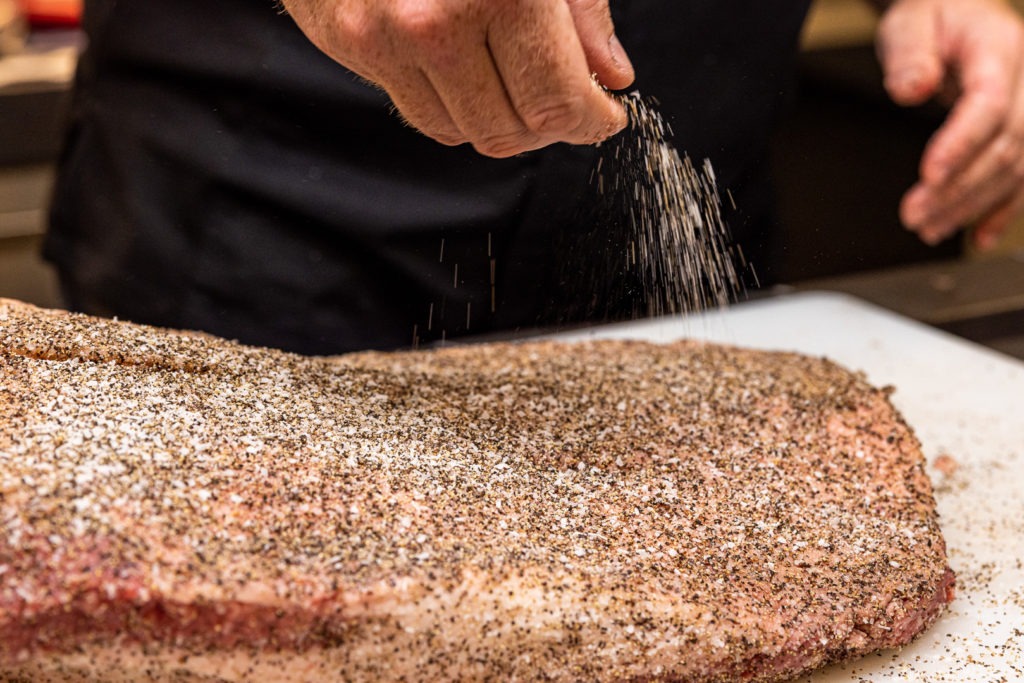
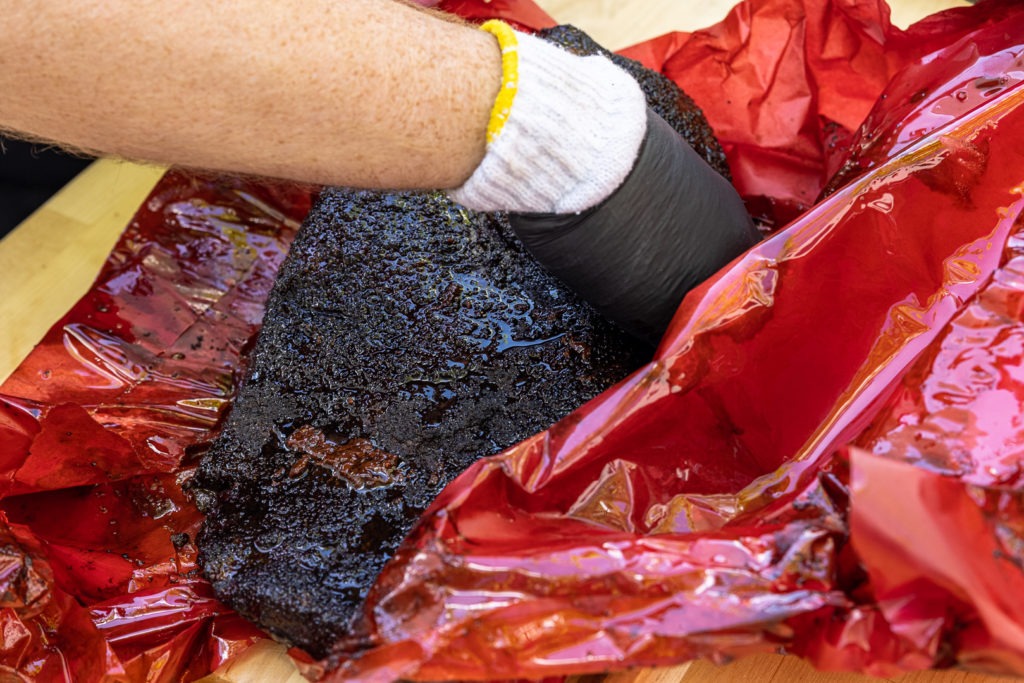
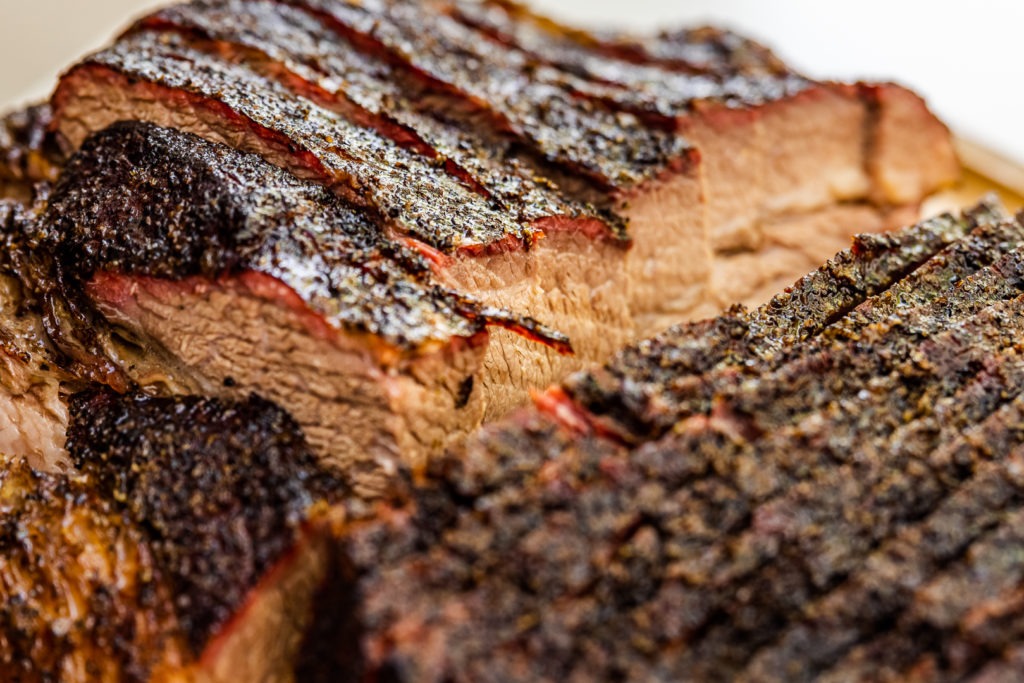
Perfect brisket should also have a good bark. Bark is the crusty, smoky layer of spices that coats a brisket. The rub you use will mix with the juices of the brisket and dry out, creating a delectable crust that is one of the hallmarks of good BBQ. Any brisket method that we use should give us a good bark.
How to smoke a brisket: keys to success
Slow cooking brisket
As we discussed above, the stall is caused by water being squeezed out of the muscle fibers, meaning the meat perspires and cools. So why don’t we end up with dry brisket every time? Because of the collagen! In brisket, the collagen connective tissue unwinds as it cooks into gelatin—which is highly absorbent, holding up to ten times its weight in water. The gelatin in brisket acts as a reservoir, holding on to water that is not bound up in the muscle fibers themselves. After the meat passes “well done” and is dried out, the collagen starts to dissolve, replenishing the meat’s structure with moisture. This is, again, why the low and slow cooking is so important. The meat actually dries out before it becomes moist again.
So the problem of chewiness and dryness is solved by the very fact that we’re cooking this BBQ style. But what of the stall? What if you don’t want to spend 16 hours cooking dinner?
The Texas Crutch
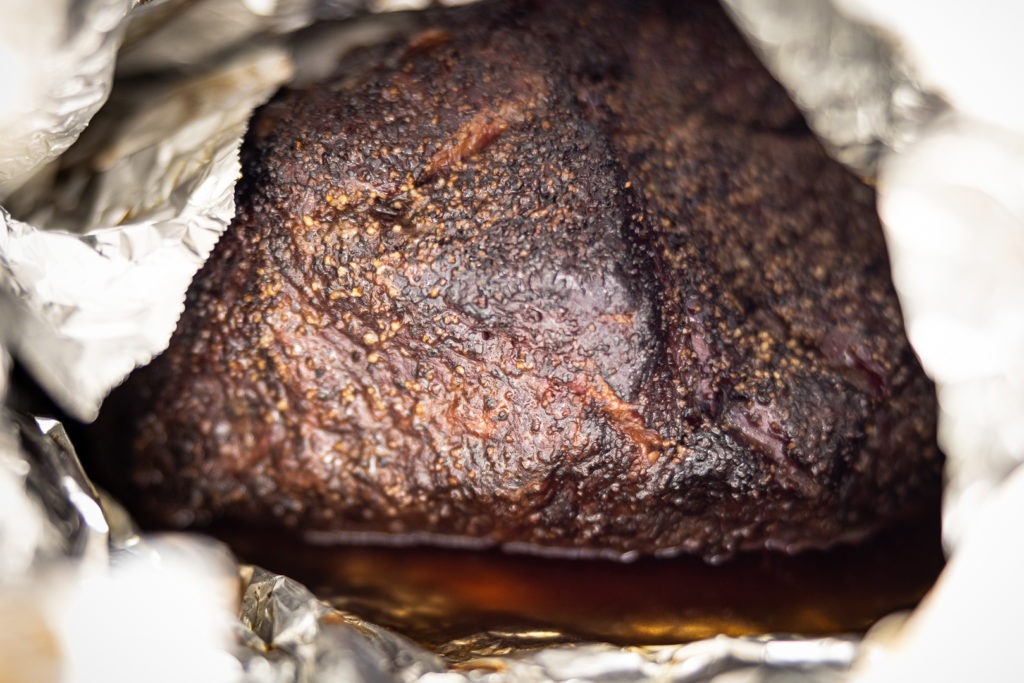
Long ago, legendarily in Texas, some pitmasters found that if they smoked their brisket partially, then wrapped it for the remainder of the cook, they got to their end goal sooner. The stall wasn’t taking as long. The reason for this, unbeknownst to those old-time cooks, is that wrapping the brisket slows evaporative cooling. When the brisket is wrapped in, say, foil, a micro-climate is established. The humidity in the foil quickly reaches 100%, meaning that there is no room for evaporation to take place. No evaporation means no stalling, and you can push right on through the stall without waiting for the meat to wring itself out like a sponge before heating. Called the “Texas Crutch,” this technique is the sworn technique of barbecue cooks the world over.
I always crutch brisket. I think it makes a significant difference.” —Meathead Goldwyn
Crutching methods
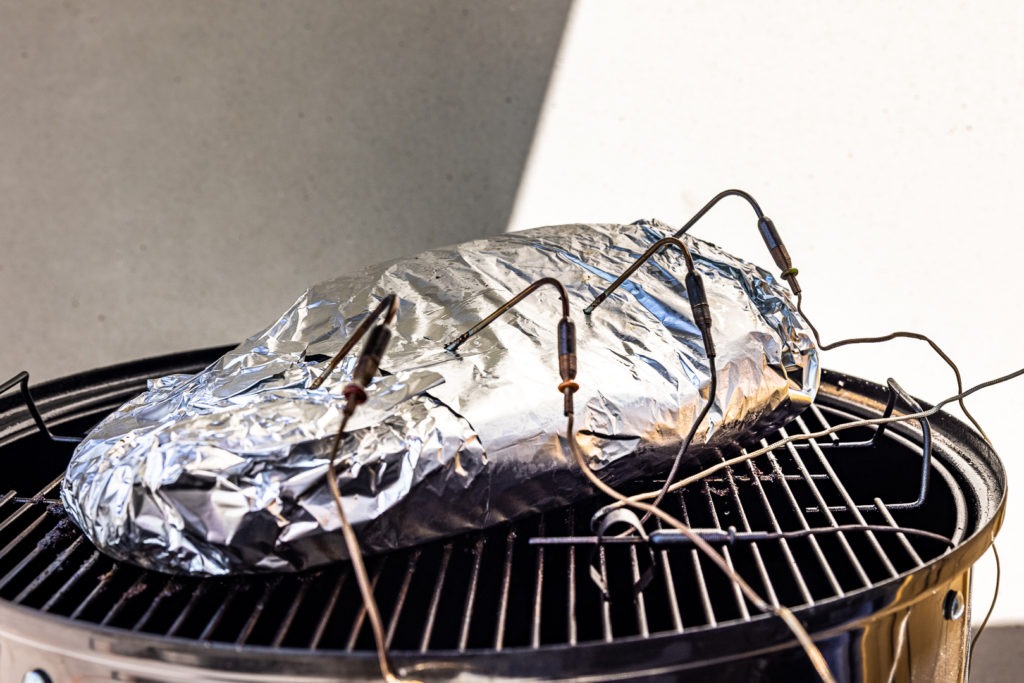
The most traditional crutching method is to use aluminum foil, which is non-permeable to water, and thus creates a solid barrier against evaporation.
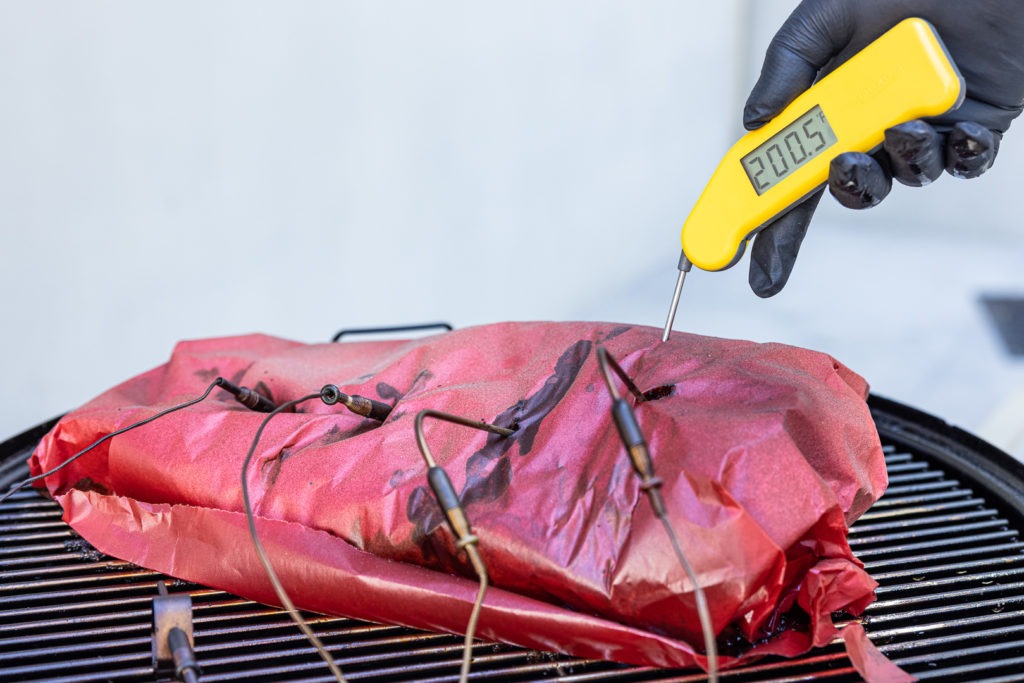
Other brisket gurus, most notably Aaron Franklin of Franklin BBQ in Austin, swear by peach paper: a type of pink-colored un-coated butcher paper. The idea behind using peach paper is that it creates a non-perfect barrier to evaporation. Some transfer of water can occur through the paper, but not so much as naked evaporation would allow. This theoretically speeds the cooking to some degree and retains some moisture in the meat, while allowing more of a bark to form.
Those who cannot locate peach paper often use packing paper, craft paper, or other uncoated paper. The goal is the same as that of peach paper: less evaporation, more bark, faster cooking.
And, of course, there is always the naked brisket. We’ll be cooking one of each of these and analyzing their outcomes.
Method


We cooked four briskets, each one with a different crutching method. Each was of roughly equal size (all between 15.5 and 16.5 lbs). They were all cooked on the same cooker, though at different times. Before cooking, each brisket was first trimmed of excess fat and coated in a mixture of equal parts by volume of salt and black pepper—pure and simple.
Cooking brisket three ways: experimental method
We cooked one brisket without any crutching, naked. We also cooked one brisket each with peach paper and foil, wrapping them after 4-1/2 hours, at just about the time that an internal temperature of 150°F (66°C) had been reached.
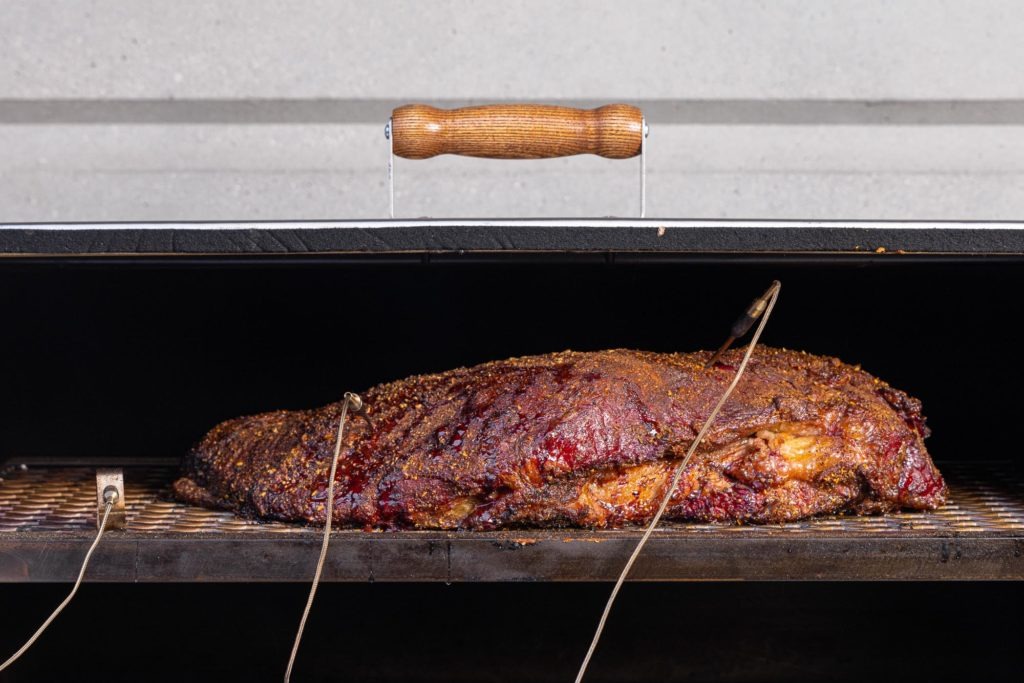
Each brisket had four probes placed in it, two in the point and two in the flat. One, a handsbreadth from the end of the flat, the next a handsbreadth beyond that. In the point, they had the same spacing, starting a handsbreadth from the point-end.
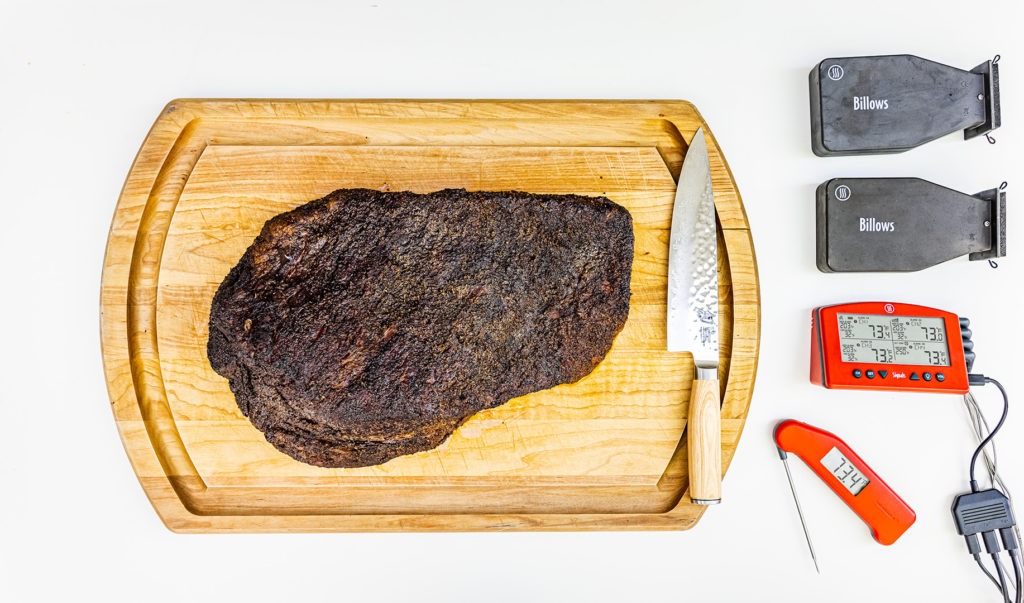
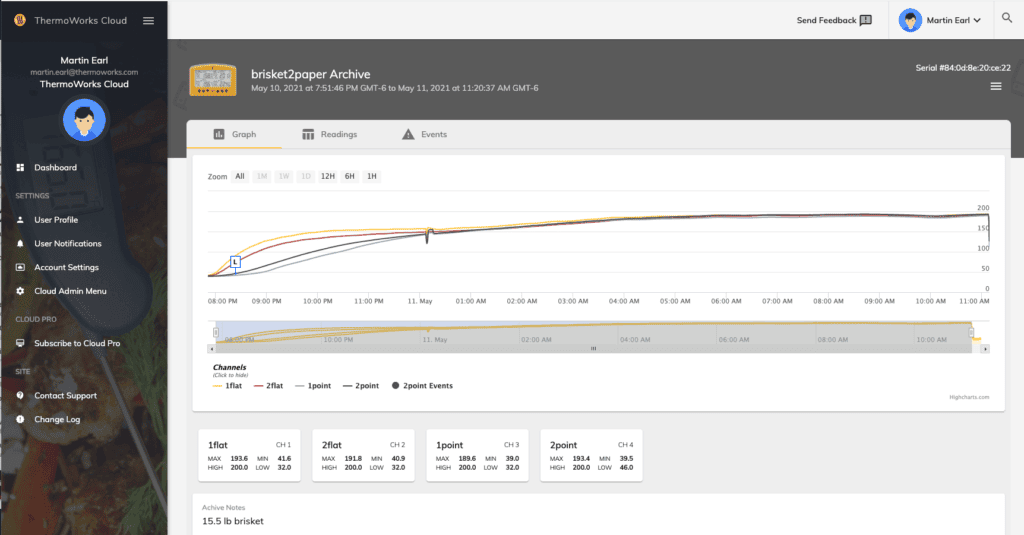
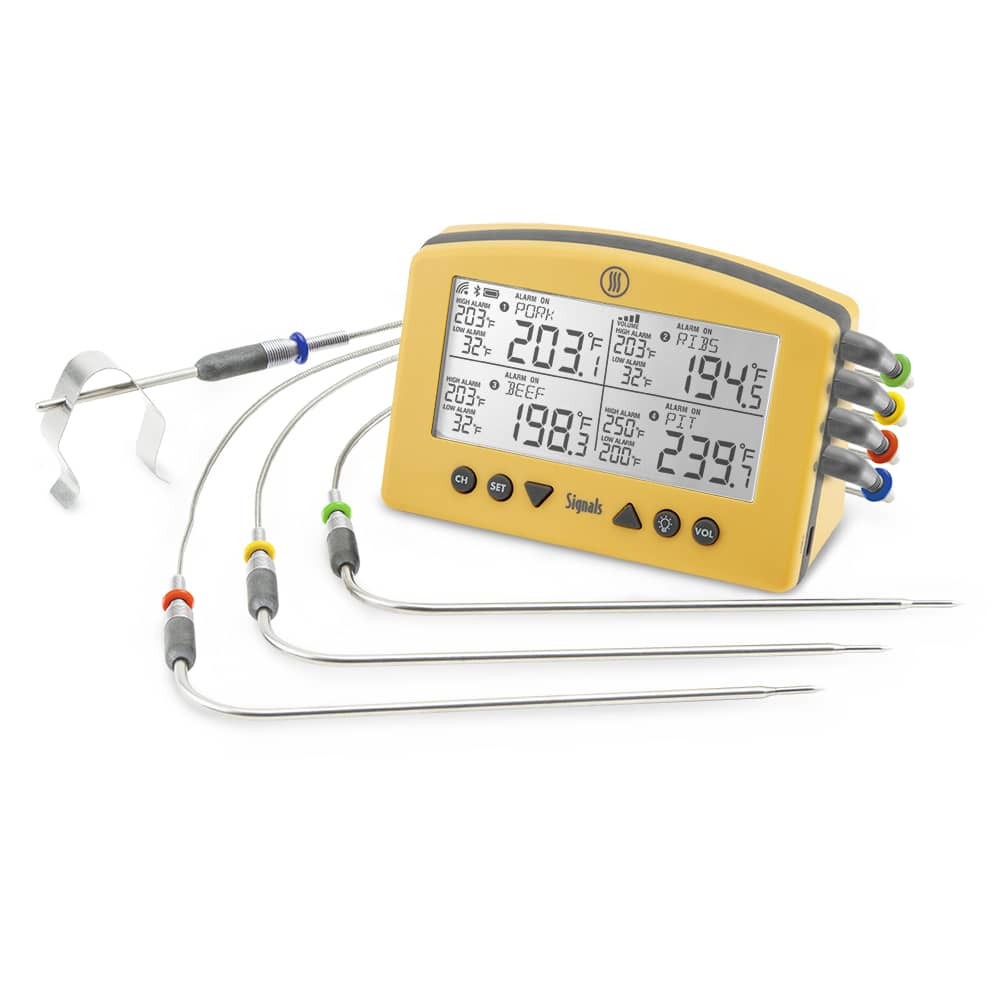
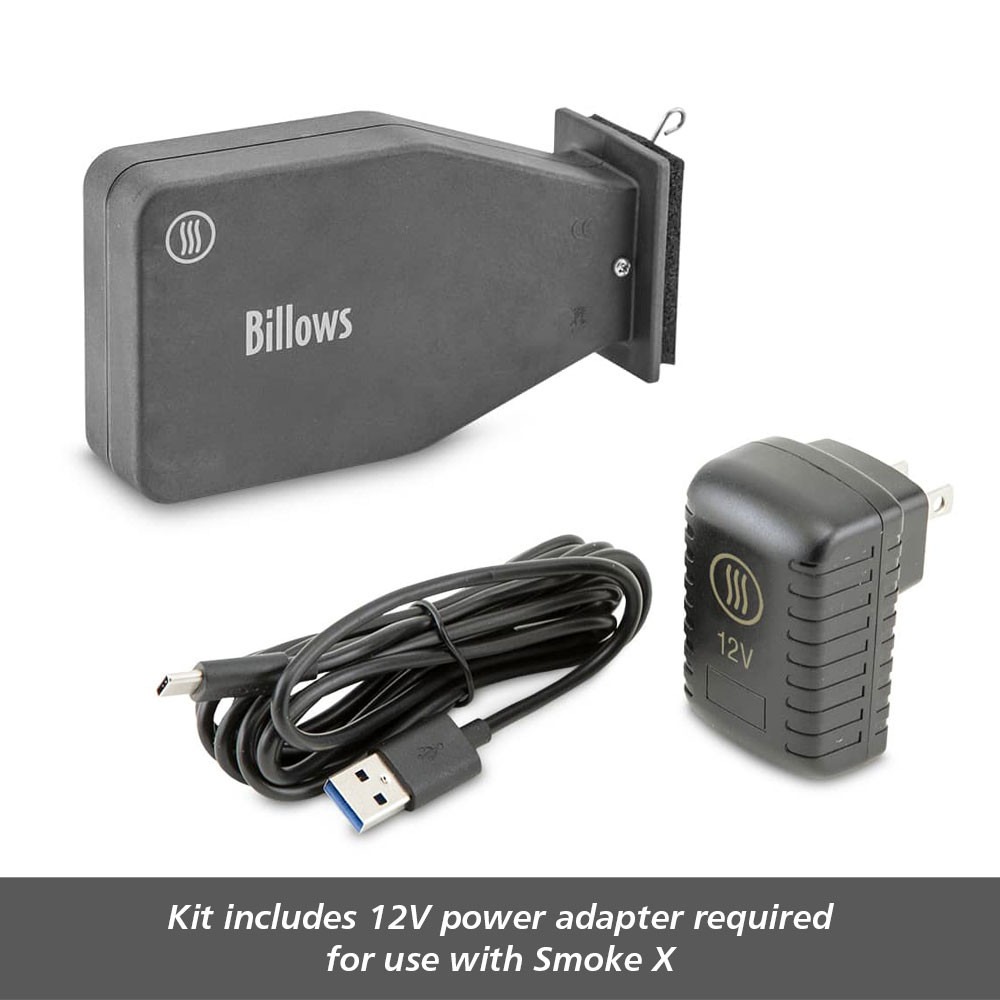
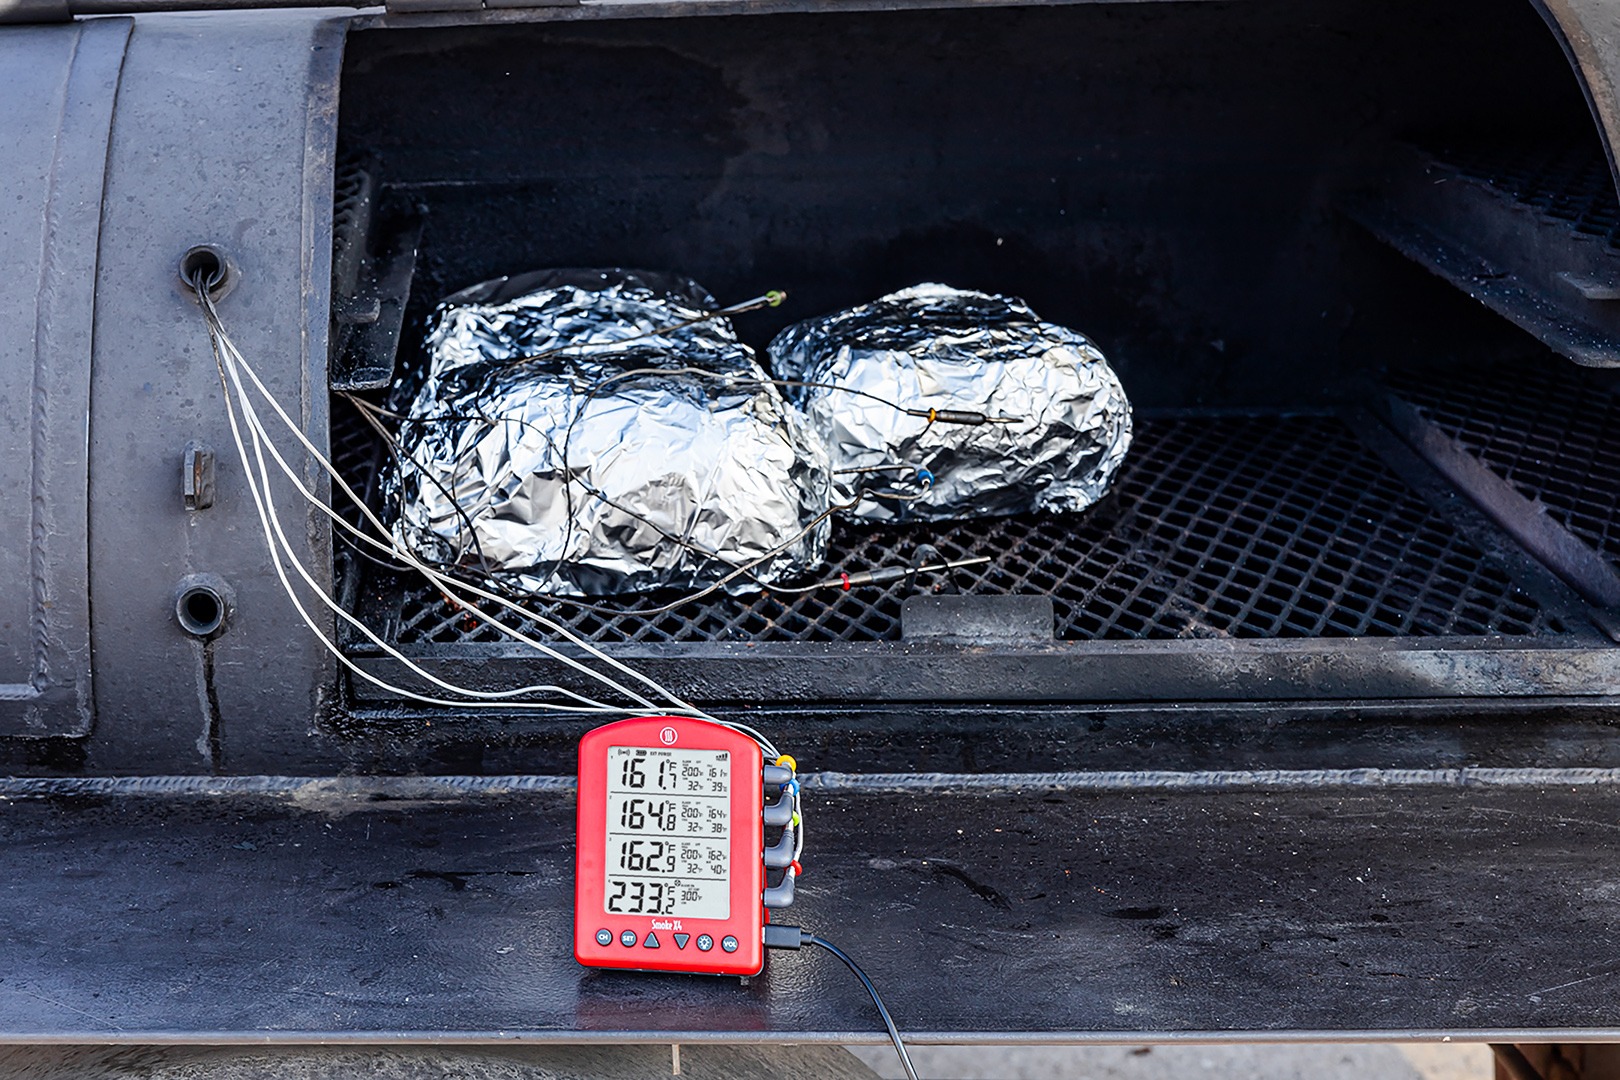
These probes were attached to Signals™, our WiFi-enabled quad-channel thermometer so that we could both monitor the cooks remotely via the ThermoWorks app and record the data for later examination on the cloud. We used a separate Signals to run an air probe and two Billows™ in each cook. Obviously, you don’t need two Signals’ to cook brisket, but we wanted four channels of data plus fan control, so we used two.


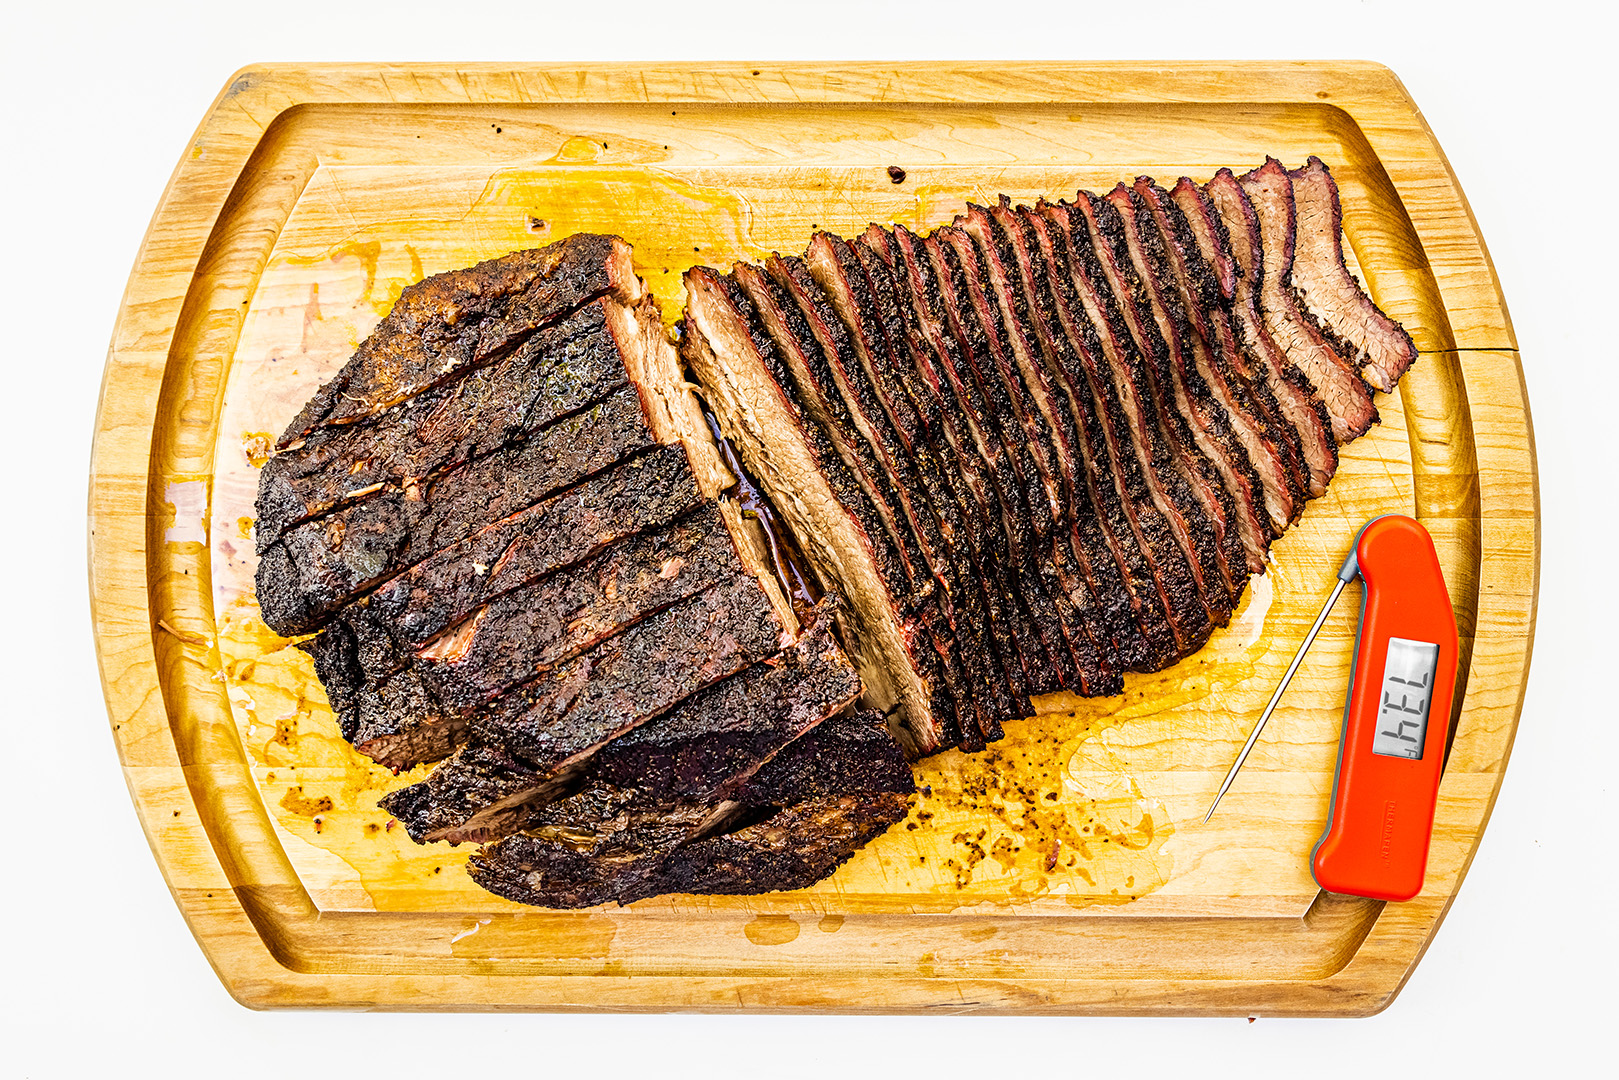
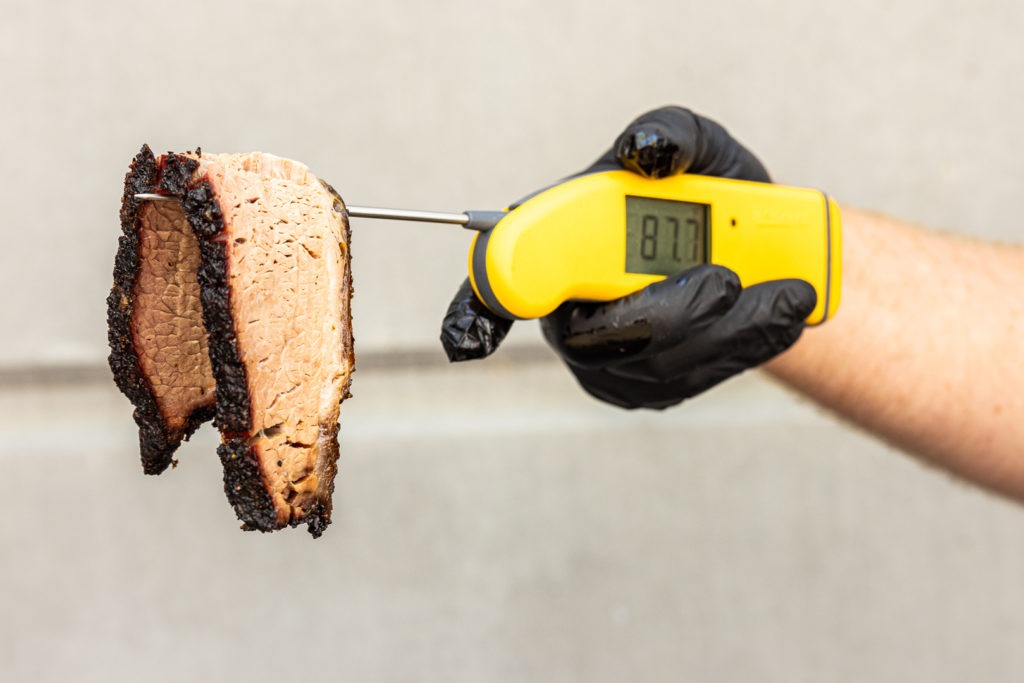
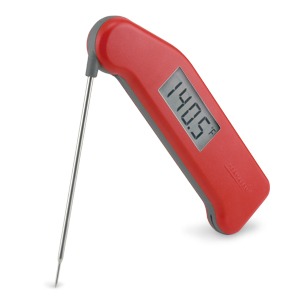
Each brisket was cooked, fat-side down, in the same cooker with two Billows controlling the temperature at 250°F (121°C). (We used two billows to get enough airflow through this rather-large smoker. Most smokers just need one Billows.) We didn’t use a water pan, and each cook got two chunks of applewood for flavor. Our target temp was 200–203°F (93–95°C). Our pull temp was determined based on temperature as well as feel: a Thermapen® was inserted into both the flat and point of each brisket to verify temperature and to feel for tenderness.
After cooking, each brisket was allowed to cool down a few degrees and then put into a closed cooler to rest for one hour before slicing
(Note: If you look at the time markings on these cook charts you can see them going all through the night. I monitored the briskets from my home as they cooked on the ThermoWorks BBQ patio. This tool makes BBQ much easier to deal with, because you don’t have to sit by the pit the whole day or, as the case may be, the whole night long.)
Results: is brisket better wrapped or unwrapped?
Naked brisket: results with no wrapping
The naked brisket—our control for this experiment that was not wrapped—took about 16 hours to cook.
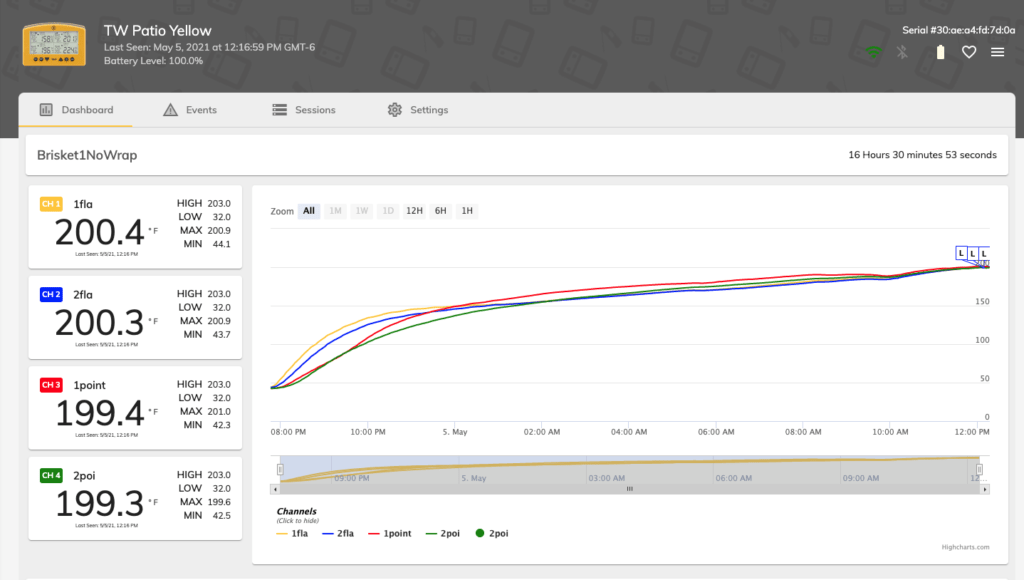
You can see the temperatures taking right off, especially in the thinner flat. By the time three hours had passed, the brisket had pretty much entered the stall. The flat stalled before the point did, which makes physical sense. At about 10 A.M. you can see a slight dip in temperature where we ran out of fuel and had to get more coals going and into the cooker. We lost a little thermal momentum on that, but it did bring all of the temperatures to within a few degrees of each other, which was great.
When we verified temps with the Thermapen at 200°F (93°C), we found the point and the flat to be exceptionally tender.
The bark on our naked brisket was crusty, flavorful, and plentiful.
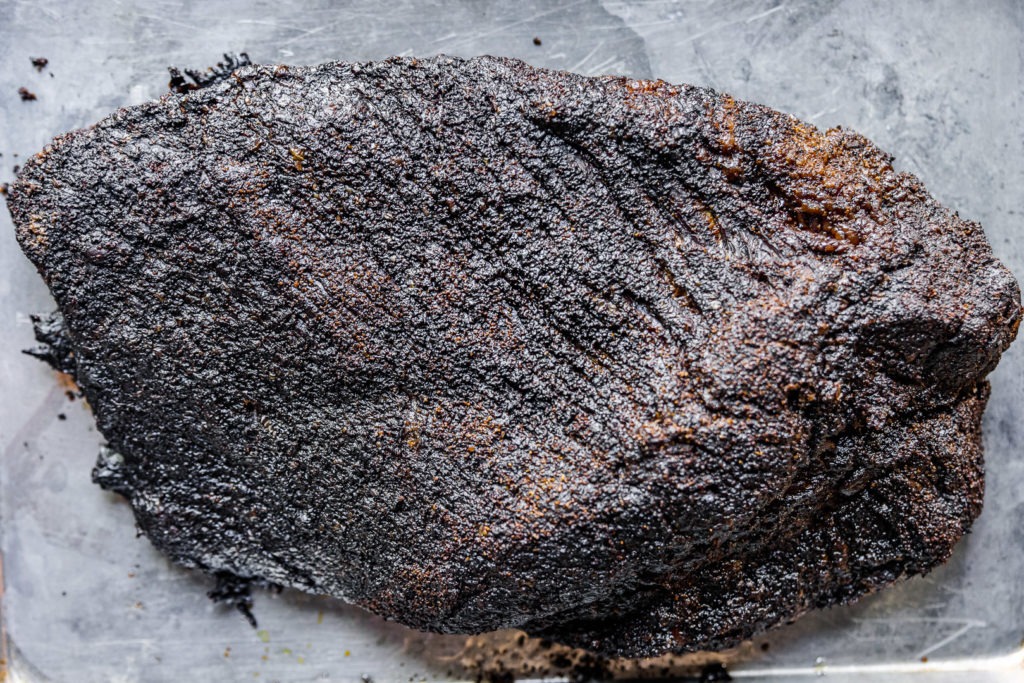
The meat was smoky, tender, and juicy with an almost silken texture in the point. It was, truth be told, the best brisket I’d ever made up to this point in my life. But the moisture in the meat was excellent. The fats had fully rendered. It received very high marks from everyone who ate it. Even the flat, which is sometimes sacrificed for a good point, was tender and deeply flavored. It was, frankly, amazing.
Peach paper brisket:
The brown-paper brisket cooked for 15 hours, not a huge time savings.
You can see that the stall was…lessened. The slope of the temperature curve is greater. We ran out of fuel at the same time again, and lost a little momentum there, but recovered and got to 200°F (93°C), checked it for tenderness, and let it rest as we had the other.
The results were positively delicious, but not quite as in-your-face tasty as the naked brisket. The flat was very good, and the point was almost as good as that of the first one. One thing that was an indication of good results was the front corner of the flat. That little bit is often overcooked and tough—like jerky almost—no matter how well the rest of the brisket was cooked. That was not the case here. Even that corner was tender and even—gasp!—rather moist.
The theory behind the paper stood up to experimentation. The bark was firm and well developed—it had not sogged away—without being hard. However, it lacked the wild-smoke flavor of the unwrapped version. It was a little tamer. Excellent brisket.


Foil brisket:
The foil-wrapped brisket took only a little over eight hours to cook. It is the speediest method we tried. If you want brisket for dinner tonight, you can put it on this morning and get there. Not so with the others!

From the data, you can see that the flat did stall a little bit, but the point basically rode a nearly straight line up temperature mountain. Not only was there no stall to speak of in the point, the temperature increase actually accelerated once we added the foil!
(I should note that before this went in for its hour of resting, we “burped” the steam out of it. We let the other two cool somewhat before resting, and this wasn’t going to cool without letting some air out, so we undid the ends of the foil and let it air out for a few minutes.)
And how did it turn out? Good. Quite good. But…
The problems here were twofold: the bark and the meat itself. The bark was not well set, despite the fact that it was well-set before wrapping. After the wrap, it was quite loose. Also, the pepper in the bark tasted more raw. We got sharp pepper flavor, but not cooked, smoked, toasted pepper flavor.
The meat was very juicy, even (especially?) in the flat, but it was chewier than we wanted it to be. Not that it was super chewy, mind you. It was still better than a lot of brisket I’ve been served at BBQ chain restaurants. The flat has a very good texture, but needed just a smidge more bend to it, and the point needed to be cut into thinner slices to be as enjoyable.
The reason for this is that collagen dissolution is a function of time as well as temperature. Getting up to 203°F (95°C) quickly didn’t give the collagen enough time in the melt zone to do all it needed to do. Giving the foil-wrapped brisket more time in the cooker beyond the time it takes to come to temperature might solve this. Even a longer rest might help.
This brisket had more of a pot-roasty feel and flavor than quality BBQ. Is it worth it, though, for the time you save?
If you were gettin’ in trouble and maybe your brisket wasn’t going to get done on time, you could wrap it in foil and really accelerate the cook time. It really comes down to taste.”
—Aaron Franklin
Brisket Conclusions
Here’s a quick rundown on the results:
| Method | Time | Bark outcome | Meat quality |
|---|---|---|---|
| Naked Brisket | 16 hours | Strong, crisp bark | Juicy, tender, amazing. Stellar quality. |
| Peach Paper Brisket | 15 hours | Quality bark | Excellent, just a hair less amazing than the naked one. |
| Foil Brisket | ~8.5 hours | Loose bark with raw pepper flavor, little smokiness | Generally a little chewy, not enough collagen breakdown. Needs more time at temp. |
Obviously, these outcomes are variable, because brisket is jazz! Every cook is an adventure. May is National BBQ month, and we hope that you’ll get out there and give brisket a try, and then tell us about your own results.
If this is your first time cooking a brisket, our recommendation is to try the naked brisket first. This will give you a baseline against which to judge your subsequent cooks and experimentation. Have the unwrapped, full-cook-time experience first, and then try messing with rubs, sauces, crutches, etc. Simplicity first, then jump into the music and start to improvise.
But no matter what way you choose to cook your brisket, be sure to monitor it with a quality thermometer! The Signals BBQ Thermometer, paired with Billows, is an excellent way to keep an eye on your brisket so you can know when to wrap it, when to poke it, and how your fire is burning. Smoked brisket is truly one of the most challenging meats to cook properly, but with the right instruments you, too, can wail with the kings of the ‘Q!
Happy cooking!
P.s. Here’s a great video of how to slice your brisket once it’s cooked:

For more on brisket check out…
Shop now for products used in this post:
OMG, do you get paid by word count?
That was probably the longest and most tedious recipe article I have ever read in my life. I skipped down to the pics and vids, but still, this was unrealistic and absurd, as a recipe. We’re home chefs out here.
Yes you clearly did not read the article…
Amazing article, mine came out perfect thanks to all of these pointers! Thank you!!!
Martin,
Great detailed information really appreciate the breakdown between all the methods.
My question is around getting a better smoke ring when smoking on my Green Egg grill. On the last brisket, I used lump oak charcoal and oak chunks. What would you think about hickory and cherry wood?
Lastly, what do you think about placing the brisket in an ice chest to let it rest for an hour or so? Is that a good environment to allow the juices to flow back into the brisket?
Thanks!
William
William,
The type of wood shouldn’t have an effect on the smoke ring, just the flavor that is imparted by it. Using cherry and hickory sounds delicious!
Finally, an hour’s rest in a closed cooler is a great idea. The collagen can continue to melt without the danger of overcooking the flat. So, yes, it’s a great way to rest your brisket.
Happy cooking!
wow………….This article really helped me to do the Right Thing with my new pit!
Bert,
Fantastic!
Great debunking of some myths!
I do brisket naked, then wrap it tightly in foil and blankets and put it in an insulated cooler for a couple of hours. I usually use a pit temperature of 225°F (my BBQ Guru temp controller has a “ramp” feature that slowly reduces the pit temperature as the meat approaches the target temperature, helping to avoid overcooking). Never had any complaints.
Obvious question: where do you get peach paper?
Rob,
The wrap-and-cooler method is a real winner. It allows you to stay in the collagen-melt zone for longer without pumping more thermal energy into the meat, possibly overcooking it.
You can find peach paper all over the internet, some big box stores have it online and will send it to your local store. If you have a local butcher using it, ask for some. They’ll probably even sell you a roll. Good luck in your quest and, as always,
Happy Cooking!
If the flat and the point have such big differences in how they cook, (both time and temp) would it not be best to cook then separately? I have started doing this with turkey white and dark meet.
Cliff,
Good point. The separation method is a great way to get exactly what you want, just like on a turkey. However, as most BBQ cooks are looking for guidance on whole brisket cookery, we went with whole briskets for this cook. Perhaps in the future we’ll try splitting them and then we can report on the results.
Give it a try, and tell us what you think!
Please do an article on the split method. Not all of us can afford to cook for an army . I’d love to learn how to cook a smaller cut
Dave,
That’s a great idea. I’ll have to see how we can fit tath into our calendar.
Dave, it’s significantly less expensive to cook packers vs flats!! I can get prime packers at Costco for 3.69/ lb. flats are significantly higher. The cost per pound makes the packer the more economical choice. Get a food saver slice and save the rest…
How much did those briskets weigh and what grade beef were they? Thanks.
Jonathan,
Those were about 15 pounds each and were prime grade. Well worth the cost for that extra, fatty goodness!
BRAVO!
Excellant article and I agree that the foil does cut the cooking time down as well as the stall.
I cooked a 14 lb packer in 4 hours at 250 degrees. Same thing happened the last time I tried foil and while it wasn’t tuff it was a little chewy. I’m going to try peach paper on my next
cook.
JJ,
I didn’t want the peach paper to be as good as it was. I wanted it to be hype. It really was great, though. Just be sure to give yourself plenty of time!
And if you do the foil again, give it a little more time past “done” to get to a better tenderness.
Happy cooking!
Well done! I drooled on my screen.
Thank you for this information. I have two questions.
You mention four methods of crutch, but wouldn’t the naked method be the same as no crutch?
You said all four briskets were approximately the same weight, what was the weight average?
That will give those of us less experienced cooks more of a game plan idea.
Thank you.
Bruce,
First, thanks for reading the blog! Yes, naked is a no-crutch method. We did a naked one so that we could compare the crutching methods against something.
The briskets were all about 15 pounds pre-trim weight. I hope that helps a little. Brisket can be intimidating with little experience, but jump in and give it a try.
Happy cooking!
This was awesome and very helpful. Can’t wait to try some different techniques presented here. Would love a little more info… such as smoker type & weight of the trimmed packers before the cook began. Now please go do this 3 or 4 more times just to verify the results. LOL (You know you want to!) Oh, and go ahead and add an extra foiled one that you let go longer in the foil to see if you can improve the results.
Thanks!!
Dave,
I”m glad you liked it! Thea packers were about 15 pounds each we used a kettle smoker, the brand of which I’m not going to put up here. It is, as you allude, difficult to point out exact scientific results with a sample size of 1 per method. Rest assured, if we cook any more briskets (purely for science!) you’ll hear about it here!
Happy cooking!
Great write-up! Once question about buying higher grades of brisket. Usually you are paying for more fat/marbling for your cuts of beef. With brisket being so fatty to begin with, are you really gaining that much by paying more for this particular cut? Thanks!
Marcus,
Good question. Brisket is, of course, a very fatty cut, but don’t let that fat cap fool you! when we’re talking about meat grades, we’re talking about marbling, or the amount of fat distributed within the meat. Higher grades will have more of that fat, which will lead to tastier, more succulent meat. Plus, certain club-based large stores sell prime grade brisket for relatively cheap (I got one for ~$3.60/lb).
That being said, yes, it is a well-fatted cut. If the prime-grade is too expensive, don’ t hesitate to buy choice and give it a go!
Happy cooking!
Can you explain the difference between peach and brown butcher paper. I can’t find any reference to the difference other than the name.
Keith,
The peach butcher paper is thick with a coarse texture. that coarse texture, I believe, helps the moisture wick away, preventing the bark from disintegrating.
Did you double wrap with the papers? Once thinly wrap? Once fully wrapped?
What is brown paper than? Just a shopping bag?
Brian,
We wrapped it with a very long piece of paper, so there were a few layers in the end. Brown butcher paper or pink butcher paper that is from a food-service source is best. Some bags and papers are treated with things you don’t want long-cooking into your brisket.
Excellent article. One question: what type of heat source did you use? All wood? Wood charcoal? Gas? Gas with wood? Ok, that’s five questions. I have a green egg, a smoke vault and two other grills, one of which has a smoke box. With any of these, keeping a 14 hour cook is difficult. Could you address that? Six questions…
Thanks!
-Peter
Peter,
We used charcoal with wood chunks for smoke. A 14-hour cook will take a lot of fuel. These took a bag and a half of charcoal each. Tending the firebox can be a real pain, it’s true. The green egg is especially hard, as you have to take it apart to refuel. Like I said, though, you have to surrender to the brisket!
I hope that helps. Happy cooking!
Great article Martin. I have not enjoyed great success w/brisket on my pellet smoker yet. One of the issues for me is that I rarely need a whole brisket. Since I am usually cooking for 2-4 people a whole packer is out of the question for me. Can you address some of these principles for smaller brisket cuts? Supermarkets do offer 4-5 lb brisket cuts but they’re not translating to tender and juicy for me. Would like to hear your thoughts on that.
Larry,
Most supermarket brisket cuts are just the flat, which is the part that is harder to keep juicy and moist. It is thin on the edges, and those dry out easily, and it doesn’t have the same fat content as the point. I’d cook a solo flat at a slightly lower temperature, around 220°F, and pull it as soon as you get to 203°F. Poke it occasionally at the end of the cook with something sharp, too, and if it feels tender, pull it!
Happy cooking!
Excellent article, I have had my difficulties with brisket and really appreciate the in-depth information you so throughly included.
I’m always happy to let someone else shoulder the expense of such research so that I may be able to provide family and friends with a positive experience.
Thanks again.
Bill,
Believe me, this research on your behalf was our pleasure!
I have been very hesitant to do a brisket. Plenty of pork, chicken, and other scattered things, but no brisket. A bit intimidating I suppose. I appreciate this article, and look forward to giving it a shot! Thanks!
Chad,
I hope it goes well! Let us know when you do one and how it turns out.
Happy cooking!
You can also use white butcher paper that is available at your local food service provider. As it states in the article it slows the rate of evaporation without steaming it like with foil.
A lot of good information here. Briskets are tough, both the meat, and how to cook them. And you are right, ask three or a hundred different pitmasters, and they will all have their own way to do it.
There are so many differences that can affect the particular brisket you are cooking. Age and size of cow, feed, exercise, grade of meat, etc all effect that hunk of meat you are buying. Regional weather like temp and humidity, type of cooker, type of fuel, average smoker temperature, etc all effect the meat while it is on the cooker. All those being said, it’s hard to pick an exact temp when a brisket is done.
Two 14 pound similar briskets may be done hours and several degrees apart. Like you said, brisket is not science, it’s Jazz. That’s why brisket is done when the thickest part of the flat is probe tender. I use your great thermometers to monitor the temps to let me know when to start probing, but I couldn’t tell you what temps they are done as I no longer check them when I pull them off. I also then let them rest for at least two hours before I slice them.
I have a brisket document I wrote up from notes I took in listening to other brethren pitmasters. I’d be willing to share it for your critique and you could post it here if you desire. Email me if interested.
This is the best recipe/instructional I have ever read. You saved me hours and hours of time. Thanks to you my brisket came out perfect after reading this, even though it was only the second time I had ever cooked one. The only other piece of information I could have used is that sometimes the internal temperature is a little misleading and the jiggle of the meat can suggest it is done when the thermometer isn’t quite there yet. The flat was perfect (pulled apart but could support itself), point could have used a little more but ran out of time. Thank you so much for taking the time to write this!!! I owe you!!
Alex,
We’re so glad it turned out well for you! The ambiguity with the jiggle is something that I don’t have a solid answer for. Fat content, collagen content, size and shape of meat, trim, etc. all go into the thermal characteristics of the meat and therefore its doneness. Something with less collagen will be done sooner than something that was well exercised and has more collagen. With practice, you learn to depend on the thermometer and your gut. A rest in a cooler might have helped your point without overdoing your flat at the end, there.
Thanks for reading and have a brisketful summer!
Martin,
How many layers of wrap we’re used with the peach paper? Single? Double? Does it matter? Thanks.
Mark,
you’re going to get a double thickness by the time you go around a turn or two. But if the question is do you wrap it and then re-wrap it, then no.
I may have missed it but did you mention what type of wood you used?
Steve,
I used a blend of oak and cherry. Which wood to use for smoke is really a personal preference. I used those because I had them. I quite like pecan for brisket.
What tool are you using to create your cook graphs?
Conrad,
We used the ThermaData loggers to track the cooks, and then the free ThermaData studio to get the data into a .csv format. You can accomplish the same graphing goodness with the apps that accompany the ThermaQ Blue and ThermaQ WiFi, as well as the Smoke Gateway. Any of those tools is limited to two channels, so more than one is necessary for this kind of graphing. I hope that helps! let me know if you have any more questions.
I’ve read this blog several times since it came out and have learned something each time. But then I’m an engineer and am anal about data. Sorry the person who started out this comment thread with a criticism that yours was a “tedious recipe article”. Just doesn’t get the difference between a “recipe” and a “primer” that’s really a test report based on one data point for each process. I’ve been keeping a journal on every batch I’ve carried out on my Traeger since 2011. It’s over 114 pages long now–I told you I was anal. I wish I had these ThermoBlogs when I started. Would have saved a lot of grief. Now I see the science and “Jazz” behind the successful recipes I’ve followed. And that’s what blogs like yours reveal to the rest of us. Thanks for that. When new novices approach me on advice, I send them these blogs.
Now, something I might contribute: I would like to reinforce the idea of the rest period in a an insulated environment to allow the collagen to further do it’s magic after the crutch period without additional energy input. It works. I think it allows the meat to reach an even collagen state. And if I can be sacrilegious, I see no point in continuing to use the smoker during the crutch period. It only wastes fuel. I conduct the crutch sequence in a range oven–oh horrors, the humanity! What’s more, for the rest period I simply turn off the oven and leave everything alone rather than move the wrapped meat to an insulating blanket or cooler–the oven is insulated. and what’s even more, I’ve invested in a steam pan covered with aluminum for that purpose. I gave up on the disposable aluminum versions long ago because they eventually can leak, especially if you use a rack to elevate the meat above any juices. I’m still looking for a better way to preserve the bark. You may have just planted a seed….
Again, thanks. And I don’t get paid by the word count either.
Ron,
Thank you so much for your comments! Those ‘sacrilege’ points are, in truth, very valid. After wrapping, you are in essence eliminating smoke flavor from attaching to the meat. I say that whatever you do to make amazing brisket is just fine!
Happy cooking!
Also meant to say that if you give a person a fish (recipe) you’ve fed that person for one meal. If you teach that person how to fish (primer), you’ve fed that person for a lifetime.
Martin – very well written article. I was able to conquer the brisket this weekend using this information. Thank you for taking the time to provide so much valuable information.
I used the no-crutch method (KISS principle) and cooked a full packer at 235 degrees. The bark was delicious and the meat turned out nearly perfect. Fall-apart at the end of the flat, but passed the “pull test” a little further in. Used a kamado-style cooker with lump charcoal and oak chunks.
Russ,
Great to hear! That’s a beautiful smoke ring on that meat.
Question as crutch methods not very apparent.
Do you start smoking with the brisket wrapped in the crutch material, or what guideline do you use to wrap the nakedly smoked brisket?
Ian,
Start the brisket naked, then wrap it in two layers of foil when it reaches 160°F.
I’ve pulled mine off at 190 with foil put directly into cooler with towel wrapped around for 4 hours letting it still cook and cool and it was jello magic!
Most comprehensive overview on this subject I have read. Thanks !
Thank you!
Thanks for this article! I am on my 5th brisket in my new-to-me Green Egg. I have only done naked briskets, but I am going to try the crutch next time so I do not need to start my grill at 5 am for brisket supper!
Fantastic! Thanks for telling us. Good luck with the crutch, feel free to tell us how it goes!
Rest it as long as possible, even up to 24 hours, wrapped in foil or paper, and towels in a cooler. It will be much more tender. There is no food safety issue there, it was sterile when you took it off the fire and wrapped it.
Split the flat and the point before slicing, remove all the intermuscular fat, then slice each muscle exactly across the grain. This gives the best presentation.
How do I cook a 7 lb. 1st cut brisket I got from the farm near me. Flat, no fat. My family will do microscopic surgery on meat to remove fat so I bought this cut. Now I do not know how to cook it! Please help me so I do not cook it into dried leather!
Ooh! A tough crowd, indeed! We have a post specifically about smoking a flat—How to Smoke a Brisket Flat. But I’d also recommend braising it.
Excellent article! For those who found it “tedious,” all I can say is I don’t want to eat their food! Attention to detail is what makes a good chef, or home cook. For my brisket, I separate the flat from the point, and I do use a foil crutch when it stalls. However, I take it back out of the foil when it’s reached 180 to 185° and finish it on the smoker. I always get amazing results. Thanks for this thorough exploration!
I enjoted the article, thanks so much for sharing. My one question is can you smoke your brisket for 6 hours and then transfer to a standard oven over night at the same temperature? Is it not true that the meat smoke will only enter the meat for a certain amount of time? Loking to save sleep and charcoal, What do you say?
You are correct that smoke flavor stope entering the meat after some time. So that method is absolutely a good way to go. But DO make sure you oven plays at the right temperatures! You can move your air probe from the smoker to the oven juuuuuust in case.
I may have missed, but what did you use to smoke the briskets on? I have a Weber 18″ Smokey Mountain…would two Billows be needed on it?
We often use the WSM and we do attach Billows to it.