

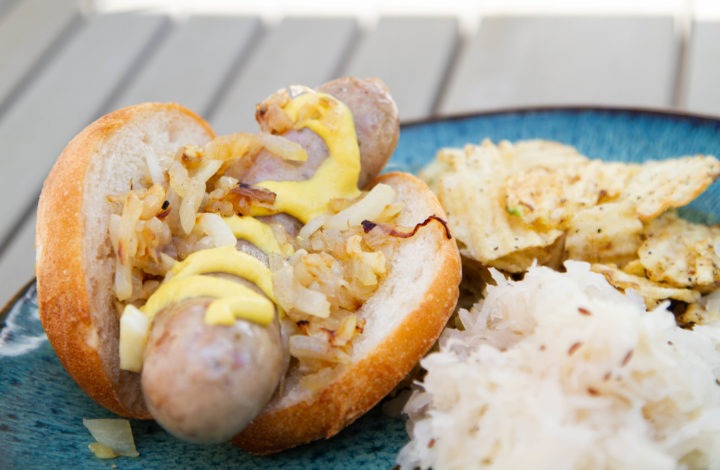
Homemade Bratwurst Recipe, Plus How To Cook Sausages on the Grill
Sausage. It is the crown jewel of the butcher’s art, the beloved, homey favorite of cultures around the world, the ruler imperial of the dinner table. And among the family of sausages, there is perhaps none so beloved in America (breakfast links aside) as the bratwurst. Whether an original German-style sausage or the more widely available Wisconsin style, bratwurst is a sure favorite on backyard grills everywhere. But do you know what’s even better than grilled brats? Grilled homemade bratwurst.
Making sausage may seem like a daunting task, but if you know the basics and the temperature requirements of sausage making and cooking, you can make fantastic sausage at home that will beat the store-bought stuff hands down—no matter what “ville” it claims to be from.
Sausage overview
Sausage is, in its loosest definition, chopped, seasoned meat in a casing of some kind. That casing can be caul fat or hog intestine or even a long plastic tube. After that, the taxonomy gets more complicated with fresh, fermented, dried, and smoked families, with lots of overlap between them. But we’re here today to talk about one kind of sausage: freshly made brats. The principles we’ll discuss here will apply to other fresh sausages, too, be they English bangers, French garlic sausages or fennel-scented sweet Italian sausage. The concepts will all be the same, only the seasoning will change.
Sausage making can be broken down into six steps:
- Chill
- Grind
- Season
- Mix
- Stuff
- Cook
By laying hold on some key principles in each step, and by using your super-fast Thermapen®, you can quickly become the best wurst cook in your whole neighborhood.
Homemade sausage how-to
Chill
The first step in sausage making is to chill your meat and your grinding equipment.
Creating a quality sausage is all about the interactions between protein, fat, and water. You need to chill your meat for the sausage before grinding to solidify the fats and, partially, the proteins. Later on, you’ll be creating an emulsification out of the ground meat, which is easier to achieve if you have fat that isn’t already melty, soft and ready to separate. (When your fat gets warm it makes the grinding sloppy, and results in a state called “smear,” which can lead to a broken emulsion and a dry, crumbly sausage. Not what you’re after.) Chilling the equipment and meat will also help keep your food out of the Temperature Danger Zone.

To ensure success, place your grinding apparatus in the freezer for at least half an hour before you start making your sausage. The motor in many mechanical grinders has to work hard to chop your meat, and that hard work creates heat. The heat from the motor will travel through the mechanism and into your meat, melting fats and creating smear, which you don’t want. Freezing your gear before you begin will help to slow that heat transfer and assure a clean cut in your grind.
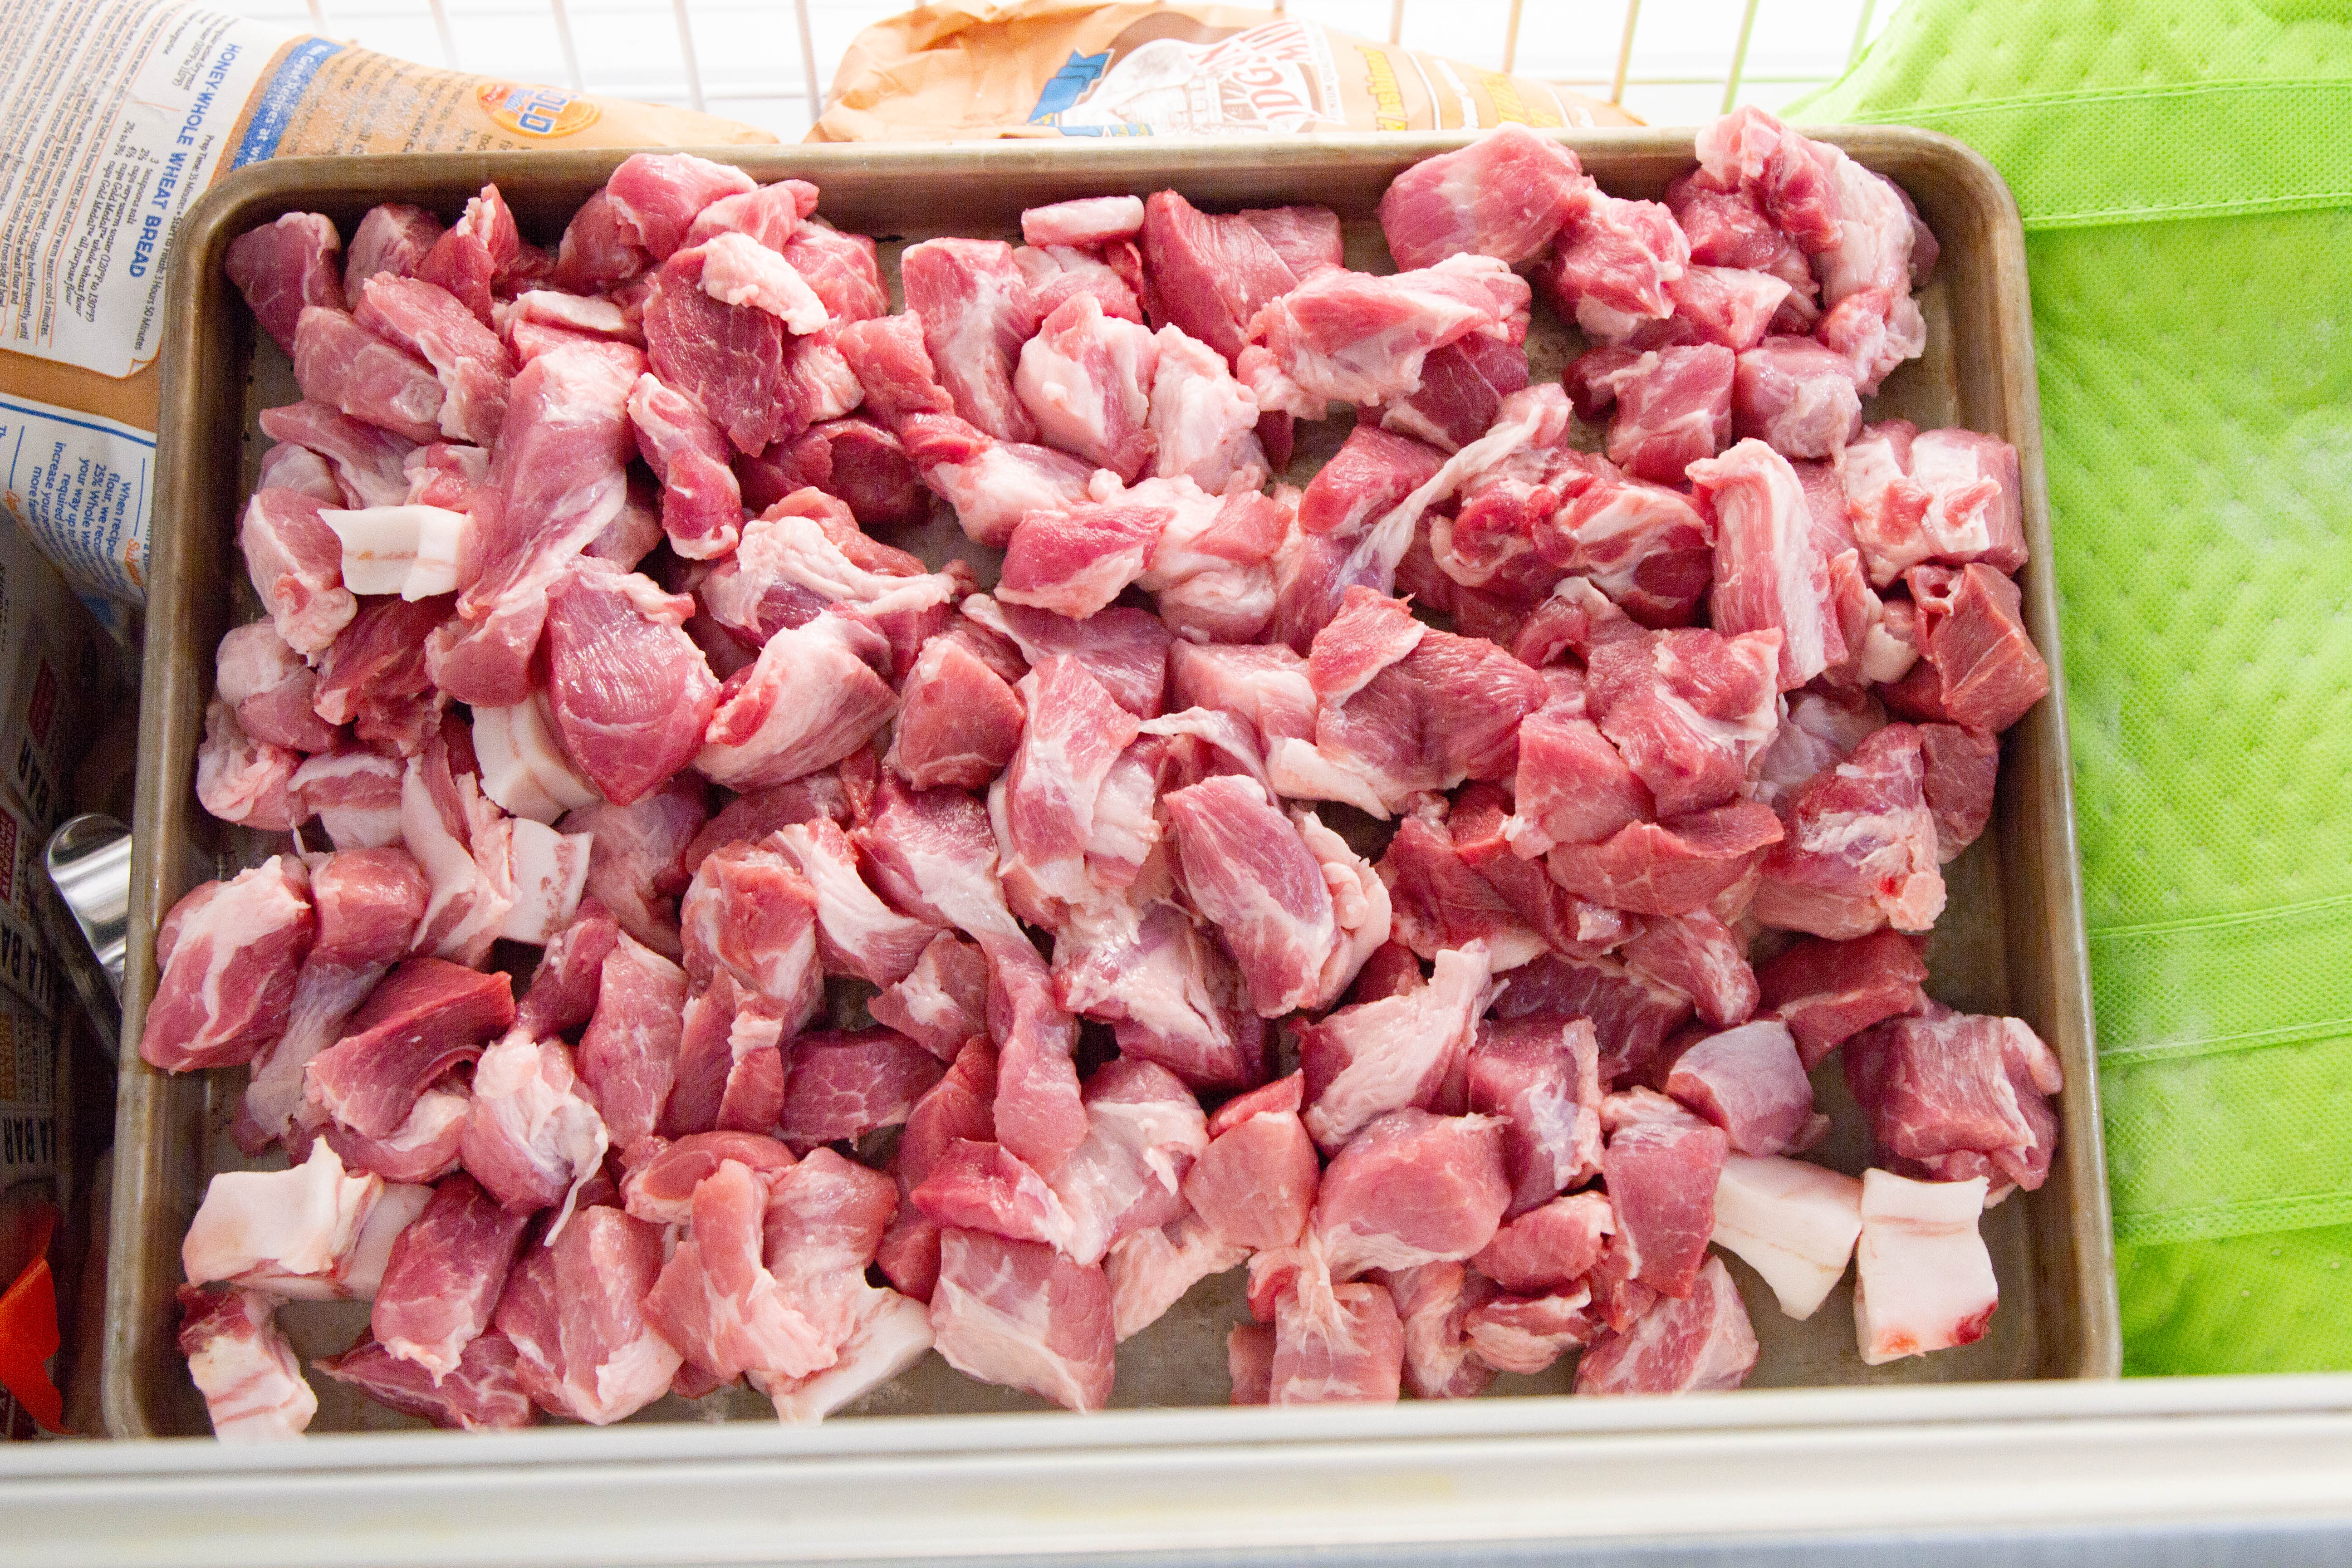
To chill your meat, cut it up into chunks 1–2” in size (or as directed by your grinder’s instructions), lay it out on a pan, and put the pan in the freezer for about 30–40 minutes. You’ll want the meat to be partially frozen, especially the fatty bits. This is an excellent time to get all your spices and other ingredients together.
Grind
The meat is chilled. Now it’s time to mince it. Back in the day, people did this with a couple of sharp, heavy knives, maybe even a mortar and pestle. I am glad we don’t have to do that anymore.
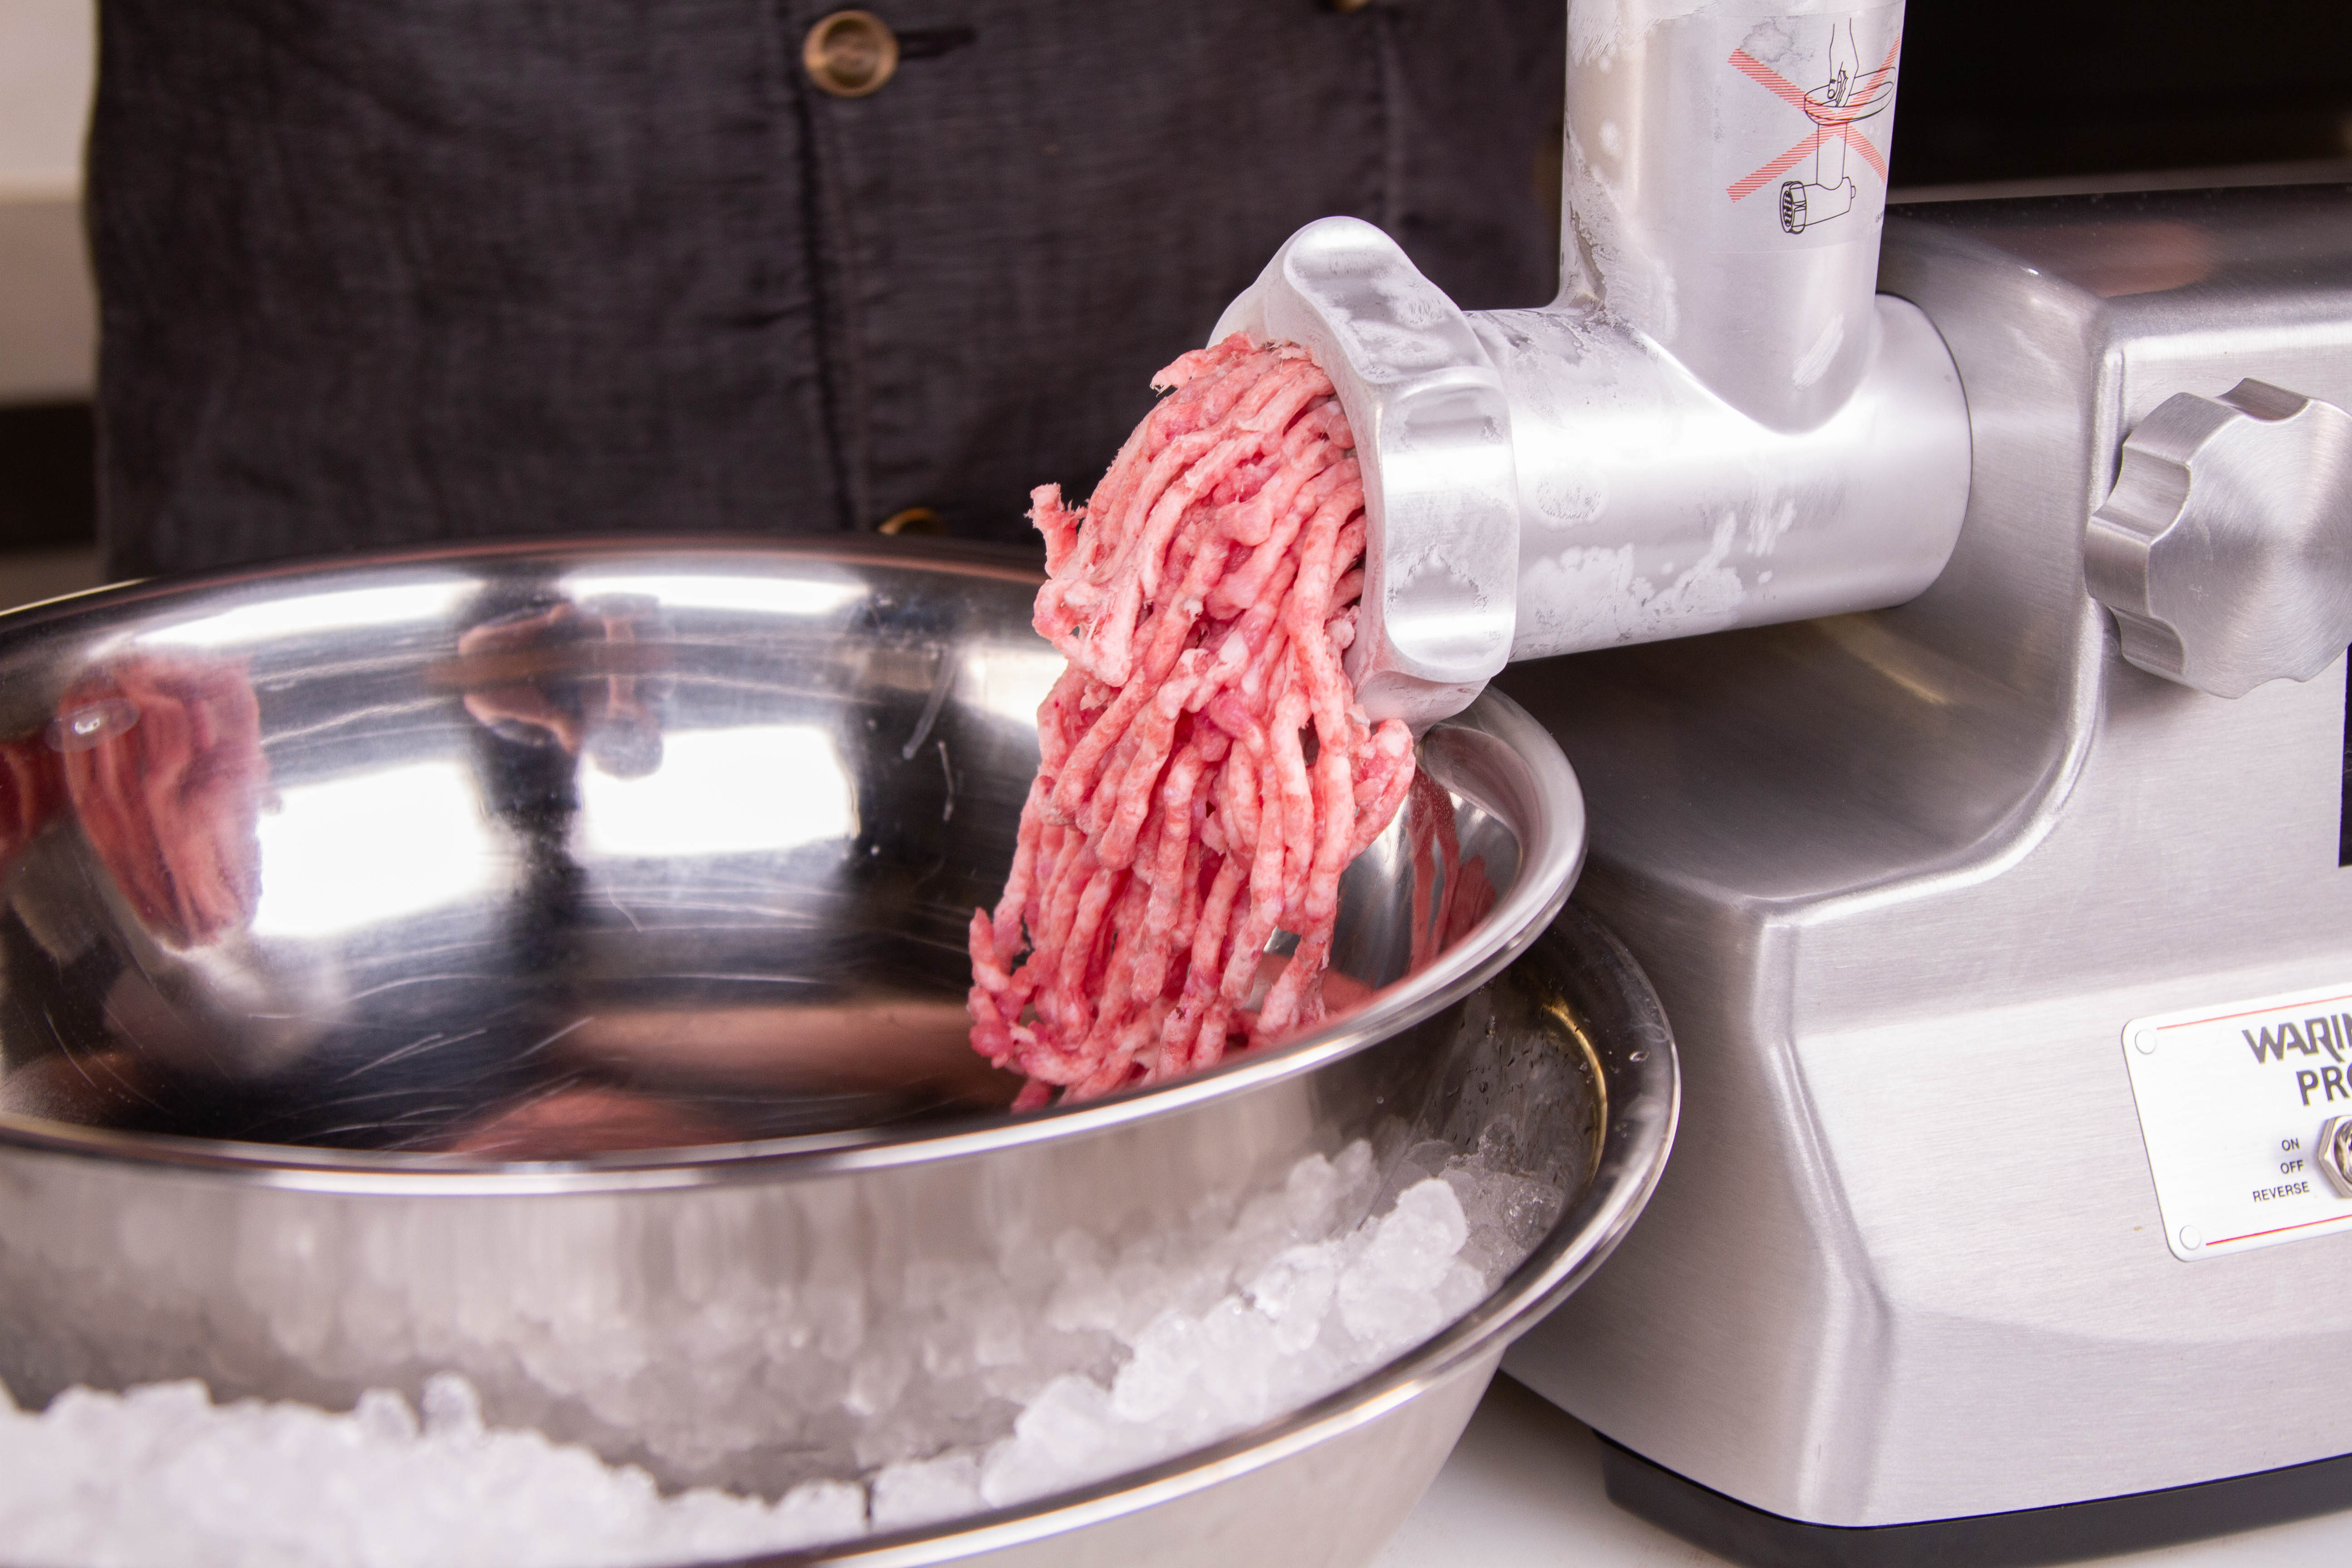
Assemble your grinder per its instructions. In order to keep the meat cold, set the bowl you are grinding into inside another bowl filled with ice. Grind away! Don’t worry if you have fattier chunks that aren’t distributed well, there’s going to be a whole lot of mixing going on later that will even everything out.
Keep an eye on the temperature of your meat and your grinder. Feel the grinder with your hands every couple of minutes, and if it gets warm to the touch, stop, disassemble it, and chill it again. Because grinders heat up like they do, it’s best to make sausage in manageable batches. Five to 10 pounds is about as much as most home cooks can muster before things warm up, depending on gear and environment.
Note: if your recipe calls for fresh onions or garlic, mix those in with the meat and grind them all together.
Second note: Once your meat is ground, put the grinder in the refrigerator to keep it cold until stuffing time.
Season
Sausages are fun because you can invent any seasoning combination you like. Plain salt and pepper will make a surprisingly tasty sausage. Add garlic and it becomes exceptional. A little rosemary? Only if you want a 5-star kitchen in your house. Play with the flavors, add herbs or spices, but no matter what, don’t forget the salt! Salt is an absolute must—after all, sausage is derived from the Latin word for salt. Not only is it necessary for taste, but salt also …
… dissolves one of the fiber filament proteins (myosin) out of the muscle fibers and onto the meat surfaces, where it acts as a glue to bind the pieces together.” –Harold McGee, On Food and Cooking pg. 169
As a good rule of thumb, use 1/3 ounce of salt by weight per 1 pound of meat, adjusted according to taste.

For a classic brat, use dried mustard, white pepper, ground ginger, and nutmeg. To make it taste a little more authentically European, toss in a little marjoram and caraway. Salt and seasonings can be added before the chill if you like, but cannot be added any later than this point. Move your meat to a stand mixer bowl or a bowl big enough to do the mixing by hand. Add your salt and spices and start to mix.
Mix
Mixing is one of the most important steps in making good sausage. You will need to mix the sausage very well to create an emulsion between the fats and water-based parts of the sausage. And the myosin that McGee mentioned plays a critical role in that emulsification. Much as flour and water when mixed together create a network of gluten proteins that trap air in a bread dough, myosin on the surface of the minced meat will create a sticky protein network in the sausage that will work to trap and retain juices and melted fats. Under-mixed sausage will lose all it’s liquid as soon as it is bit/cut into. Properly mixed sausage stays juicy.
Mix the sausage well, adding any liquid ingredients like cream, wine or vinegar, until it becomes sticky. It should be well enough mixed that when you pull a piece off, little fibrous strands become visible.
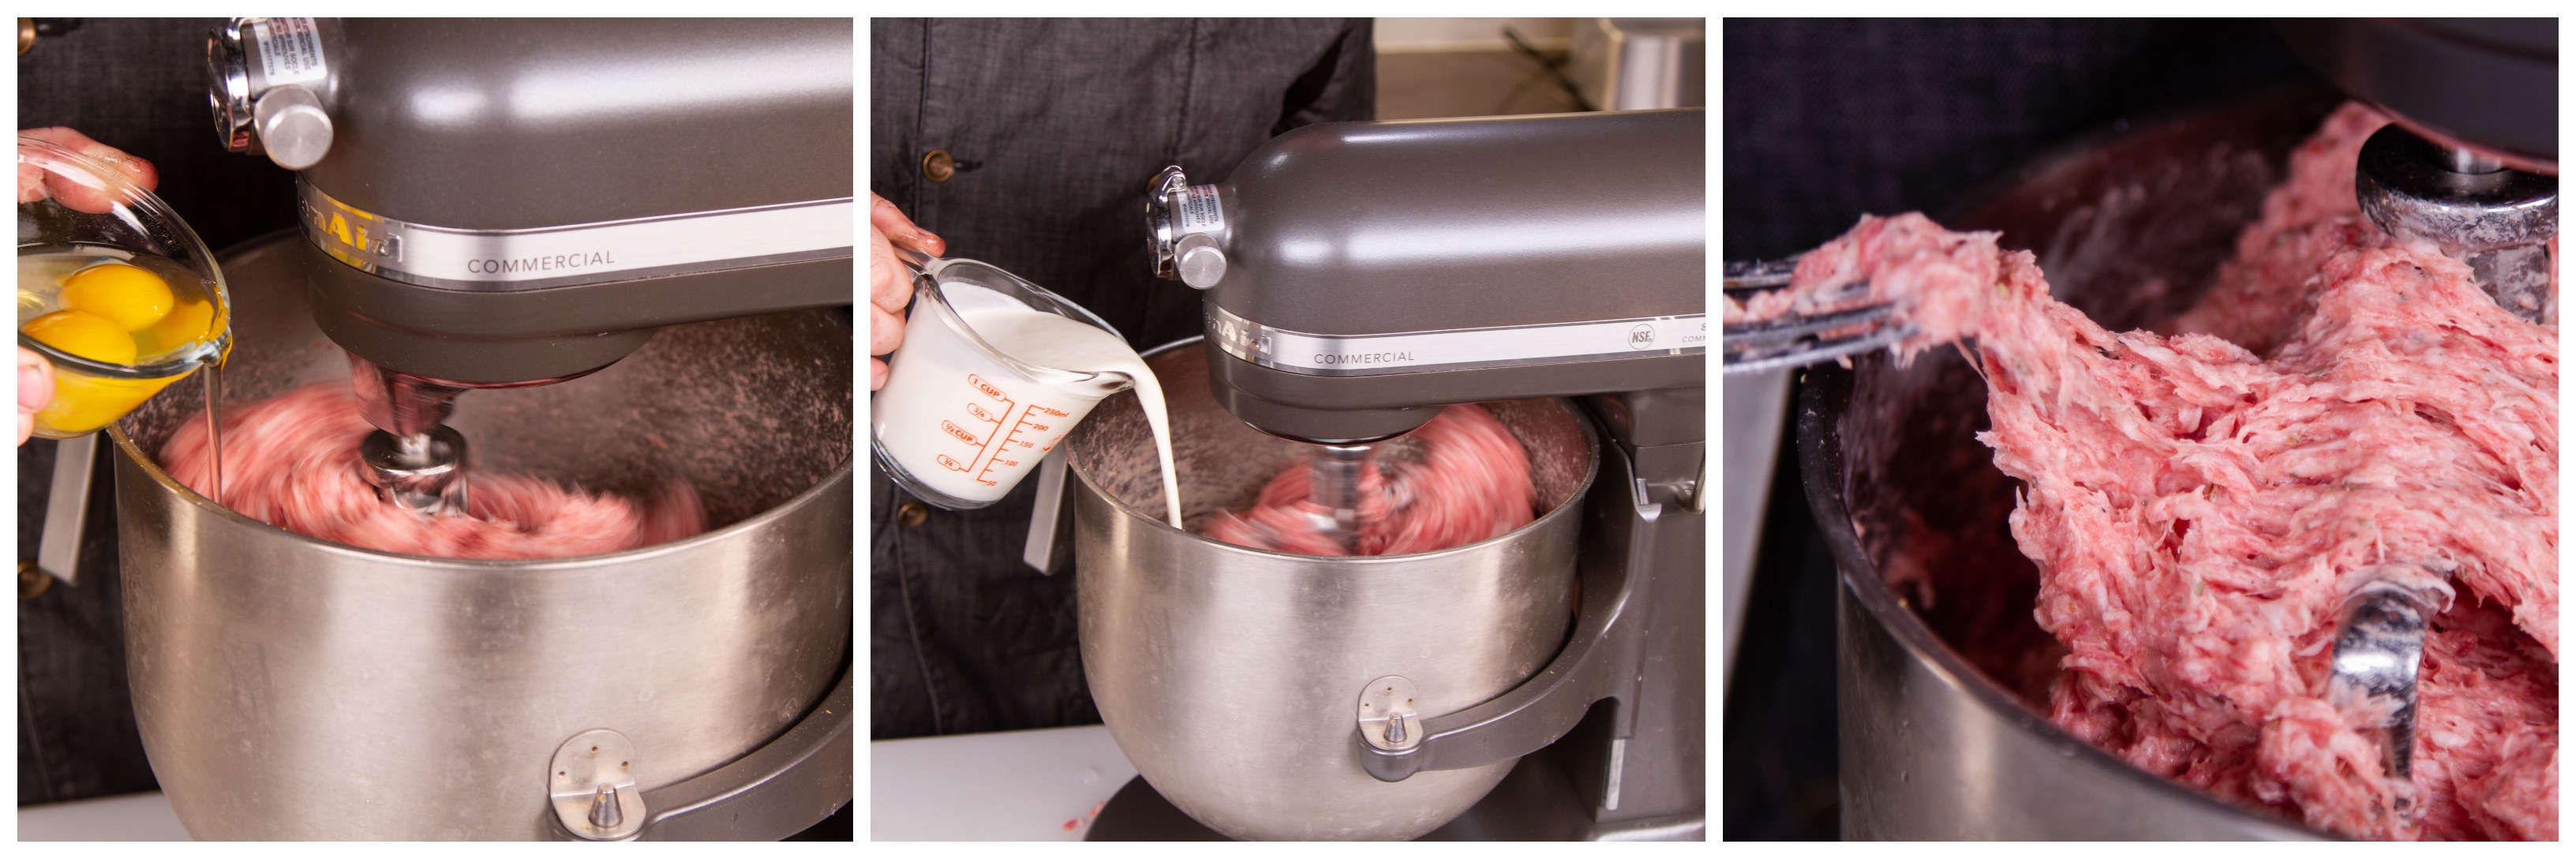
Temperature is also important in this stage. If the temperature of your meat blend rises above 60°F (16°C), the emulsion will begin to break, and the texture of your sausage will suffer. Always be checking your meat temperature!

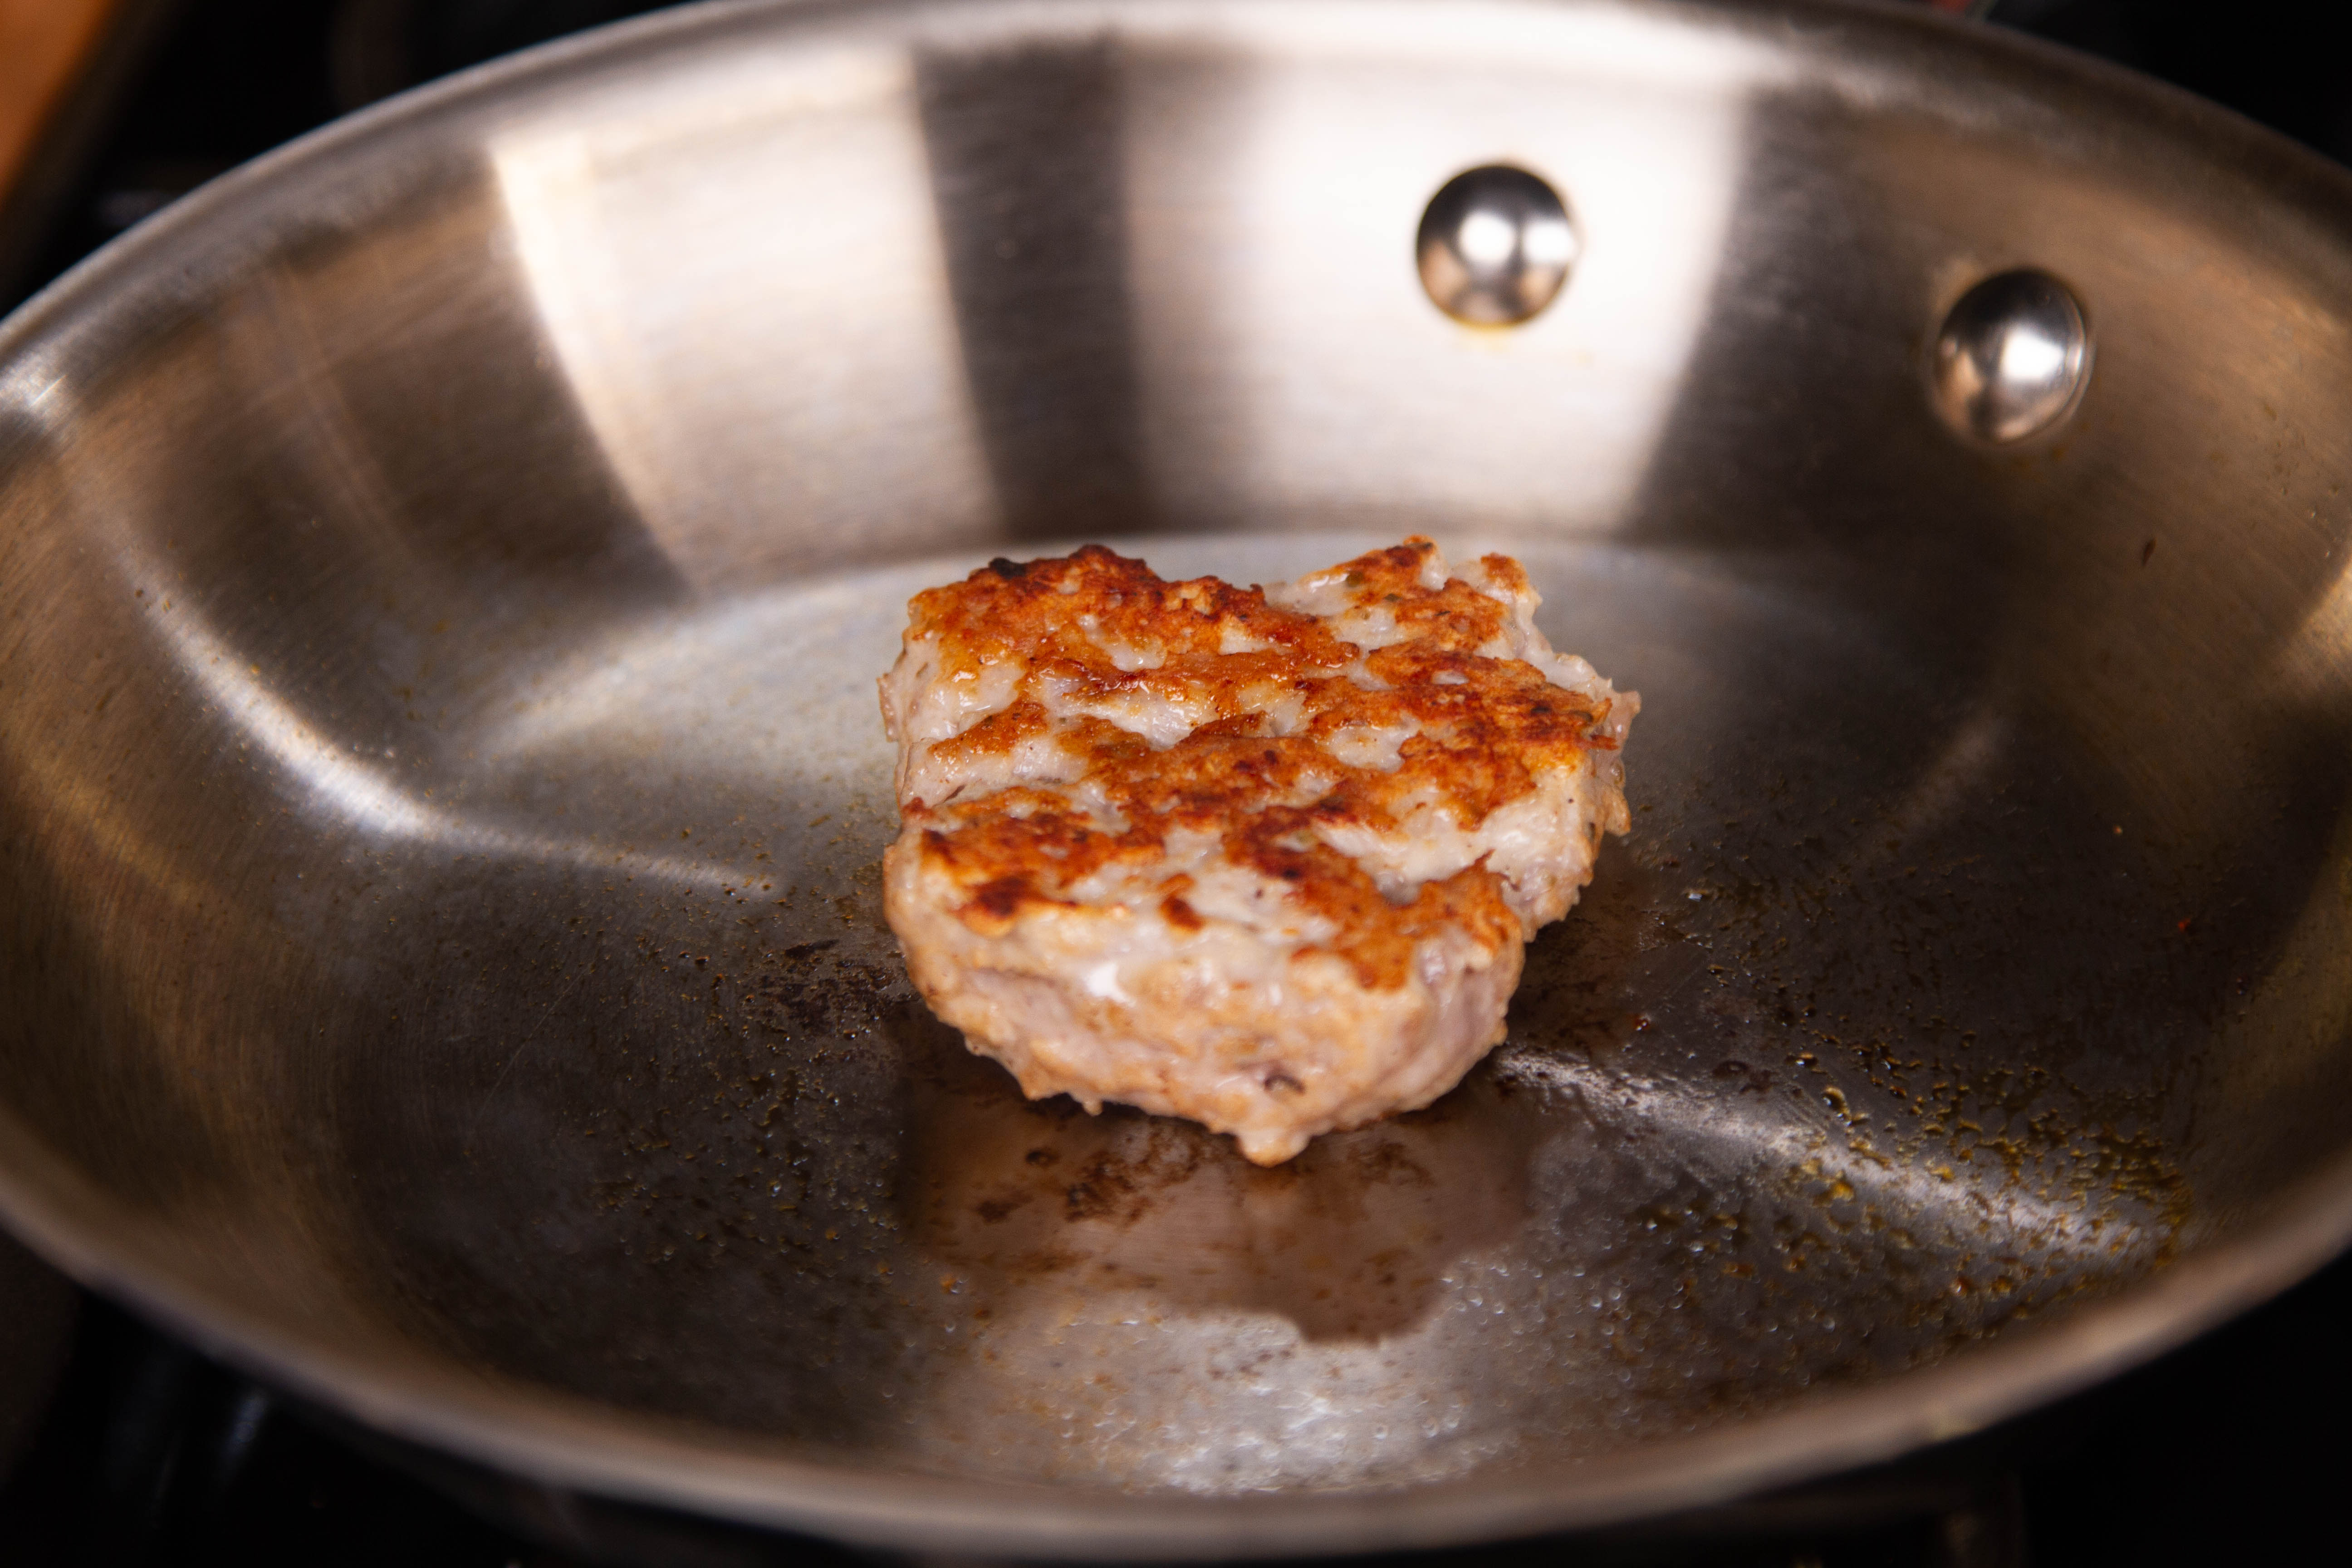
Once you’ve mixed the sausage, fry a small patty of it in a pan to check for seasonings—and to make you feel superior to your local butcher.
Stuff
Now that you have a sticky, cold, well-seasoned mass of meat, it’s time to stuff it into casings. You can use natural hog casing, sheep casing, collagen casings, or anything you like for stuffing your sausage, but classic brats go into hog casing, so that’s what we’ll talk about.
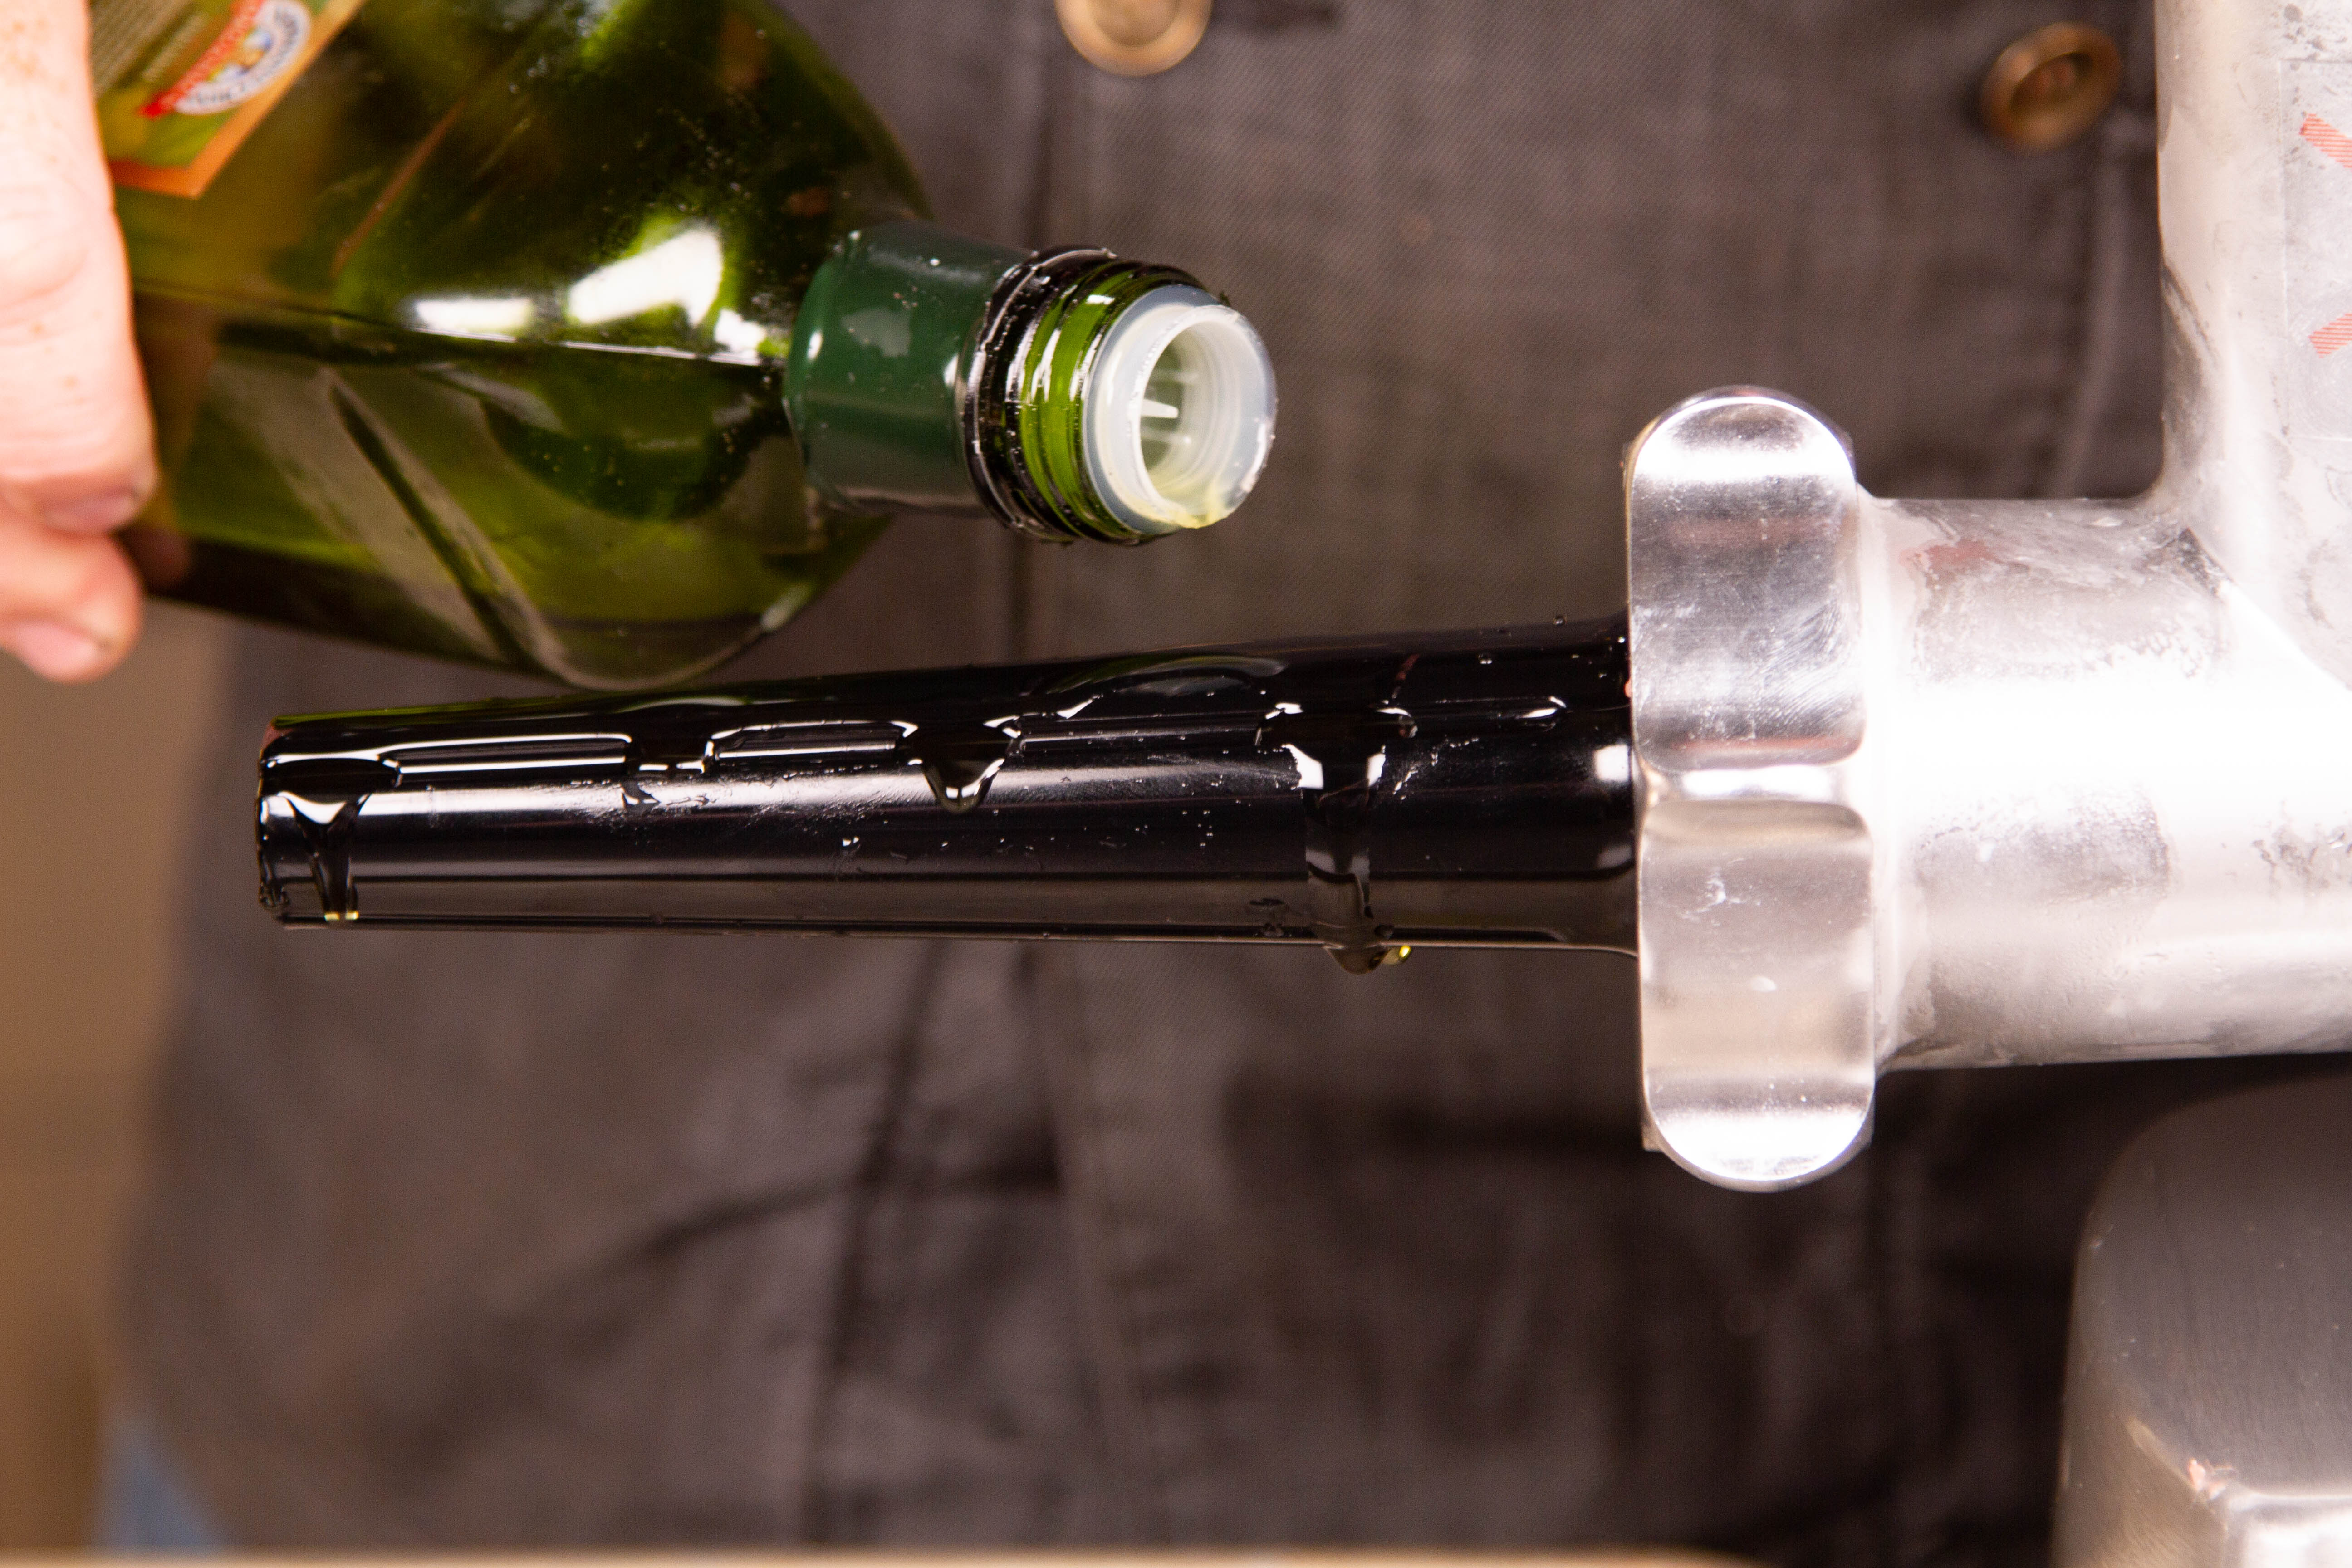
Set up your stuffing apparatus (usually part of your grinder kit) and feed the casing onto the stuffing tube. A few drops of olive or other edible oil on the stuffer will help keep the casing from binding and sticking.
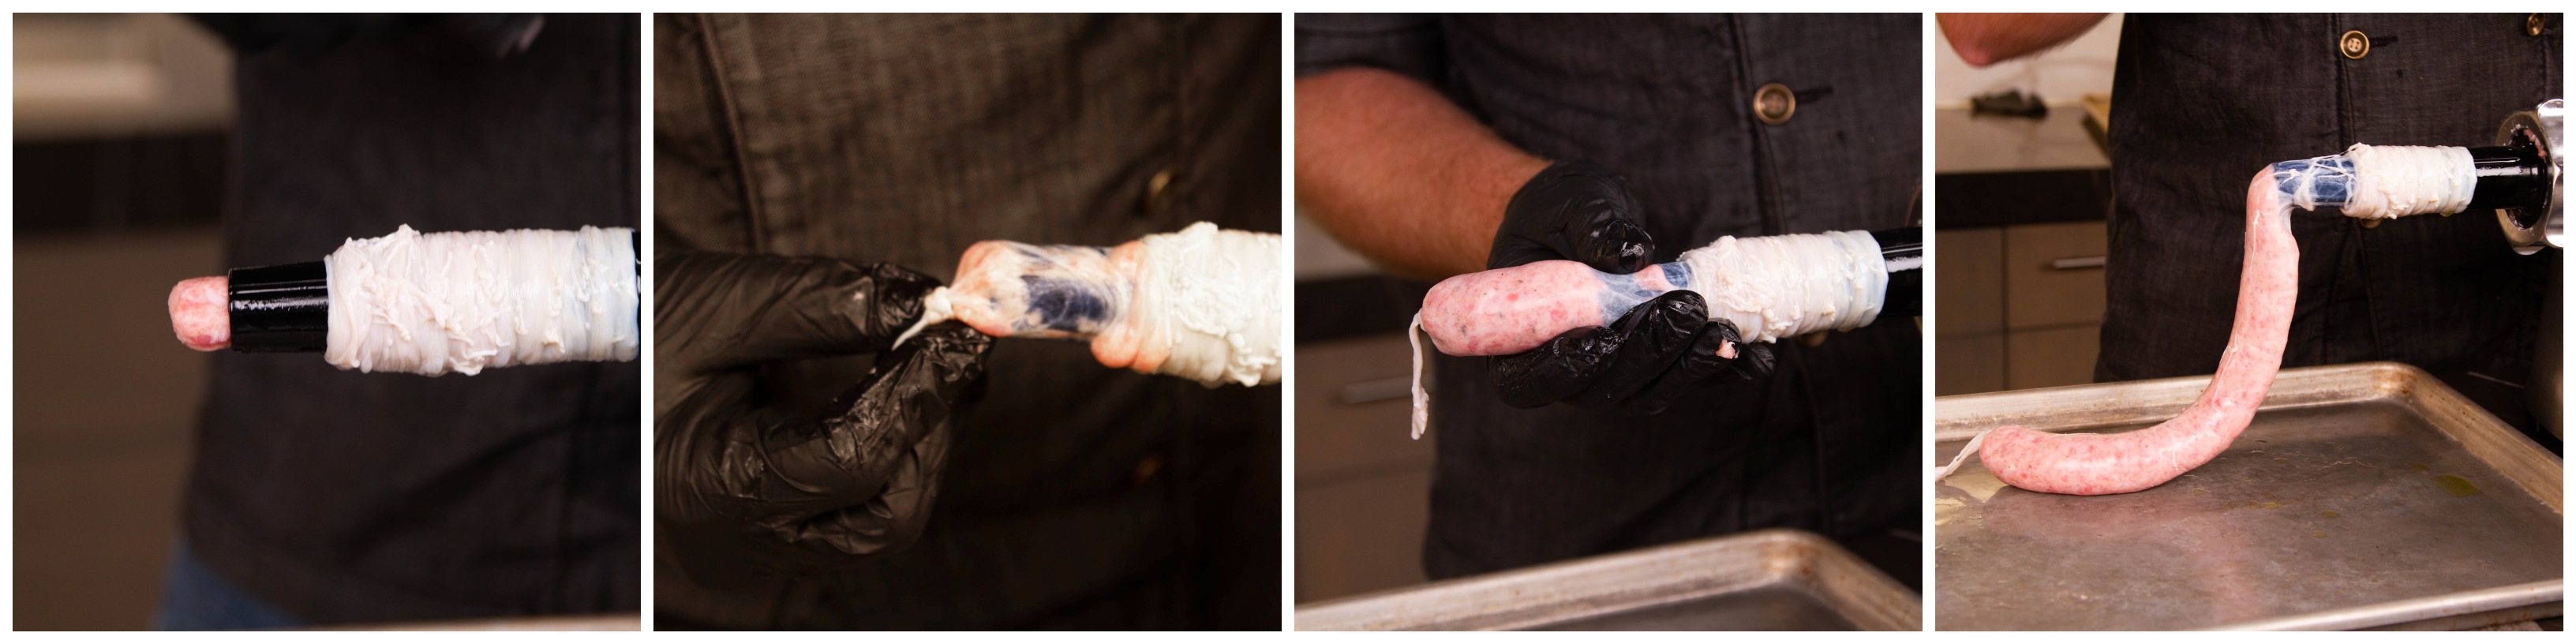
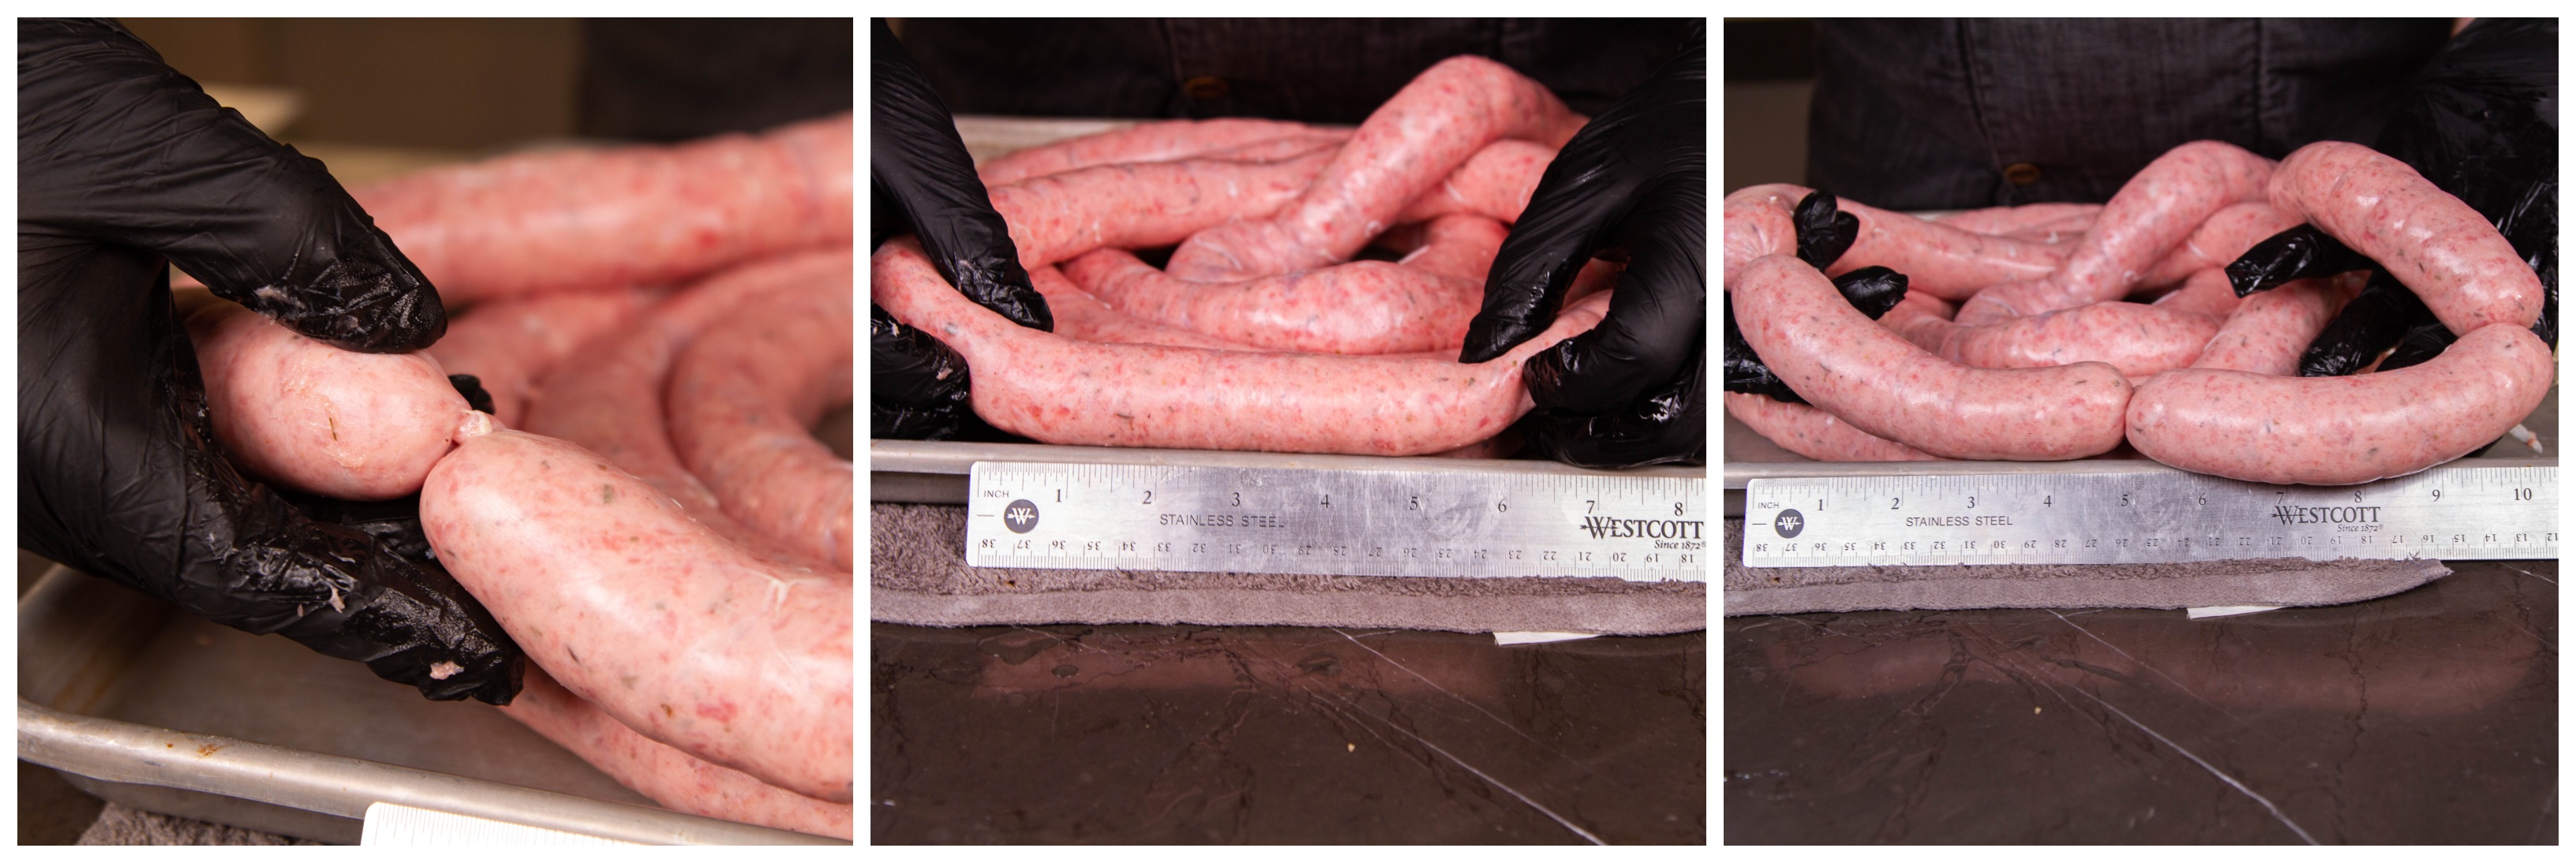
Stuff the sausage meat into the feed tube until it is just peeking out the end. Pull the casing over the end and tie a knot in it. (You don’t do this ahead because you want to avoid a bubble in your casing.) Continue feeding meat into the feed tube. Apply enough tension on the casing to fill the casing firmly without it becoming tight. Overfilling casings will make linking nearly impossible and will cause cooked sausages to burst more easily.
Coil the sausage onto a lightly oiled pan as you go. When you reach the end of your casing or your filling (they rarely come out the same!), tie off the end. If you want to cook a whole coil, as in the Cumberland Sausage style, you are ready to cook. Otherwise, it’s time for linking.
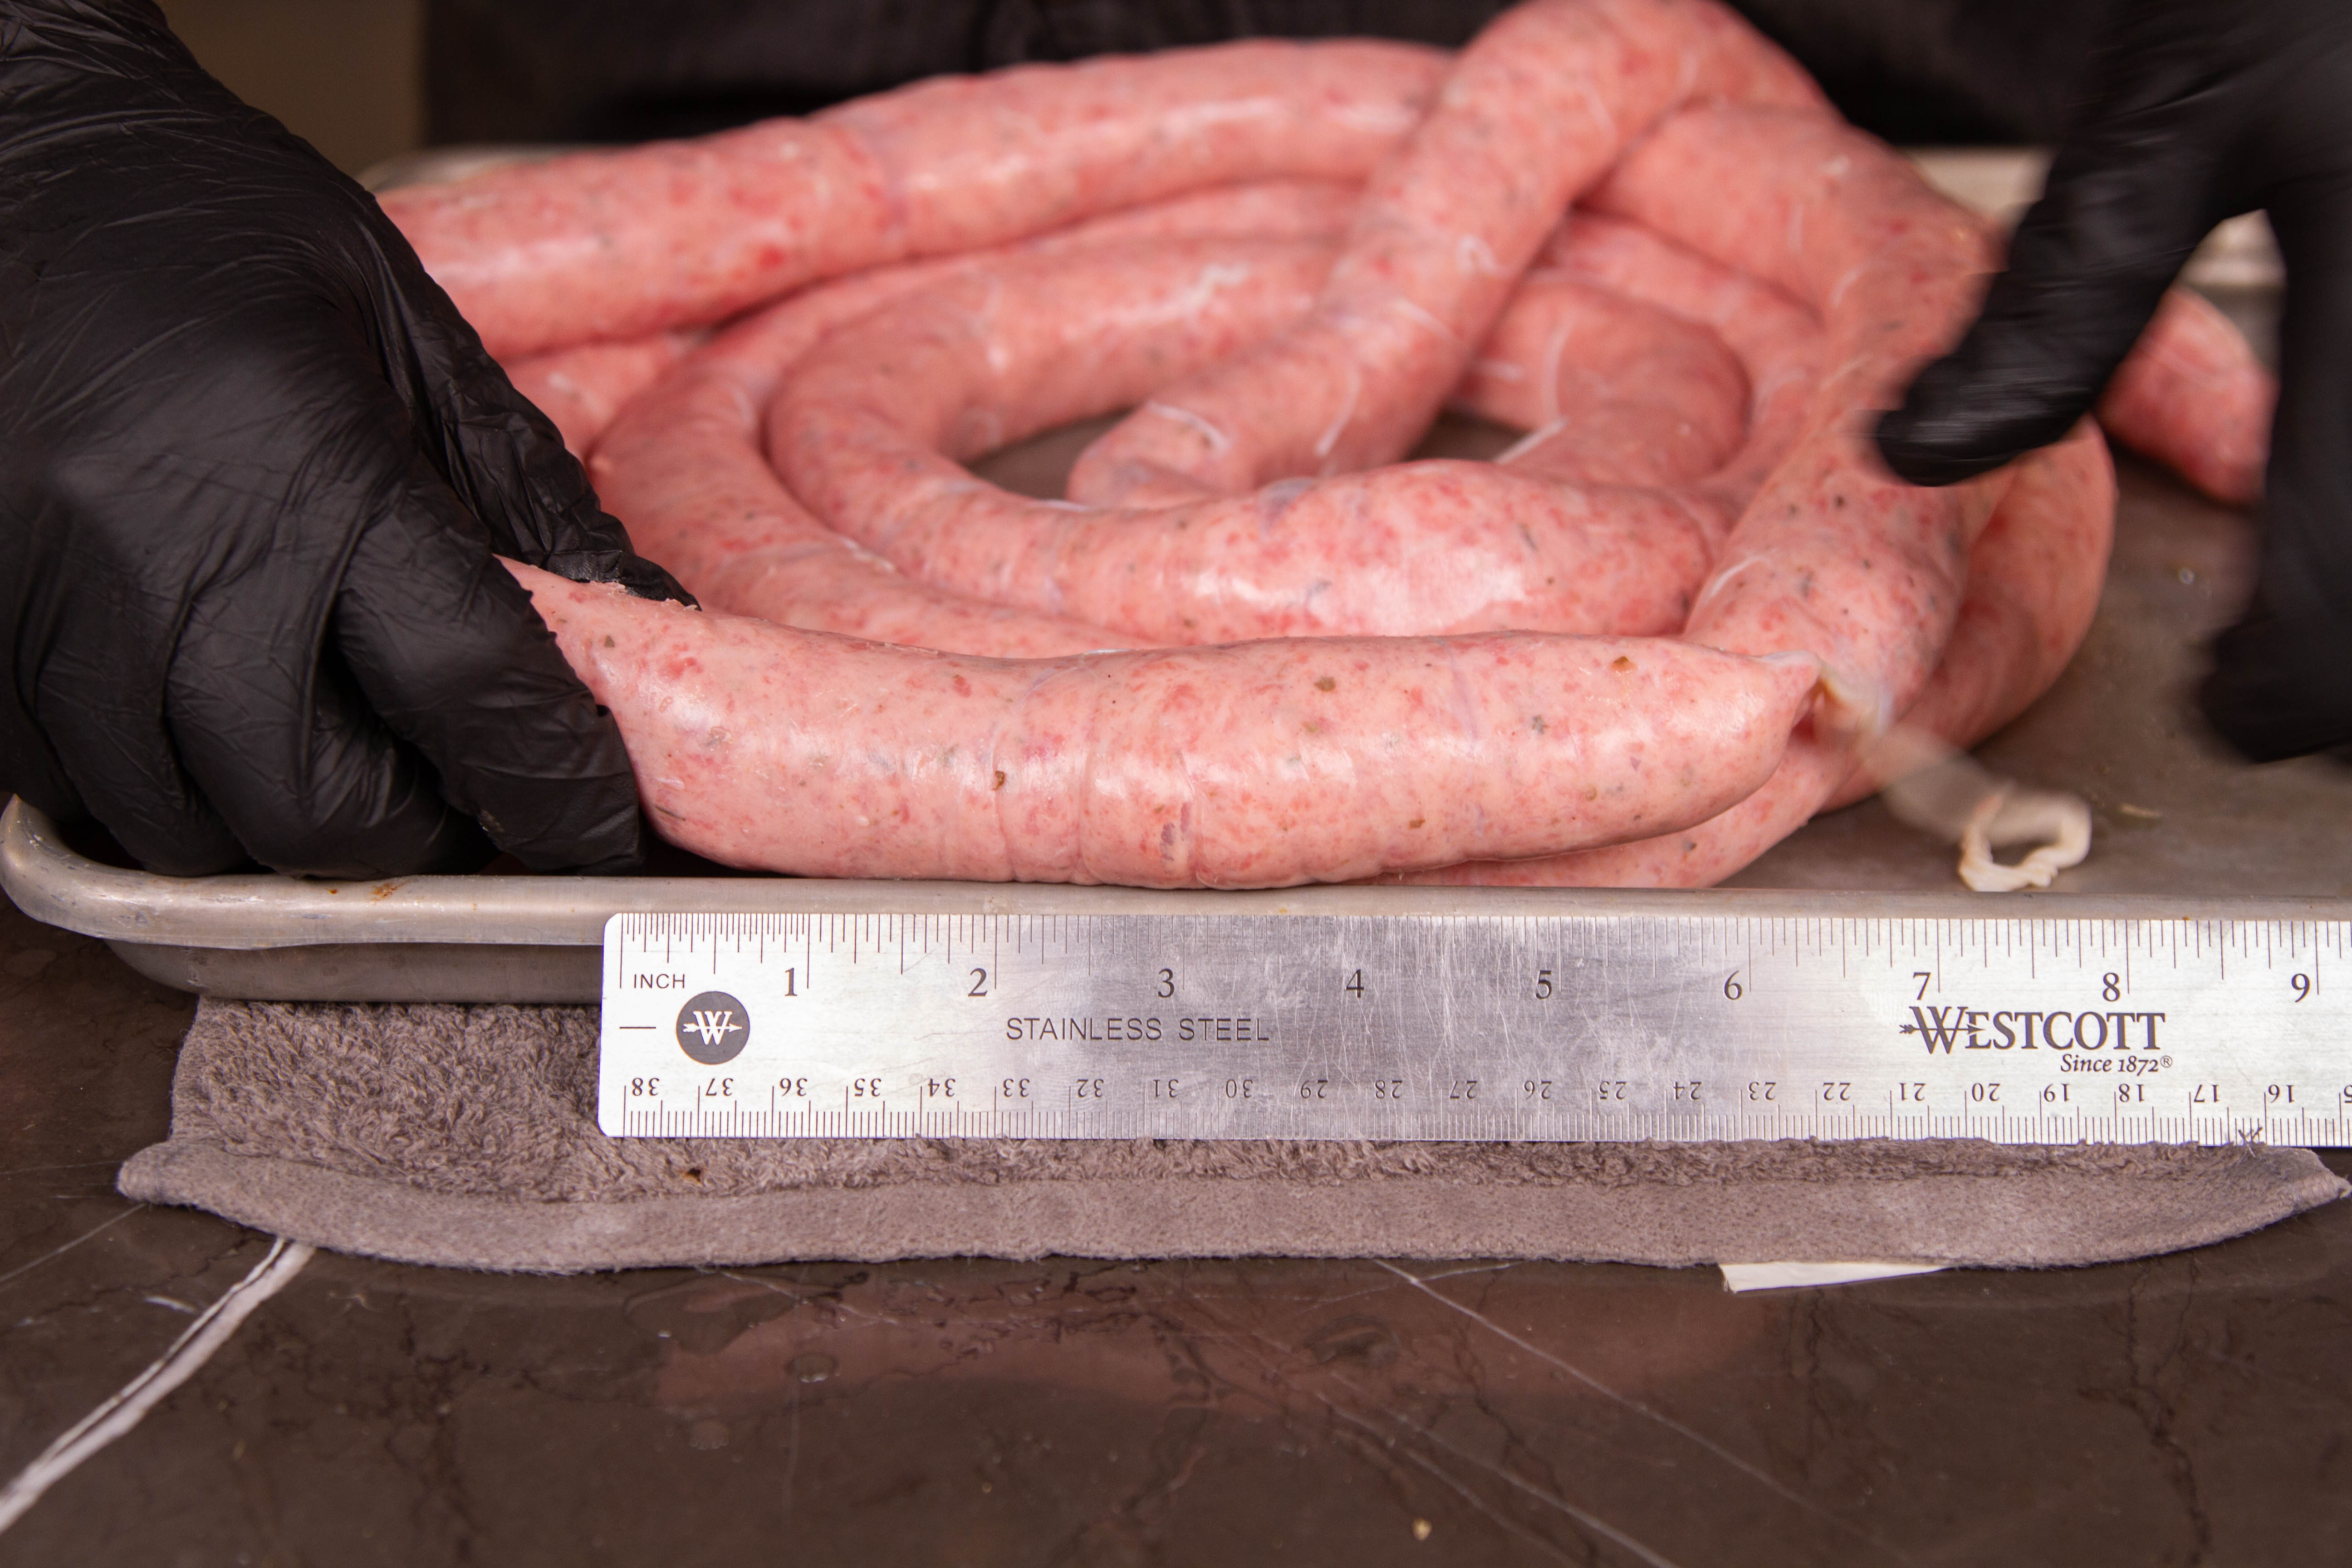
To link your sausages, measure out the length you’d like them to be (six inches is normal brat size) and twist off a link. Measure the same length again, but do not link it. Move that segment down another six inches, measure off the third link and twist it in the same direction as your first link. By only linking every other sausage, you don’t have to keep track of rotating forward or backward every other link.
Prick any bubbles that may have formed in your links to prevent rupture later on.
Note: if you don’t have a way to stuff sausages into casings, you can make sausage balls or patties out of the meat. Grill or pan-fry them for delicious results.
How to Cook Sausage
Because they are made of ground meat, brats and other sausages need to be well cooked.
Fresh sausages [like bratwursts] should be thoroughly cooked to kill microbes, but not hotter than well-done meat, or 160°F/70°C.”–Harold McGee, On Food and Cooking pg. 171, emphasis added
But it’s important to get to that temperature carefully. In their influential book Charcuterie, Michael Ruhlman and Brian Polcyn explain the best way to grill sausages:
To properly grill sausages, you need to be able to cook them over indirect heat—meaning next to but not directly above the coals—for at least part of the time. … Start the sausages over medium direct heat, just long enough to give them some color and smoke, then move them to the side, off the heat, and cover the grill. … Or you can begin by cooking them through over indirect heat and then coloring them over direct flames. It’s easy to cook sausages too fast, it’s almost impossible to cook them too slowly.”– Ruhlman and Polcyn, Charcuterie, pg. 111
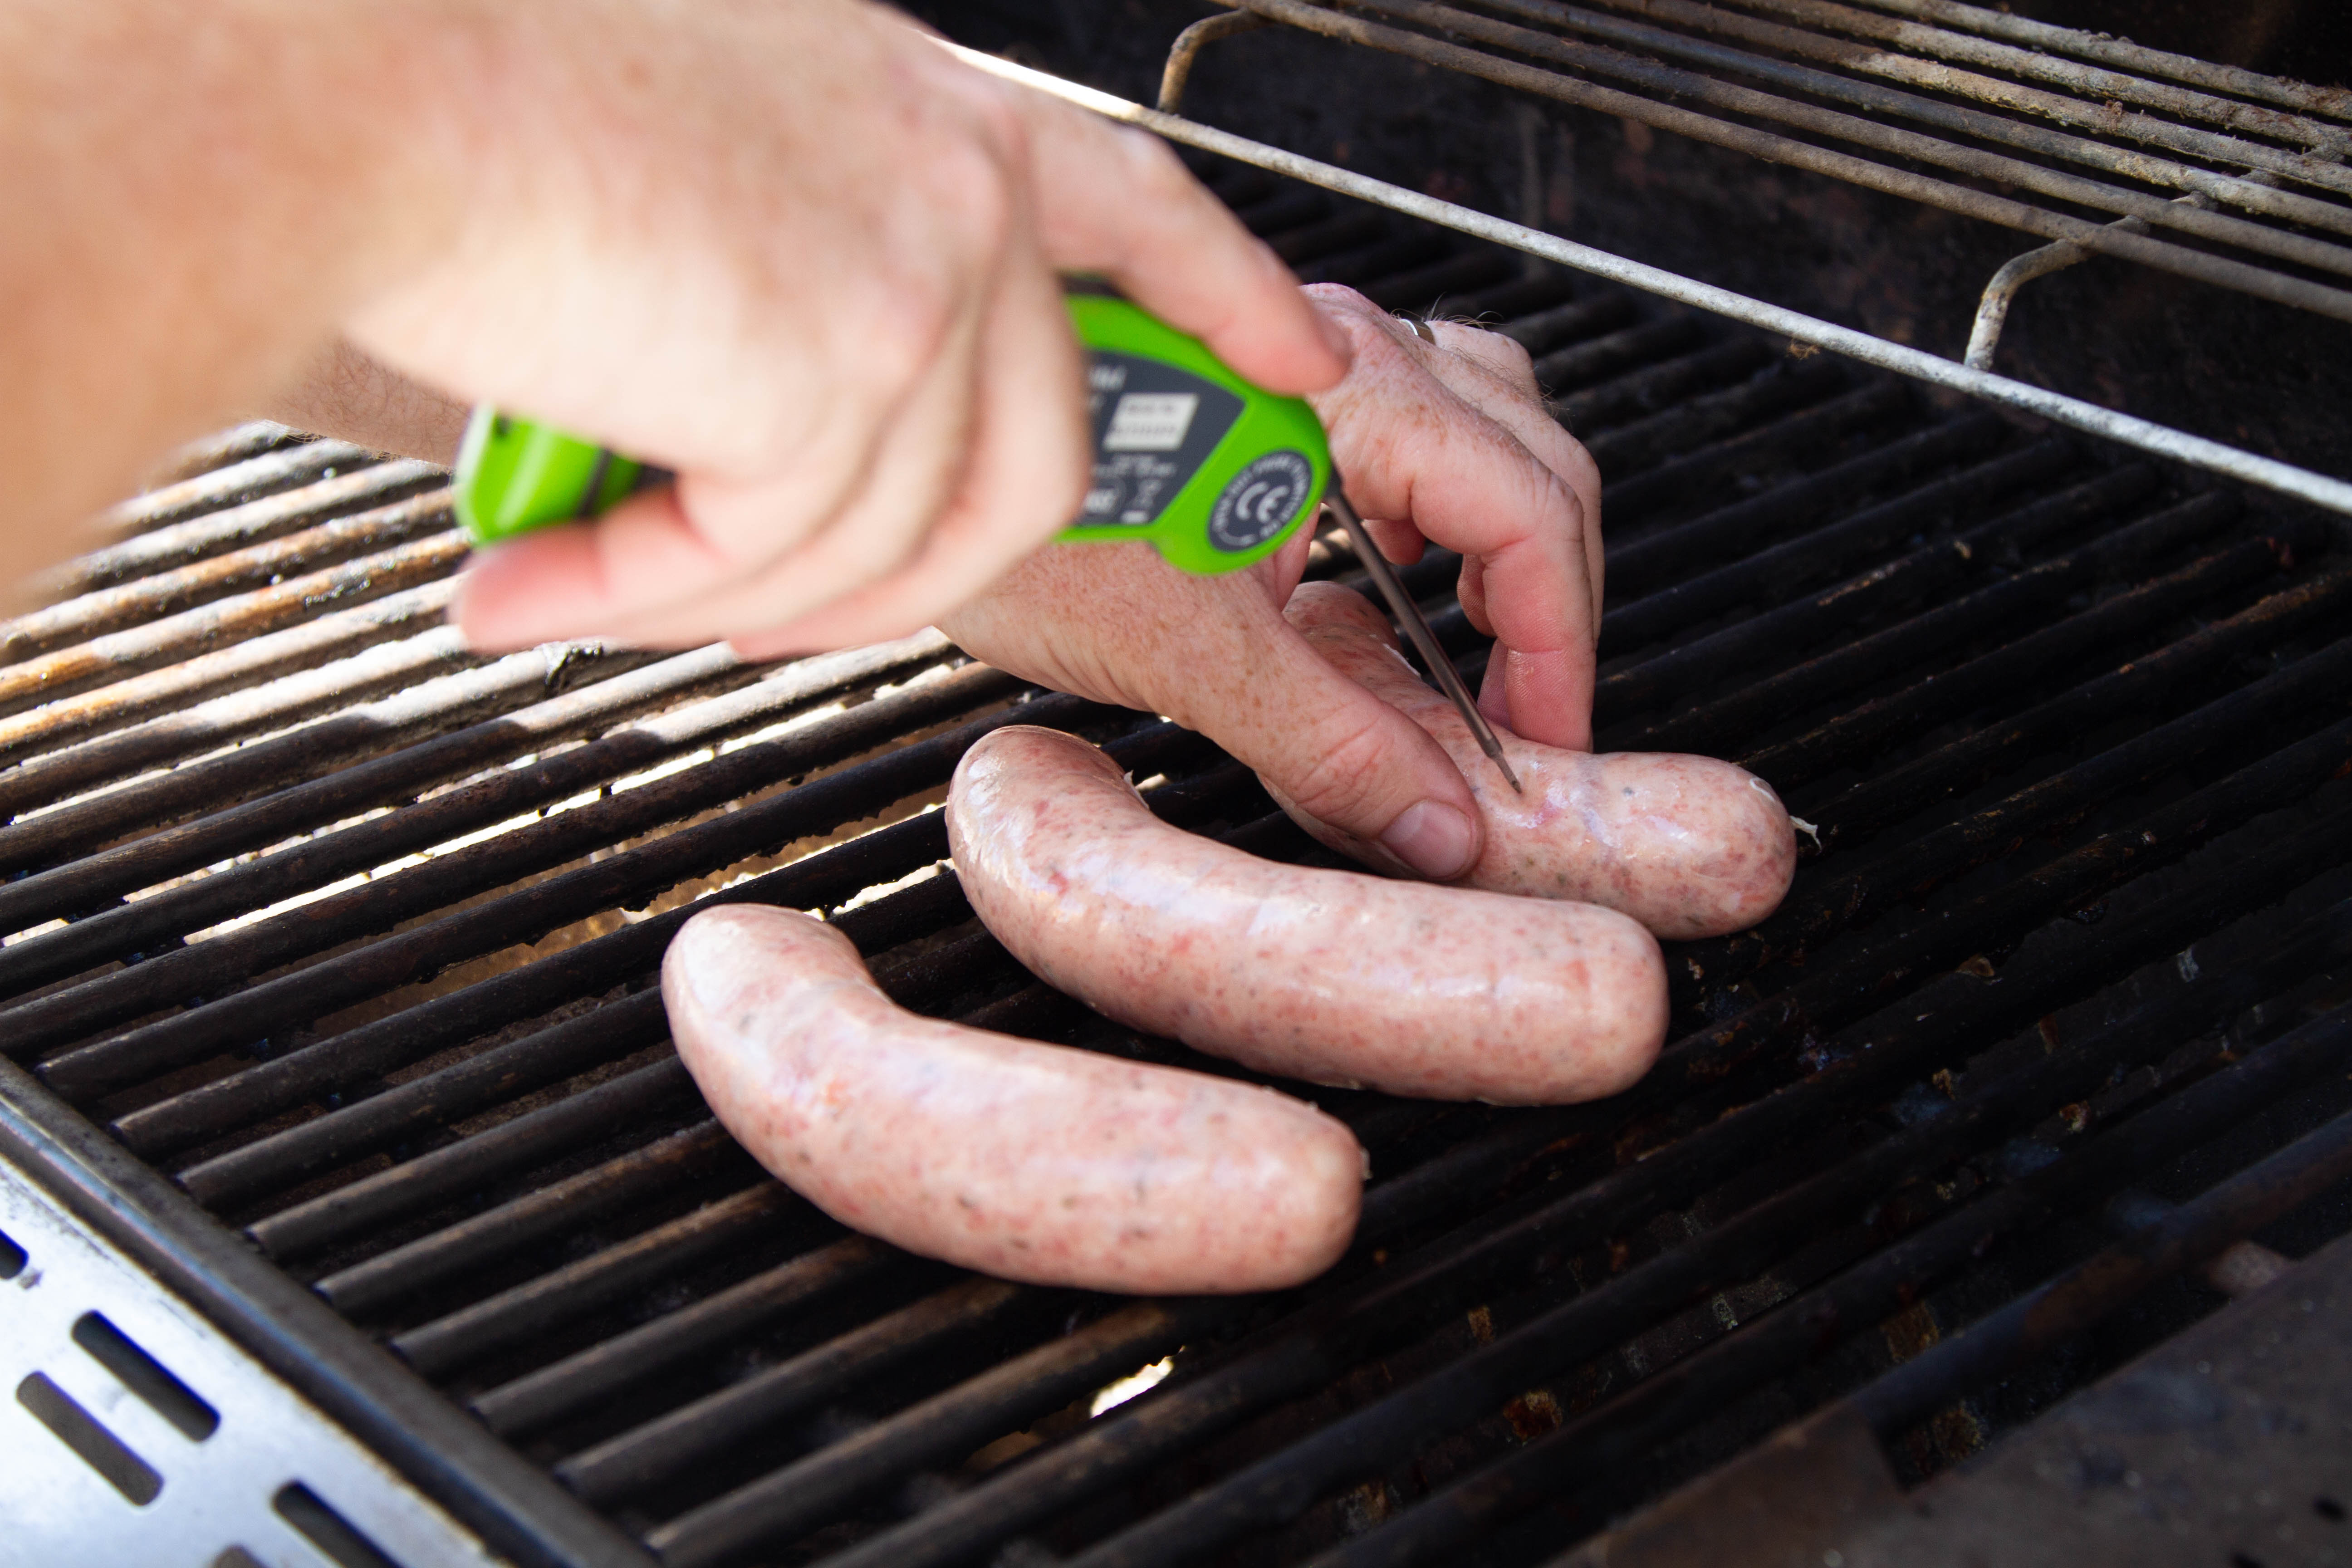
When grilling sausages, it is very important to prick them. A lot. I realize this seems like I’m telling you to dry out your sausage, but if you don’t prick it in five or six places per side, you’re going to split the casing, and then you’ll lose some major juices.
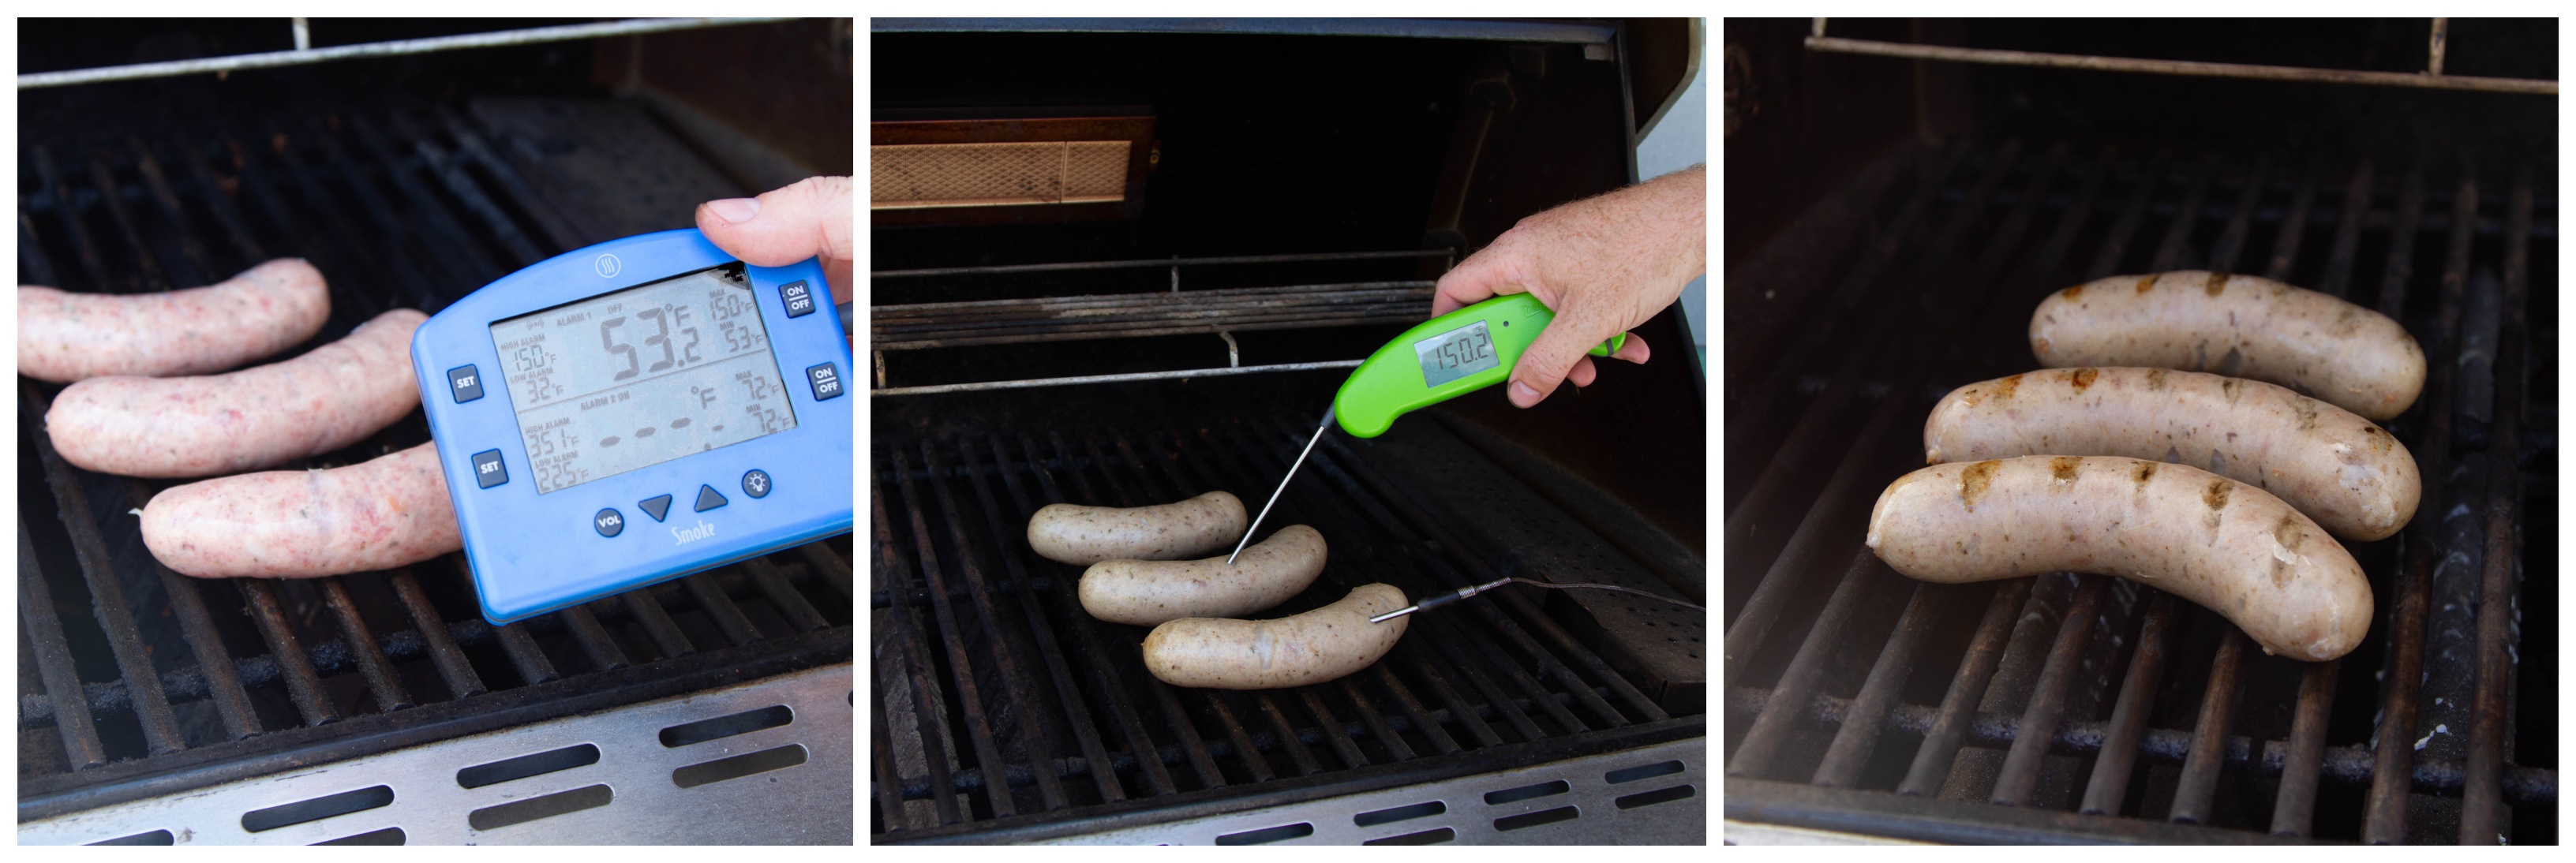
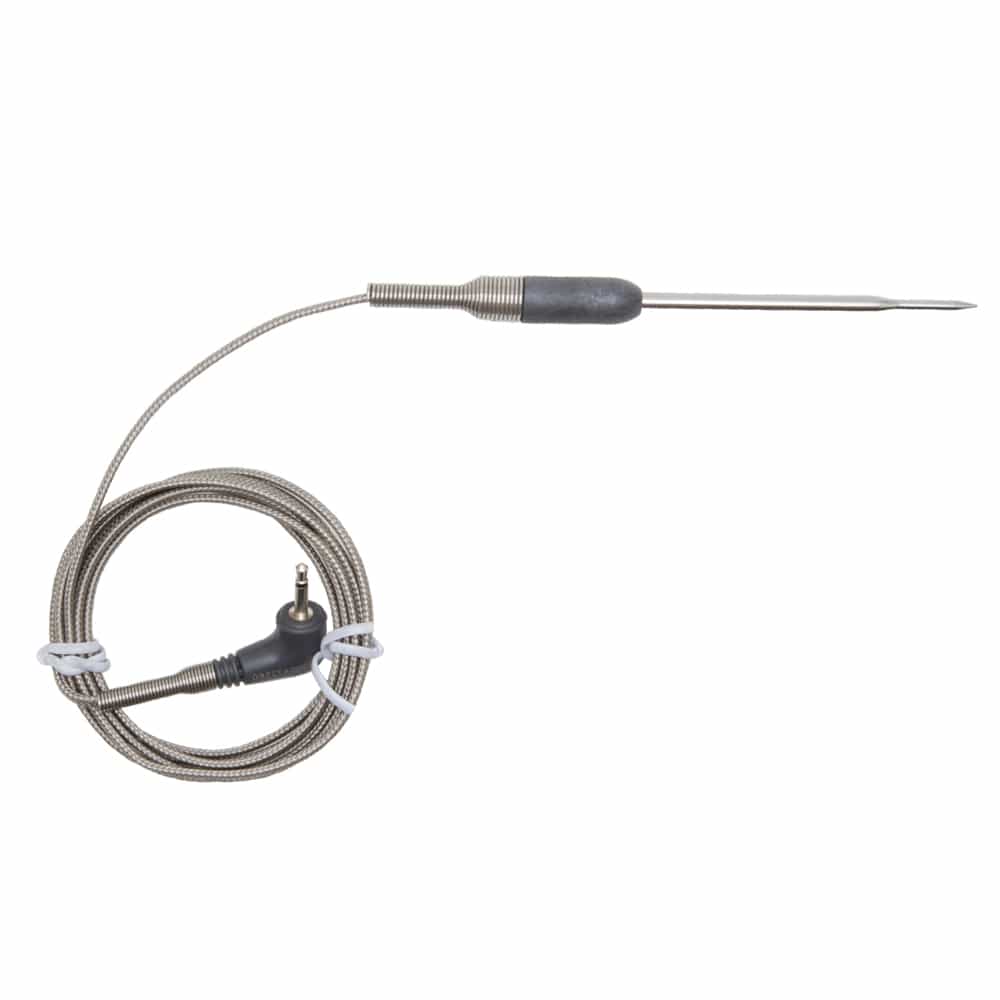
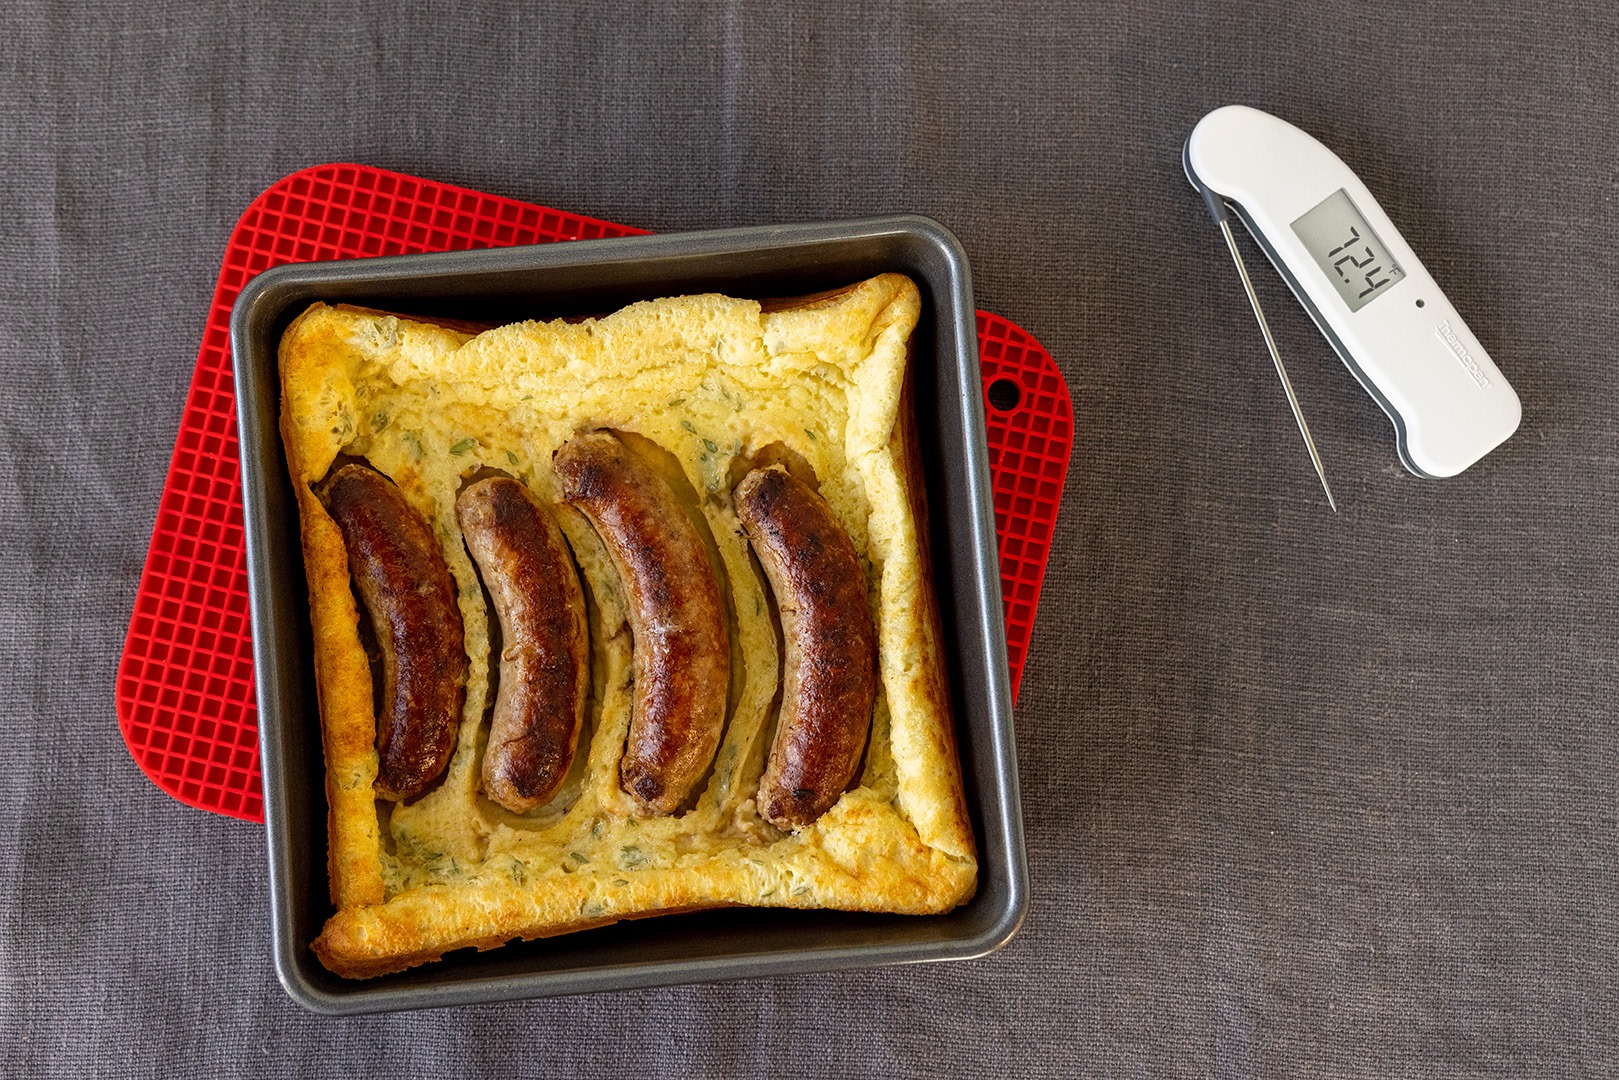
We opted for the cooking our sausages over low heat first, up to 150°F (66°C), using our SmokeTM dual-channel thermometer and an optional 2.5” Pro-series® high-temp straight probe to monitor the sausage’s internal temperature. Once that temperature was reached—and verified with our Thermapen—we moved the sausages to the medium-heat side to pick up a little color.
And that’s it. Keep your meat and gear cold, mix the meat well, don’t overstuff, and cook your sausages carefully and slowly over indirect heat. Perfect sausage.
Homemade Bratwurst Recipe
For your first go-around on sausage, try this recipe based on the great one presented by The Meatwave blog
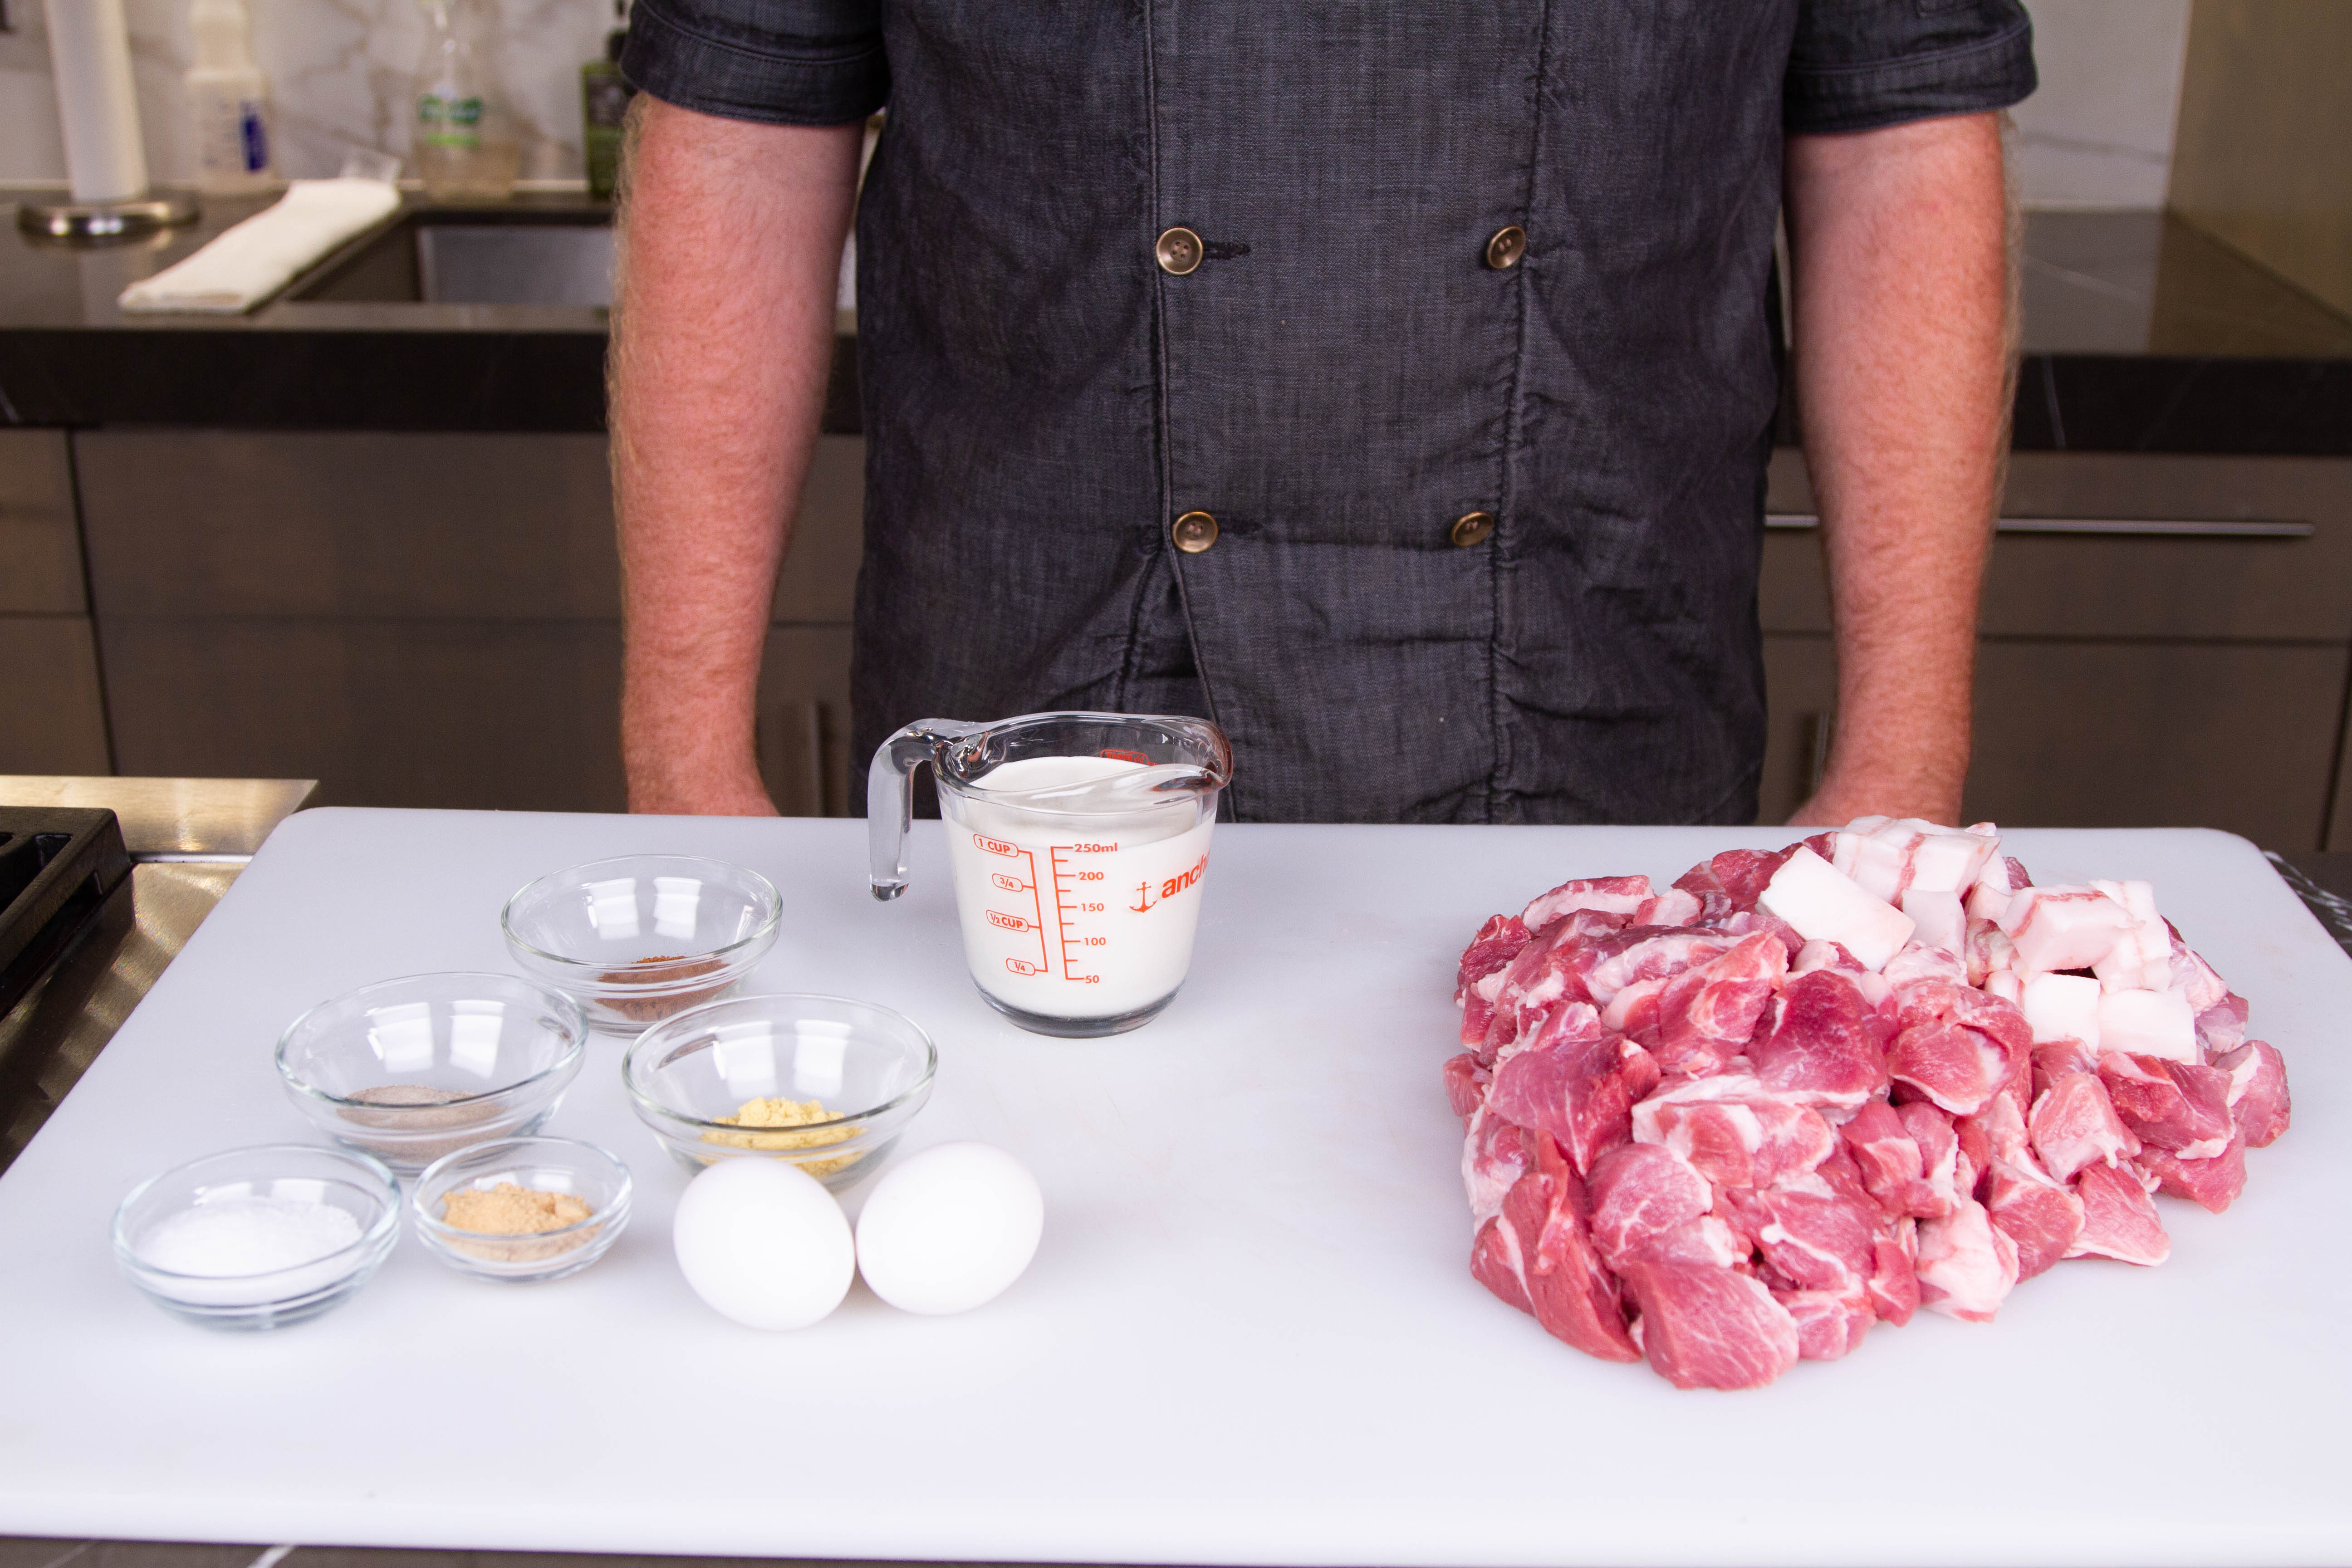
Ingredients
- 4 1/2 pounds boneless pork shoulder butt, cubed
- 1/2 pound pork fatback or uncured pork belly, cubed
- 2 Tbsp Kosher salt
- 1 Tbsp ground white pepper
- 2 tsp ground ginger
- 2 tsp of dry mustard
- 2 tsp dried marjoram (optional)
- 1 ½ tsp caraway seed (optional)
- 1 1/2 tsp ground nutmeg
- 2 large cold eggs
- 1 cup ice-cold heavy cream
- Sausage casing (about 8 feet)

Instructions
- Chill meat and grinder equipment in freezer ½ hour.
- Grind meat into bowl set into another bowl filled with ice. Make sure the meat stays cold in the grinding process.
- In a stand mixer bowl, mix spices with ground meat.
- Add the cream and eggs and mix until fibrously sticky. Make sure the temperature during mixing does not exceed 60°F (16°C).
- Prepare casings for stuffing.
- Feed a little meat through the tube and tie the casing over the end.
- Stuff sausages tight enough to fill but not too tight to twist and link.
- Measure a link of sausage and twist it to link.
- Skip a link and measure the next one. Twist it off.


July is National Grilling Month, so take this opportunity to try something new and make your own delicious homemade bratwursts. Then move on to other sausages! With your Smoke or ChefAlarm® and your Thermapen®, you can brat with the best of them.
Products Used:

References:
Harold McGee, On Food and Cooking
Michael Ruhlman and Brian Polcyn, Charcuterie
Joshua Bousel, The Meatwave blog


Good recipe and directions. My “Wisconsin” style brats call for a little less port shoulder and the addition of veal shoulder. And after cooking, we put them in a beer/butter bath for around 15 minutes. It’s all good. I look forward to trying your recipe to compare.
Craig,
A lot of versions call for some veal, and it’s a great way to go. Veal is hard to come by in some areas, so we went with an all-pork version. Do you grill them until they’re done and then beer bath them? Sounds delicious!
Prick the brats? NO! NO! NO! You will wind up with a dry brat, just as dry as when the casing splits. The trick is to grill them over medium heat getting them nice and brown without splitting the casing. The casing only splits when the grill is too hot. A good brat spills hot juices down your chin on the first bite. If your brats aren’t juicy you did it wrong.
indirect heat works great,then put a few grill marks on them
I really enjoyed your article. It was very interesting to see how Brats are made. We make our own breakfast sausage. I don’t have a meat grinder, we buy our ground pork from Costco business store
and add our own seasonings and mix our own. I am wondering if you could use the ground pork from Costco in place of cubed pork shoulder and pork belly since we don’t have a meat grinder?
Can’t wait to hear your answer. Thanks again!!
Val,
You could absolutely do that! Mix in the seasonings, eggs, and milk, make sure it emulsifies, and there you go. That’s a great shortcut, too, so thanks for sharing!
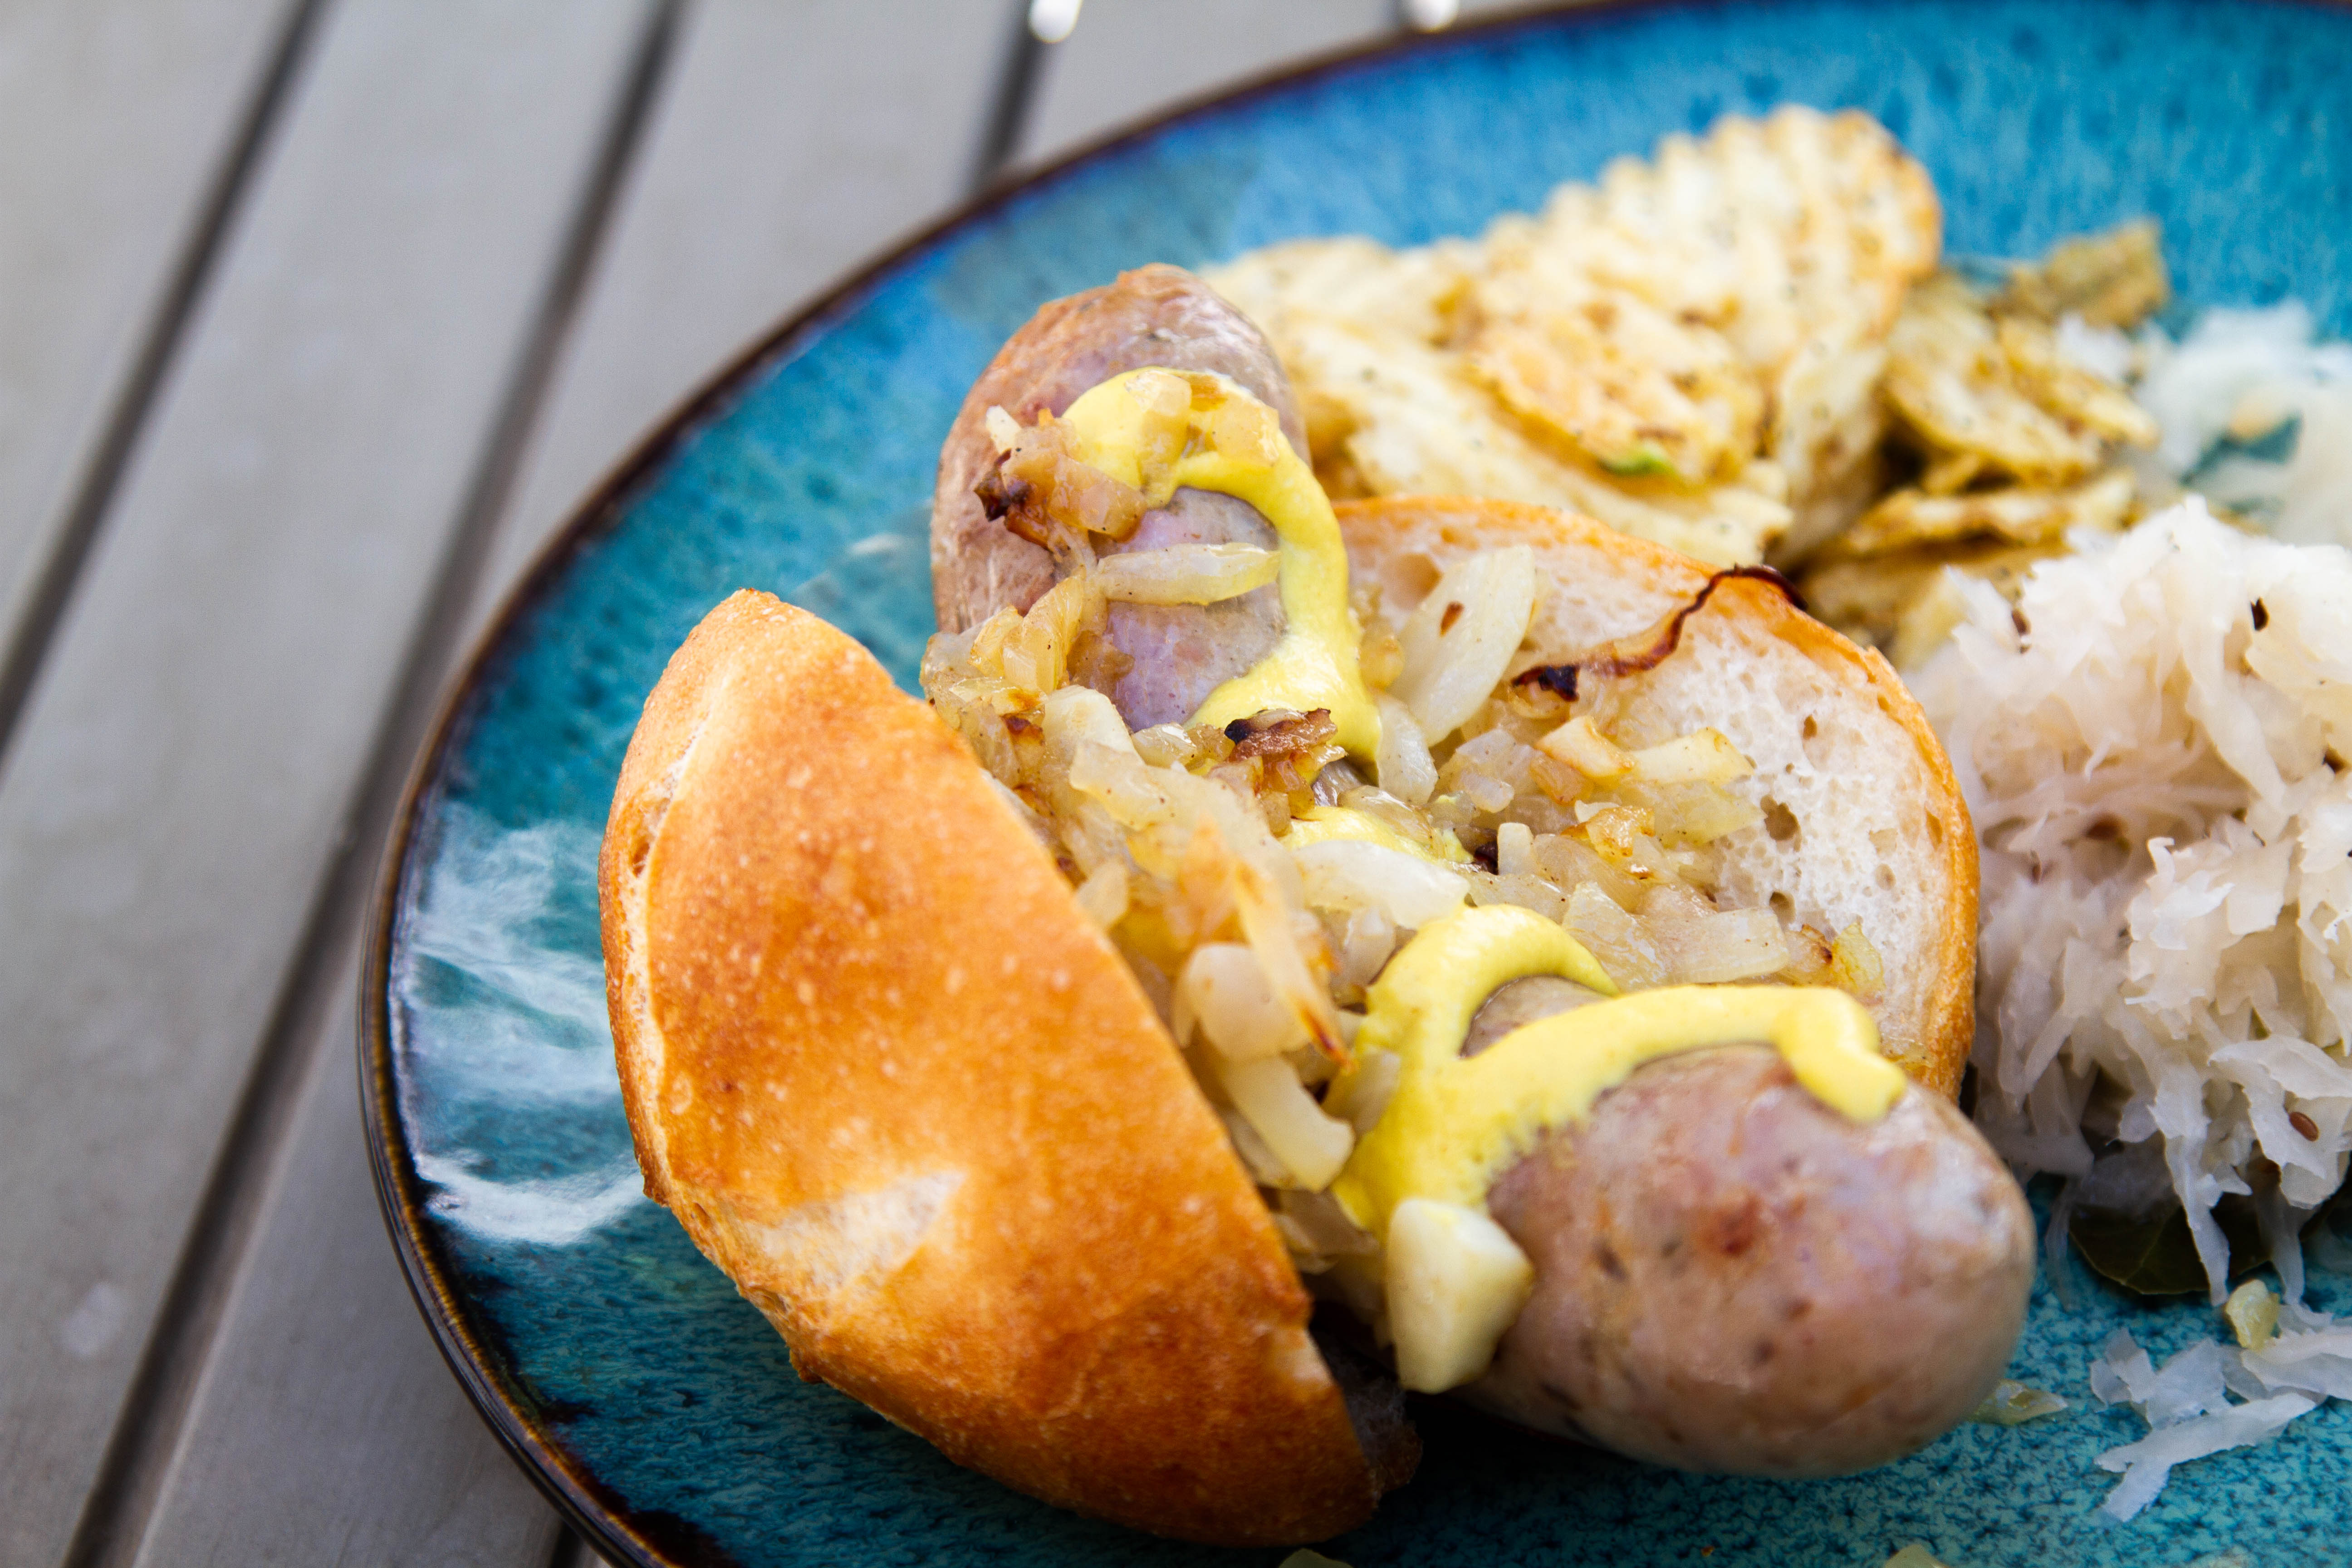
My wife is from Wisconsin, and shortly after meeting her for the first time she introduced me to Grilled Brats. I had never heard of them before. Wow, where had these been my whole life, LOL. Anyway, we usually boil the refrigerator temp brats in straight beer and sliced onions to actually cook them on low to medium heat for about 20 minutes or so, then put them on the grill on low heat, rotating them every few minutes to give the skins a nice even brown color. Some people like to eat them right off the grill like that, but we like to put them back into the hot beer and onion water pot where they absorb some more of that great flavor. After about 15 minutes, we pull them out and put them on a tray and serve them with nice soft hot dog buns and of course a generous topping of well sauteed onions and then add some spicy mustard to finish them. Add a few chips or fries to your plate with a nice cold beer on a hot afternoon and you have a little bit of heaven, LOL.
Delicious!
Thank you for this great article. Going into detail on the specifics of brats. Love the extra tips and pointers. I made Polish sausage ,apple sausage, spinach and feta sausage but I can’t wait to get started on these brats!