Porterhouse Steak Perfectly Done
Sometimes called The King of Steaks, a porterhouse steak is an indulgent and impressive cut of meat. This substantial steak will easily serve as a dinner for two and presents a couple of unique cooking challenges. Preparing the steak just right with the best cooking method for the cut is important, and we have the tips you need to be sure your investment is well taken care of.
What is the Difference Between a Porterhouse Steak and a T-Bone Steak?
A true porterhouse cut can take a little planning to find. Knowing the difference between a porterhouse steak and a regular T-bone steak will make your job easier. Familiarize yourself with the USDA definitions to keep yourself from being duped, and don’t settle for less.
Two Steaks in One
T-Bone and porterhouse steaks look a lot alike and they’re almost the same. They’re both a cut with two steaks separated by a T-shaped bone: a New York (sirloin) on one side, and a tenderloin filet on the other. This “two-for-one” steak gives you the beefy best of both worlds: A mouthwateringly tender filet mignon, and a robust, flavorful NY steak.
The Difference is in the Tenderloin
But a porterhouse steak is actually taken from farther back on the cow. USDA regulation states that the tenderloin section of a porterhouse steak must be at least 1.25 inches (3 cm) across at its widest point. Anything from .51-1.24 inches (1.3-3 cm) across on the tenderloin makes the steak a T-bone. Anything smaller than .50 inches (1.3 cm) across is called a bone-in strip steak.
Now that you know the difference, you’re ready to find your porterhouse steak. It may take a few phone calls to your local butcher shop or grocer to find your steak, but it will be worth the effort. Don’t hesitate to ask the butcher or grocer to measure your steak with a ruler just to be sure. You want at least 1.25 inches (3 cm) across the tenderloin.
$$$ A Word on Cost

➤ While it is expensive, keep in mind that when compared to what you might pay in a high-end restaurant ($50-100 per steak), enjoying a porterhouse at home seems like a no-brainer.
Porterhouse Steak Cooking Challenges
1. The Bone
The very anatomy of a porterhouse steak presents some challenges. While cooking, protein fibers shrink and pull away from the bone. When the meat begins to shrink on a porterhouse steak, the center bone sticks out a bit, causing the meat to have very uneven contact with the cooking surface. The meat needs exposure to high heat despite the bone ridge in order to develop a proper brown, crisp crust. A pan sear isn’t enough for this steak. Grilling or broiling are better options for producing high heat that penetrates past the bone.
Pan-searing is extremely difficult with a T-bone. As the meat cooks, it tends to shrink down a bit, so the bone ends up protruding, preventing the meat from getting good contact with the pan surface and inhibiting browning. You’re much better off grilling or broiling it. —The Food Lab, Kenji Lopez-Alt
 2. Two Steaks that Cook Differently
The two different steaks on either side of the t-bone are actually different sizes and have different levels of intramuscular fat. The smaller, leaner tenderloin will cook faster than the larger, richer sirloin steak.
➤ Only sear as long as necessary to develop a crust. Left under high heat too long, the tenderloin can become overcooked and dry.
Shield the Tenderloin
Position the steak so that the tenderloin is farther away from the heat source than the strip is, to promote even cooking. —The Food Lab, Kenji Lopez-Alt
Vigilant Temperature Control
Spot-check the internal temperature of both sides of the porterhouse steak at regular intervals with an accurate thermometer to ensure that one side isn’t cooking too much faster than the other. If you notice more than a 10°F (6°C) difference between the thermal centers of the two sides of the steak, reposition the cast iron pan in relation to the broiler heating units or crack open the oven door as necessary to cool the tenderloin down and maintain even cooking.
➤ As with any other bone-in meat, avoid the bone with the thermometer probe when spot-checking the temperature for the most accurate reading.
Why Broil a Porterhouse Steak?
Broiling=Even High Heat
Broiling is a cooking method where the meat is in close proximity underneath a high heat source without having to be in physical contact with a cooking surface. Broiling is much like grilling because of the high temperatures involved. Powerful broilers used in restaurants can reach temperatures up to 2,200°F (1,204°C)—very similar to the high temperatures involved with grilling (check out our post, The Difference Between Grilling and BBQ for more information).
➤ Why A Cast Iron Pan?
Cast iron cookware has high heat absorbency and retention properties give it the ability to maintain even temperatures for a long period of time. The pan will maintain the high temperatures needed for a good sear.
Home ovens can reach about 550-600°F (288-316°C) with the broiler setting on high. Preheating a heavy cast iron pan is essential to maintain the high temperatures of this cooking method. Once the steak is placed on the pan, the meat will have direct contact with the high heat of the pan for a short period of time while the top of the steak is exposed to the powerful radiant energy from the heating element. Broiling can brown even the trickiest cuts of meat—perfect for a flavorful crust!
Avoid Uneven Cooking While Cooking in the Oven
Place the NY steak side of the porterhouse steak nearest to the hot spots on the pan and underneath the broiler. The temperature will naturally be higher toward the back of the oven, and lower toward the front where heat is lost most dramatically when the door is opened. So, usually it is best to put the larger cut (the NY steak side) toward the back of the oven.
Know When the Pan is Ready
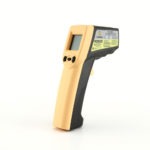
➤ Using an infrared thermometer like the IR-GUN-S can really be helpful so you know exactly when the pan is hot enough to sear the porterhouse steak. The surface of cast iron has the perfect emissivity (about 1) for an accurate IR surface temperature reading. Temperatures in the range of 500-550°F (260-288°C) are best for searing meat.
The Cook
Ingredients
- One 1.5-2 inch thick Porterhouse steak (24-40 ounces [680-1,134 grams])
- Vegetable or olive oil, as needed
- Salt and pepper, as needed
➤ Optional
- 2 tbsp butter
- 2 sprigs fresh herbs—thyme or rosemary
- 2 cloves fresh garlic
Equipment
- 12-inch (30.5 cm) cast iron pan
- Infrared thermometer (IR-GUN-S)
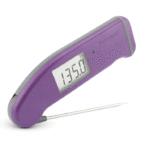
- Instant read digital thermometer (Thermapen® Mk4)
Directions:
—Arrange oven rack to top position, place cast iron skillet on the rack and preheat the oven’s broiler on its highest setting.
—Pat porterhouse steak completely dry and season with salt and pepper. With such a large steak you’ll want to season generously.
—Pour the oil onto the skillet and tilt it to coat the cooking surface.
—Using an infrared thermometer, check skillet’s temperature. Once its surface temperature reaches 500-550°F (260-288°C), place the seasoned porterhouse steak on the skillet with the NY side facing the inside of the oven, and the tenderloin side facing the oven door. Cook for about 2-4 minutes on each side just to sear.
When broiling, use the oven to finish cooking meat through. First place the meat as close as possible to the broiler flame or electrical element and color the meat as desired on both sides. Then remove the pan from under the broiler and finish the cooking in a moderate oven. —Keys to Good Cooking, Harold McGee
—Once both sides are nicely seared to your liking, turn off the broiler and reduce the oven to a standard setting of 300°F (149°C).
—Place the skillet on a lower rack in the oven and allow the porterhouse steak to finish cooking (about 10 minutes) until it reaches its internal pull temperature (verified with a Thermapen) as listed below for desired doneness (we pulled our steak at about 120-125°F [49-52°C] for medium rare doneness):
Porterhouse Steak Pull and Doneness Temperatures
—Remove the skillet from the oven and place the porterhouse steak onto a carving board to rest for 5 minutes. Anticipate the internal temperature to rise 5-7°F (3-4°C) with carryover cooking.
➤ Optional Finishing Step
- Over medium-high heat, melt the butter in the cast iron pan on the stovetop. Add the fresh garlic and fresh herbs. Place the steak back into the pan and spoon the butter over the steak. This extra step adds rich flavor.
—Transfer to a carving board and slice:
How to Slice a Porterhouse Steak
- Cut along the bone to remove the large strip section
- Turn the steak around and cut the tenderloin section off the bone
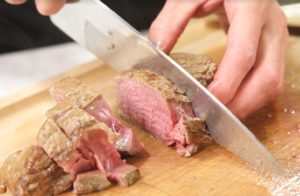
- Cut each piece crosswise into 1/4-inch (.6 cm) thick slices
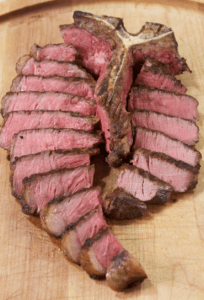
- Replace inside the bone for presentation
Serve, and enjoy your masterpiece!
Products Featured:
 Thermapen |
 IR-GUN-S |
|---|


 2. Two Steaks that Cook Differently


