Are you in the mood to try something different this year with your Thanksgiving turkey? Why not try deep frying it this year? Some say a fried turkey is the juiciest, most flavorful, crispy-on-the-outside, delicious bit of poultry ever to cross their lips. This project is packed with thermal critical control points that will determine the safety of the cook and the quality of the finished product—and we have all the tips you need.
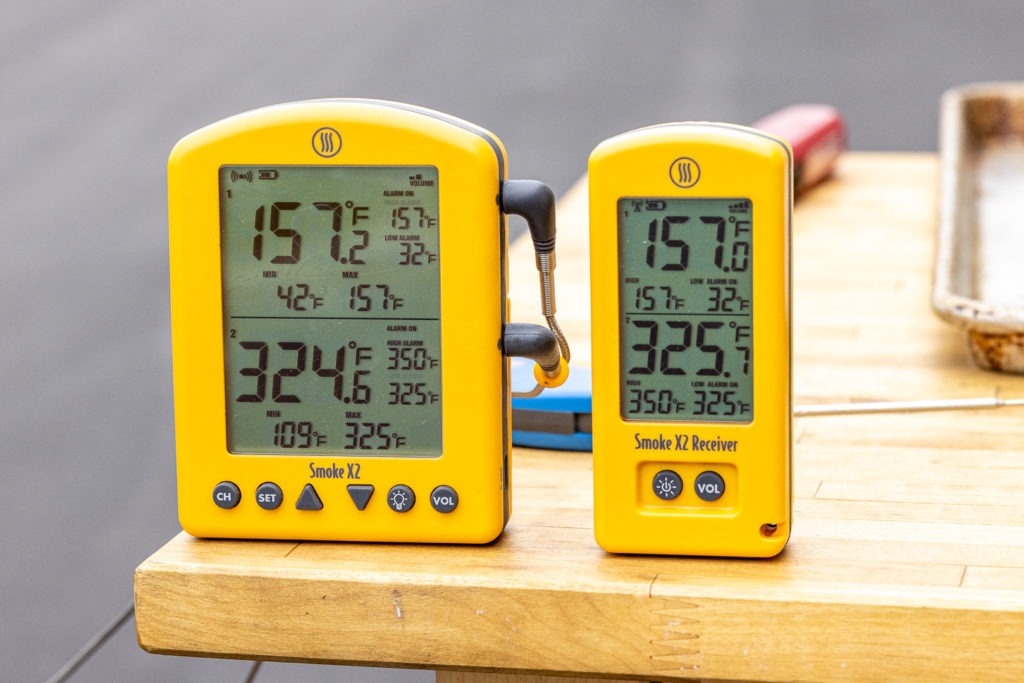
We’ll be using the ThermoWorks® Smoke X2™ 2-Channel Alarm Thermometer with an additional 12″ Pro-Series® High Temp Probe so we can measure both the turkey meat and the critical oil temperature on the same device.
Why fry a turkey?
It’s quick and frees-up your oven!
Deep frying your holiday bird will take less time than roasting does. Most turkeys take about 3 minutes per pound to fry. For example, a 14-pound turkey will take about 42 minutes to cook. While your turkey is cooking outside, the oven will be available for baking rolls, pies, and side dishes.
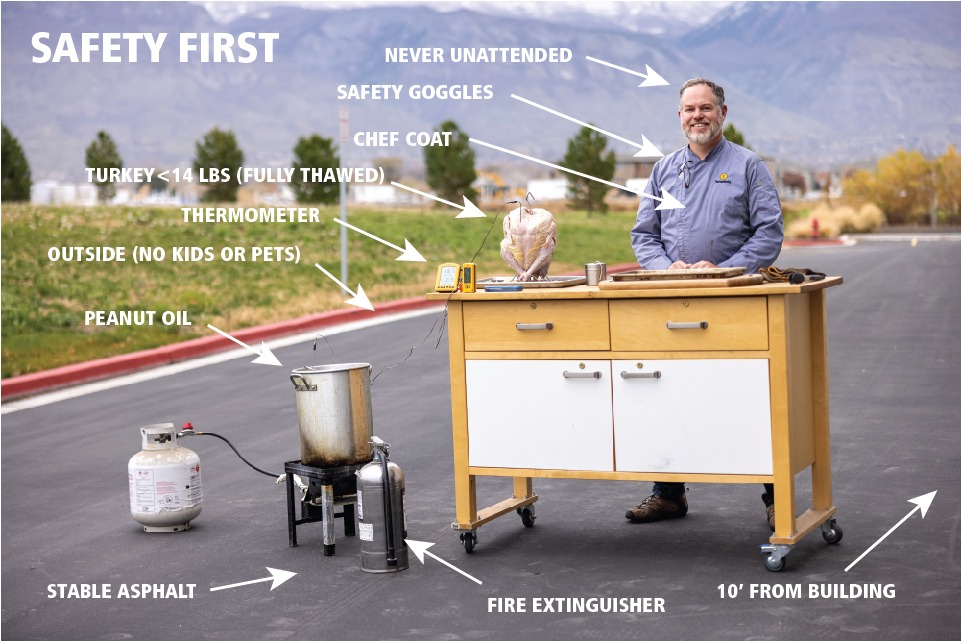
⚠️ Safety First
Frying a whole turkey in hot oil can be dangerous, and caution must be observed. Thousands of fires and injuries occur every year due to turkey fryer fires. Hot oil is highly combustible, and the pot of hot oil will be sitting directly over an open flame. Follow these important tips to ensure the safety of your cook.
- Keep a dry-powder, multipurpose fire extinguisher handy at all times. Never use water to put out a grease fire, it will cause the hot oil to spatter, thereby spreading the fire rapidly.
- Take it outside. Set up the turkey fryer more than 10 feet away from your home, covered patio, roof overhangs, and any other building.
- Set up the burner on stable ground, concrete, or asphalt. Not a wood deck.
- Keep fryer away from children and pets.
- Never leave the setup unattended. Stay within a 10-foot perimeter of the hot oil at all times.
- Don’t drink and fry. The process requires full, focused attention.
- Use a thermometer. Temperature control is crucial. Do not allow the oil to exceed 350°F (177°C).
- Thaw turkey completely. The dramatic temperature difference between a frozen turkey and the hot oil will cause furious bubbling and spillage. If oil spills over the pot it can start a fire, cause an explosion, and result in injury and property damage.
- Pat the turkey completely dry with paper towels. Water on the surface will splatter when lowering the turkey. Splatters cause grease fires.
- Turn off the gas completely when filling the pot with oil, lowering the turkey into the hot oil, lifting the turkey out of the oil, or when removing the pot full of oil from the burner.
- Wear an apron or chef jacket, safety goggles, and use heavy duty elbow-length gloves.
How Much Oil Will I Need?
➤ Water Displacement for Oil Level
Too much oil in the pot will cause the oil to bubble and spill over the sides of the pot when the turkey is lowered in—and this is a dangerous fire hazard. Using enough oil and no more is an important safety precaution.
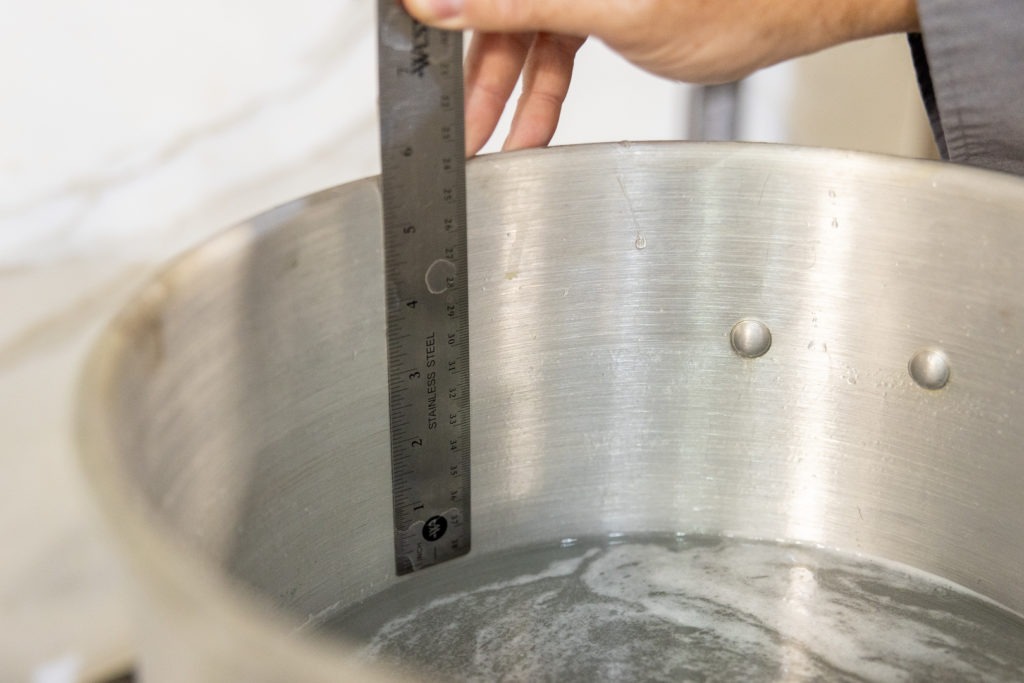
To measure the proper amount of oil needed:
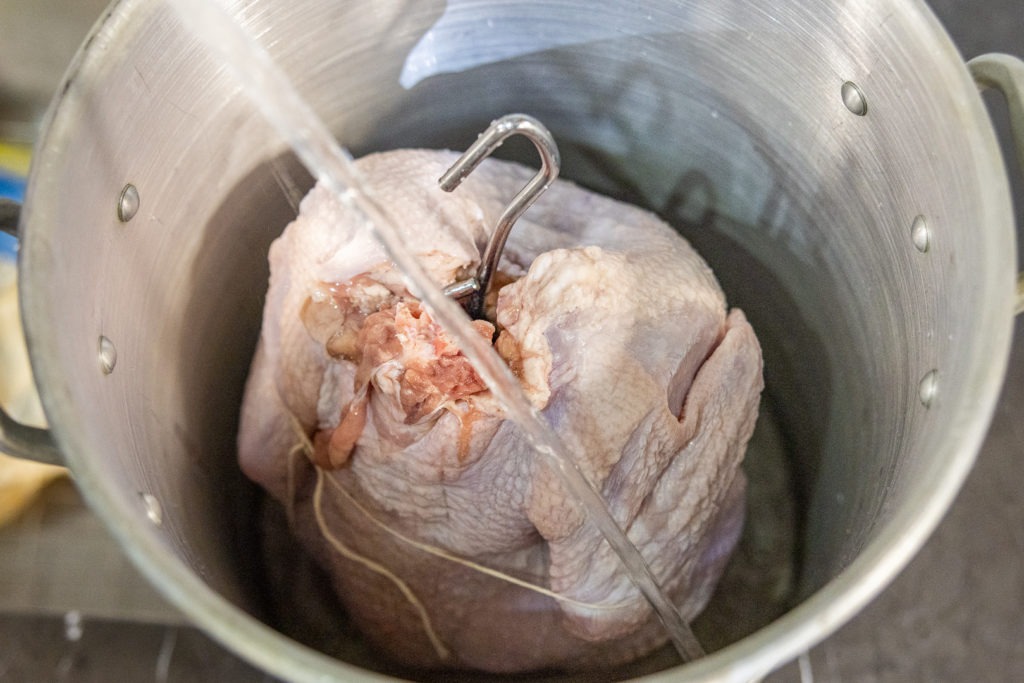
Place the turkey (set on the stand if using) into the empty pot and fill with water until the turkey is covered. Remove the turkey and measure with a ruler the distance from the top level of the pot to the top level of the water. This will be the mark to which the pot needs to be filled with oil.
What Type of Oil?
An oil with mild flavor and a high smoke point is needed for this deep-frying project, and peanut oil fits the bill perfectly. Its flavor is very neutral and has a smoke point of about 450°F (232°C).
If you or any guests have a peanut allergy, corn, safflower, and sunflower oil are options with high smoke points as well.
Start the Oil Temperature Low
Turkey frying becomes dangerous if the oil spills over the side of the pot, and that happens when there is too much oil in the pot, or if it bubbles too violently. If you’ve used water displacement to accurately measure the amount of oil needed, that safety variable is taken out of the equation.
So what causes bubbling? 3 things: 1) a bird that’s too cold (be sure to thaw it completely), 2) water (pat the bird completely dry), and 3) oil temperature that’s too high when lowering the turkey into the pot. Start with oil heated to 250°F (121°C), slowly lower the bird, then increase the oil temperature to 325-350°F (163-177°C)—do not exceed 350°F (177°C).
Seasoning a Deep-Fried Turkey
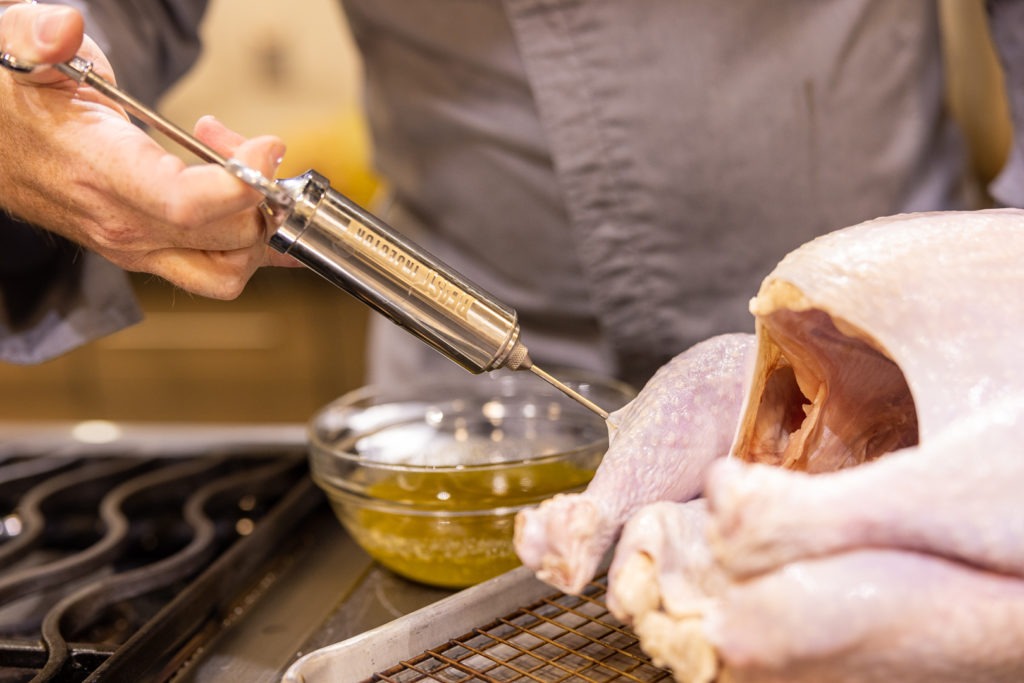
Aromatic vegetables and fresh herbs contribute flavor and moisture when roasting a turkey. But they can’t be used for flavor when deep-frying. For rich flavor and moisture, inject the turkey with a brine, broth, or melted butter. We injected our turkey with melted butter that we first infused with the aromatic herbs and spices we wanted. We simmered parsley, sage, thyme, rosemary, black pepper, garlic, and a cinnamon stick in one cup of butter until it was very aromatic. We then strained the butter and let it cool somewhat. We then injected that into our bird.


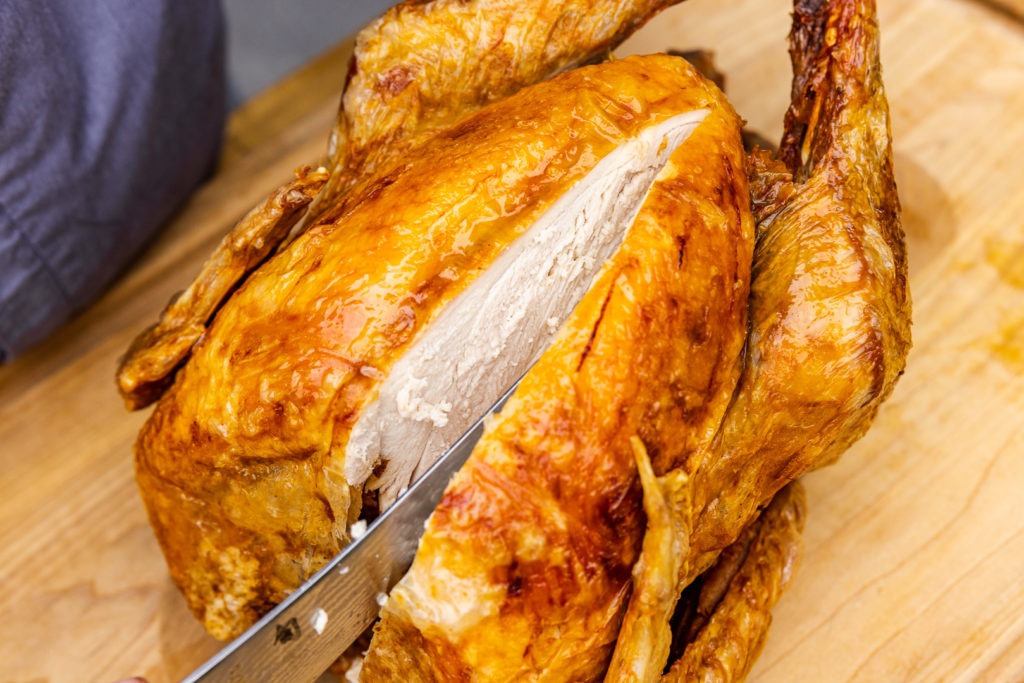
Frying your Thanksgiving turkey is a fun method to try if you haven’t before, and the results are fantastic: golden brown crispy skin with moist and flavorful meat. And did we mention crispy skin? If you can’t get enough of salty, crisp skin, a deep-fried turkey is for you!
The safety of this project and quality of the bird hinge on so many temperature control components. Temperature affects the type of oil used, the need to pat the bird completely dry, the temperature of the oil when lowering the turkey, oil cooking temperature, and the pull temperature of the meat.
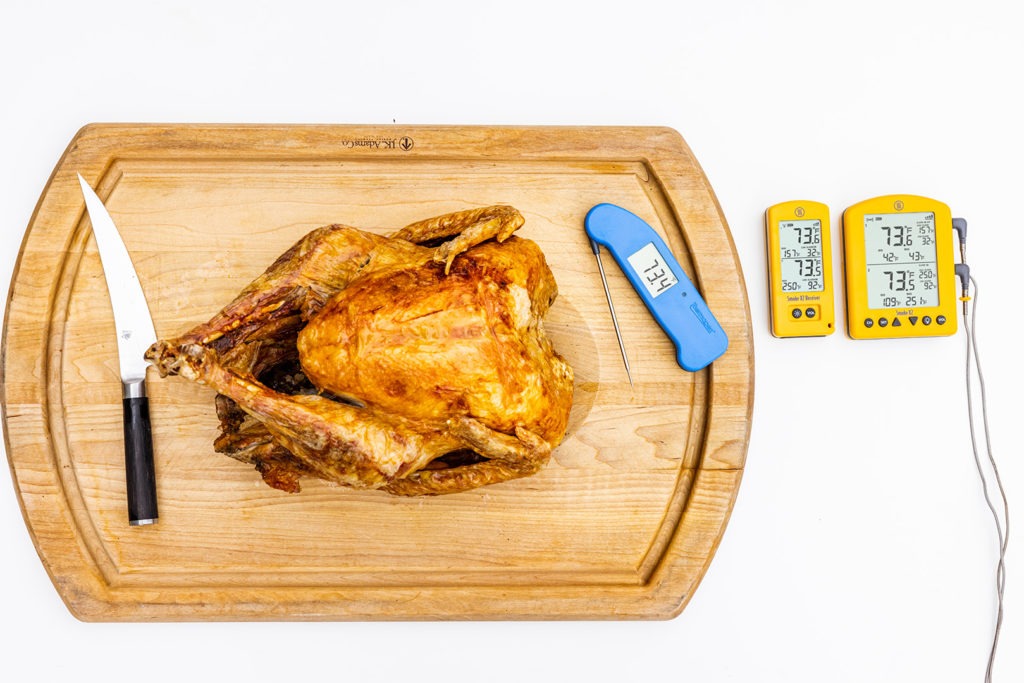
By following safety guidelines and tracking temperatures with a dual-channel thermometer like Smoke X2, and verifying turkey temps with a Thermapen ONE, this deep-fried project will go off without a hitch.
Print
How to deep fry a turkey
Description
Instructions for a great fried turkey
Ingredients
- 1 12-14 pound turkey, fully thawed
- Salt and pepper
- Vegetable oil
- Kitchen twine
For the Injection
- 1/2 pound salted butter, melted
- 2 oz. any mixture of fresh sage, rosemary, and thyme
- 1 cinnamon stick
- Dash of ground pepper
Turkey Fryer Setup:
- Fryer kit: pot with lid, turkey stand, hook for lifting, burner, and fuel hose
- Propane tank
- 3–5 gallons peanut oil, depending on the size of your pot and the size of your bird
Equipment
- Multipurpose fire extinguisher
- Dual-channel alarm thermometer, like Smoke X2
- 12-inch Pro®-series probe
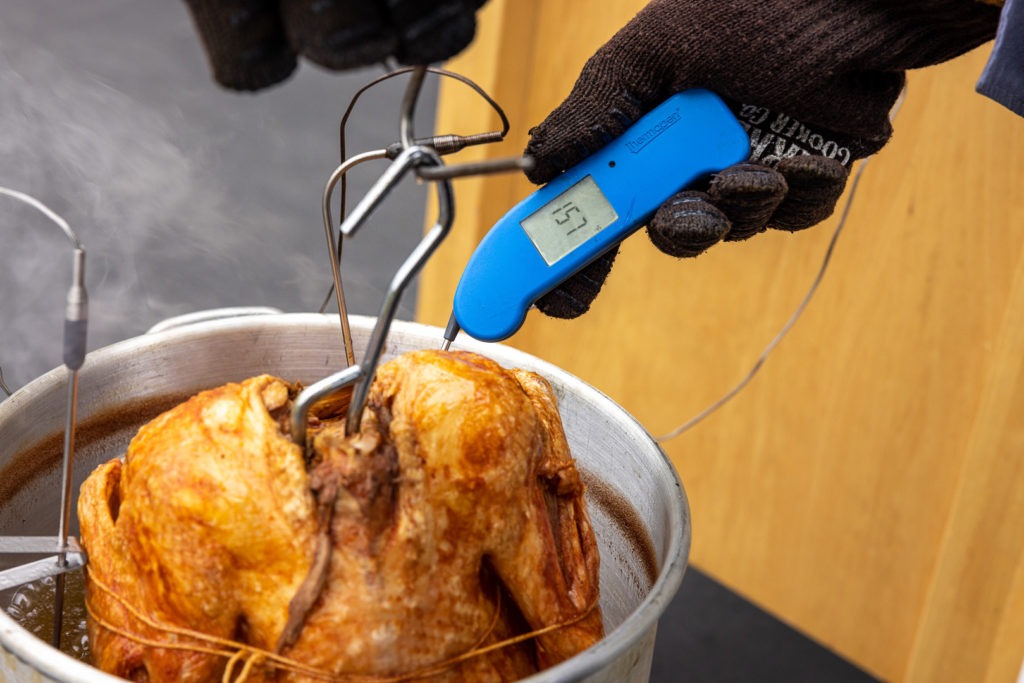
- Instant read thermometer, like the Thermapen® ONE
- Heavy-duty, elbow-length gloves
- Safety goggles
- Clean pan to place finished turkey in
- Lawnchair for you to sit and monitor the cook
Instructions
- Prepare the butter by simmering all the ingredients for the injection in the butter for about 5 minutes. Strain the butter and set aside.
- Remove the neck, giblets, pop-up timer (if your turkey has one), and trim away excess fat and skin from the neck cavity so the bubbling oil is able to flow freely through the turkey during the cook.
- Use the water displacement method as described above to properly gauge how far to fill the pot with oil. Take note of that measurement.
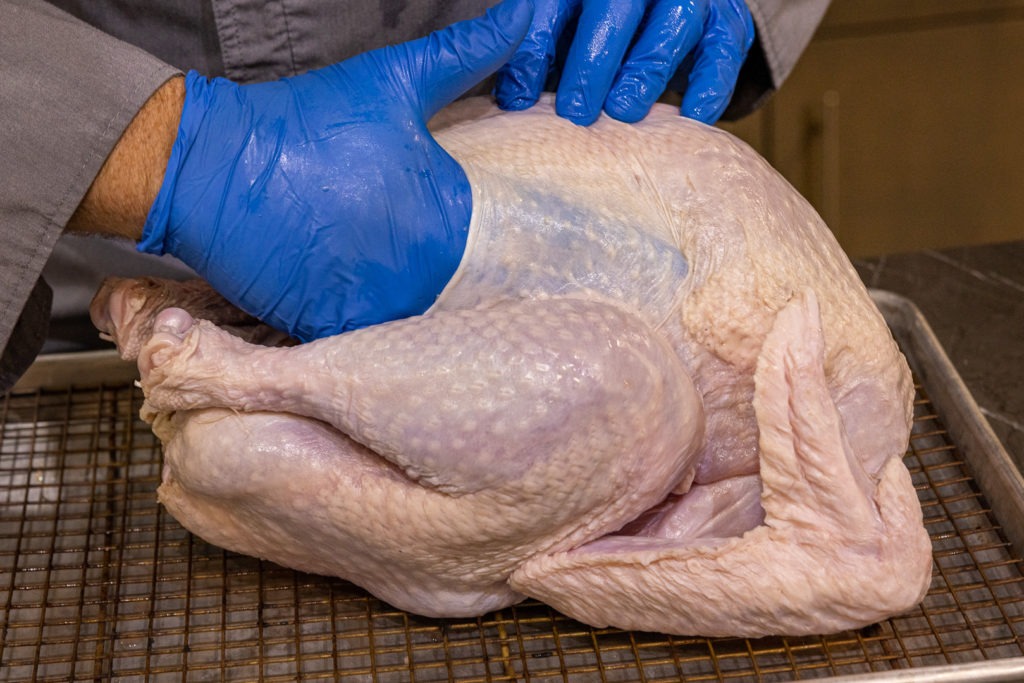
- Pat thawed turkey completely dry with paper towels.
- Draw up melted butter into meat injector and inject meat in several places throughout the breasts, legs, and the meaty part of the wings.
- Separate the skin from the breast meat. Rub the outside of the turkey with oil and season with salt and pepper (the oil helps the salt and pepper to stick).
- Turkey stand or basket:
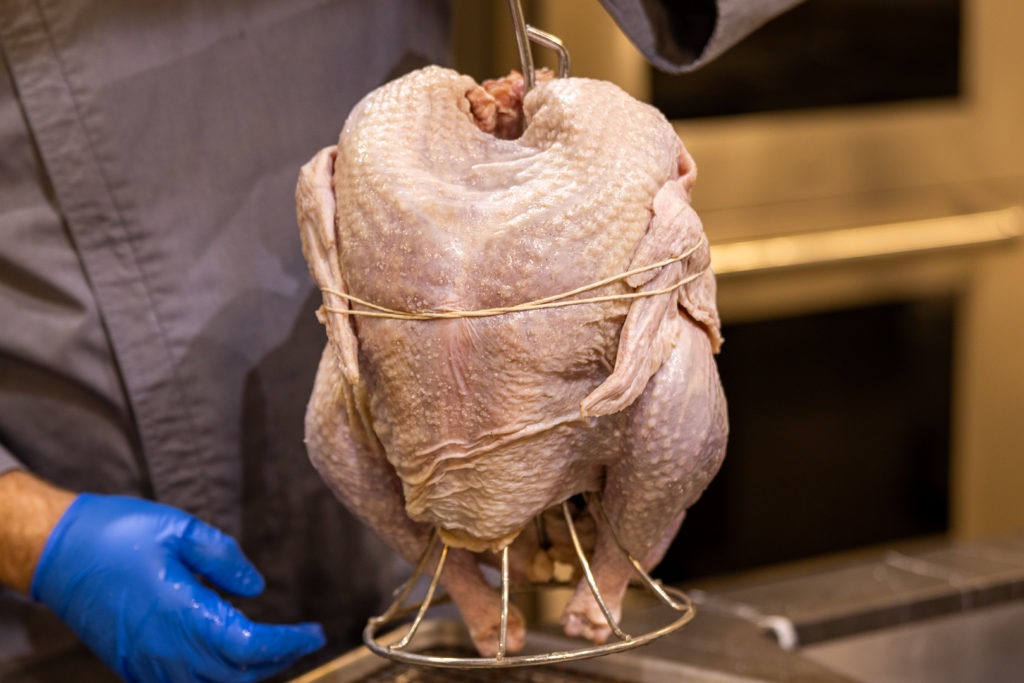
- Turkey Stand: Fit turkey over stand or skewer provided in your kit. Tie wings back and truss legs securely with kitchen twine.
- Fryer Basket: Or, truss the legs and secure the wings with twine, and place the seasoned bird in the fryer basket.
- Place a Pro Series high temp penetration probe into the deepest part of the breast, avoiding bone. Set Smoke’s high alarm for the channel that will be used for monitoring the meat’s internal temperature to the turkey’s pull temp of 157°F (69°C).
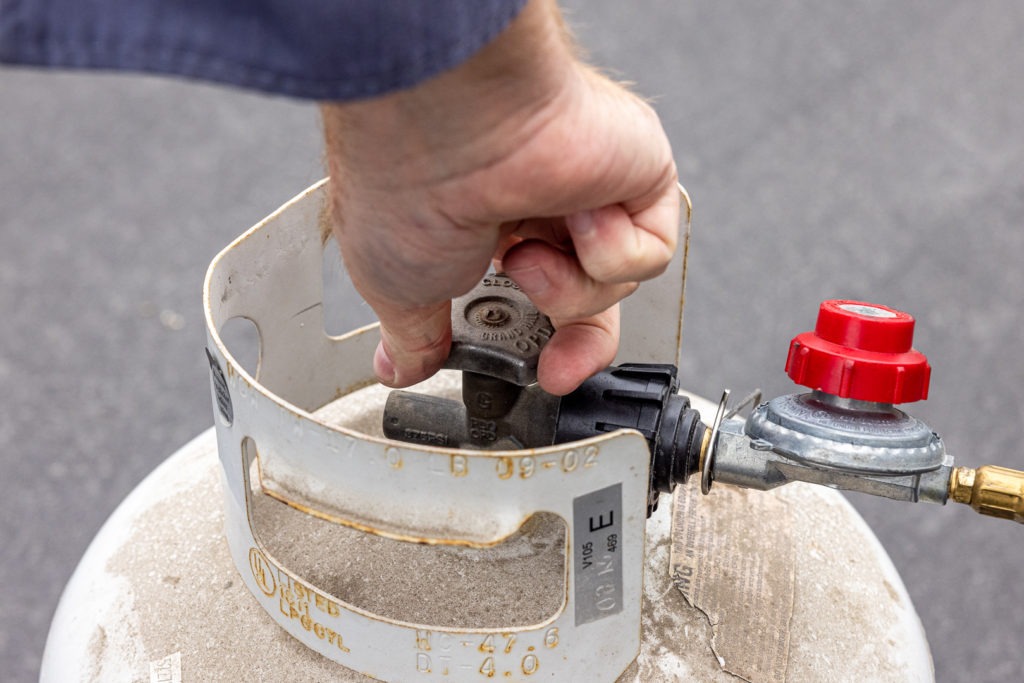
- Set up fryer burner outside on a flat surface at least 10 feet away from any buildings. Connect hose to the propane tank.
- Place fryer pot on top of the burner. With the gas and burner OFF, fill the pot with oil to the level as measured from water displacement done earlier.
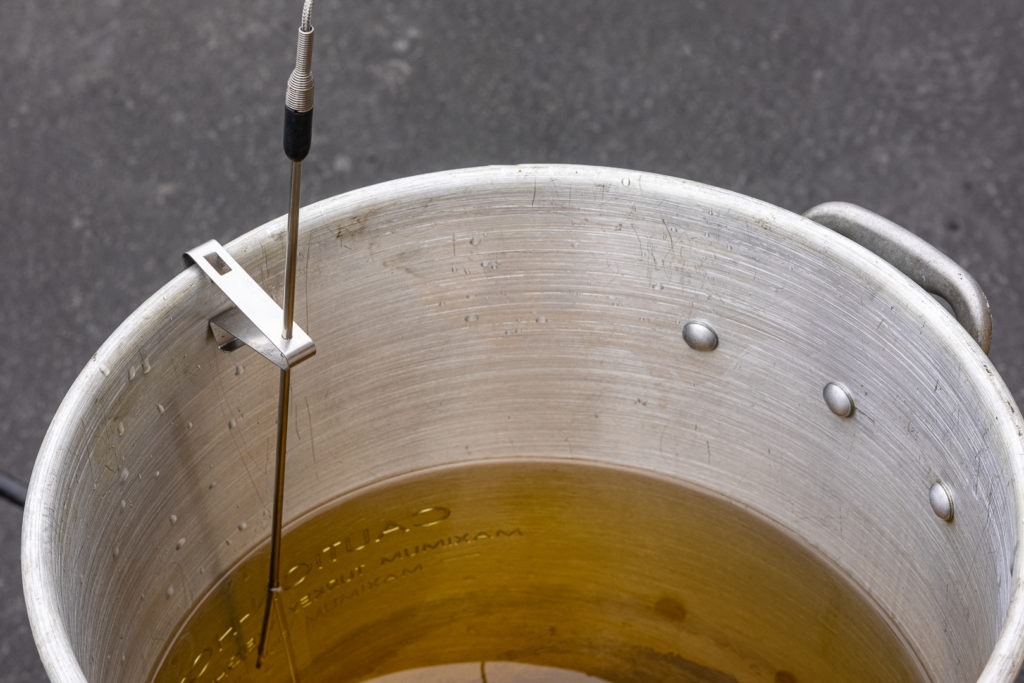
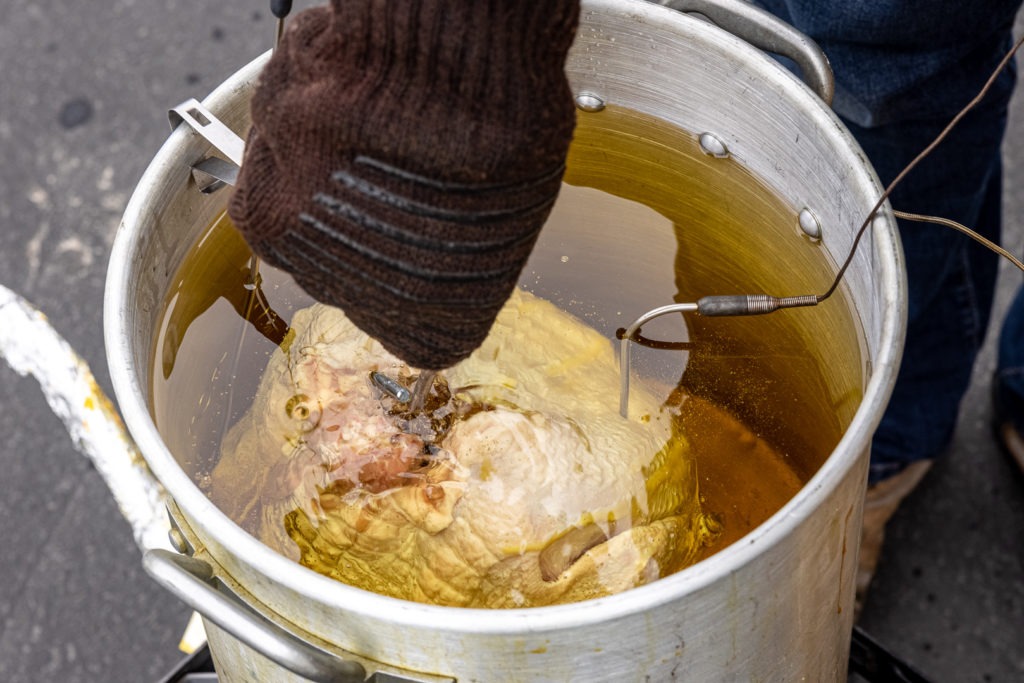
- Using a pot clip, secure a 12″ probe to the side of the pot. Set the oil channel’s high alarm to 250°F (121°C). Connect the probe to Smoke X2.
- Using the burner’s instructions, turn the gas on and light the burner.
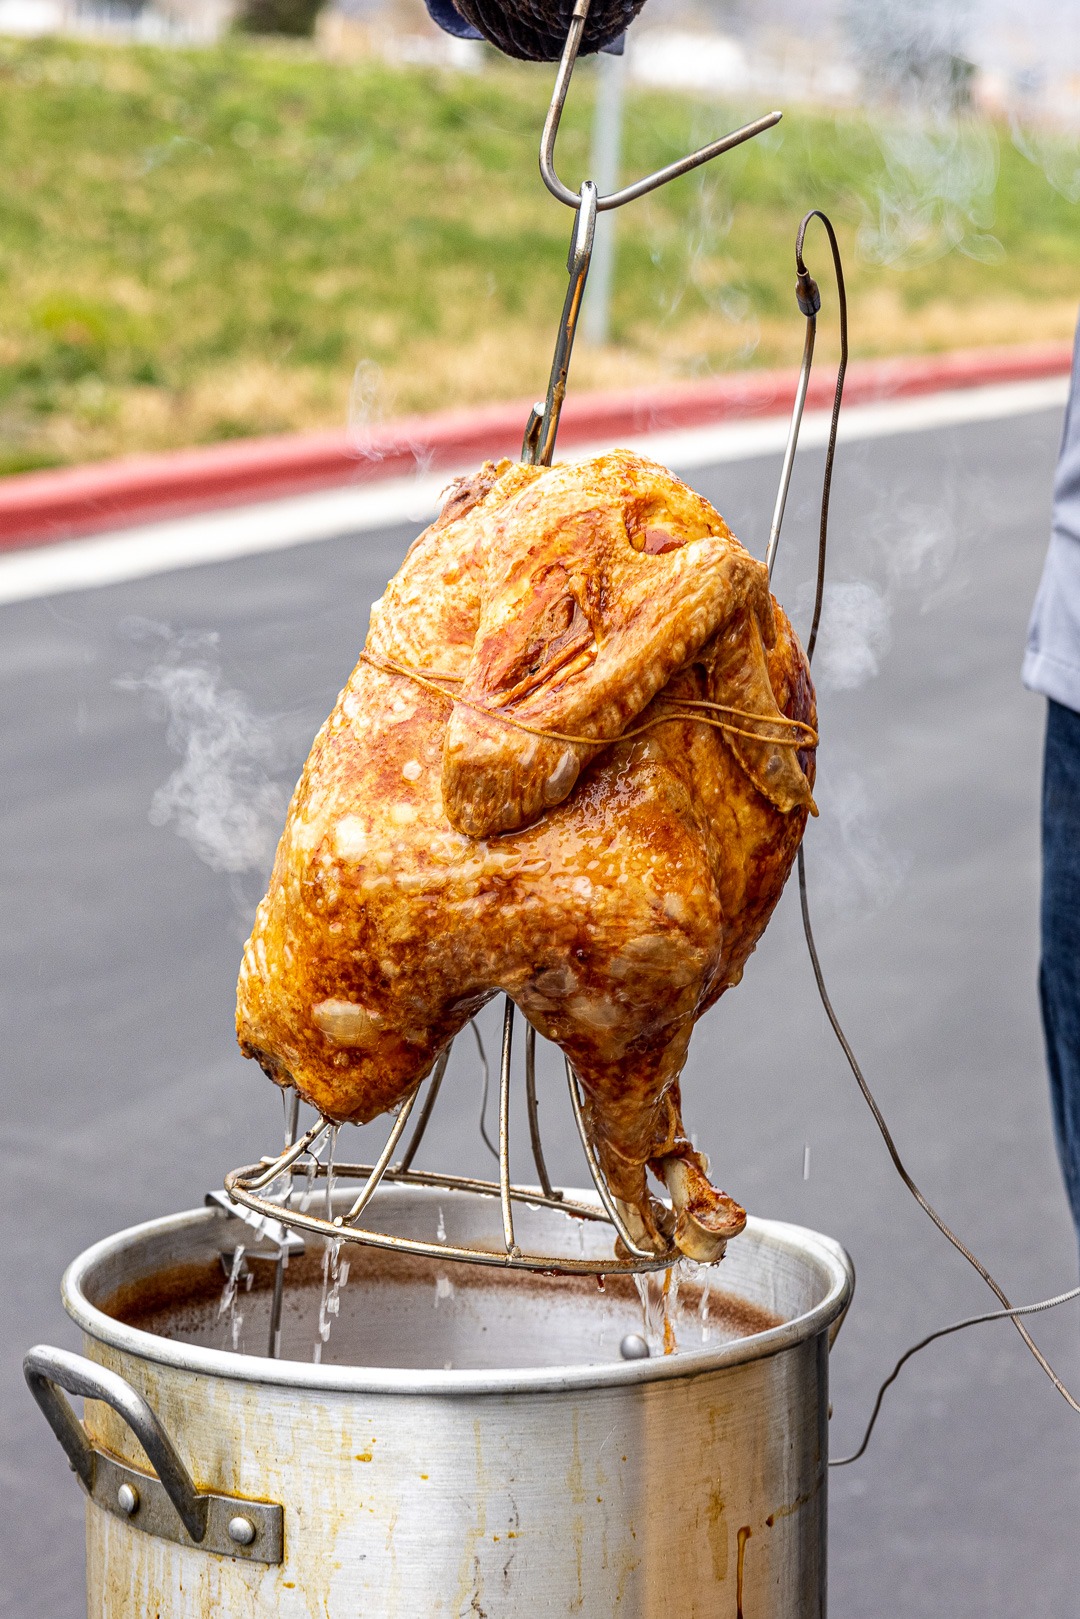
- When the alarm sounds, turn off the gas and very slowly lower the turkey into the fryer (wearing an apron, safety goggles, and gloves). Attach the meat’s probe to Smoke.
- Set Smoke’s oil channel high alarm to 350°F (177°C), and the low alarm to 320°F (160°C). Turn on the gas and ignite the burner. Adjust the gas level to maintain the oil’s temperature in this range.
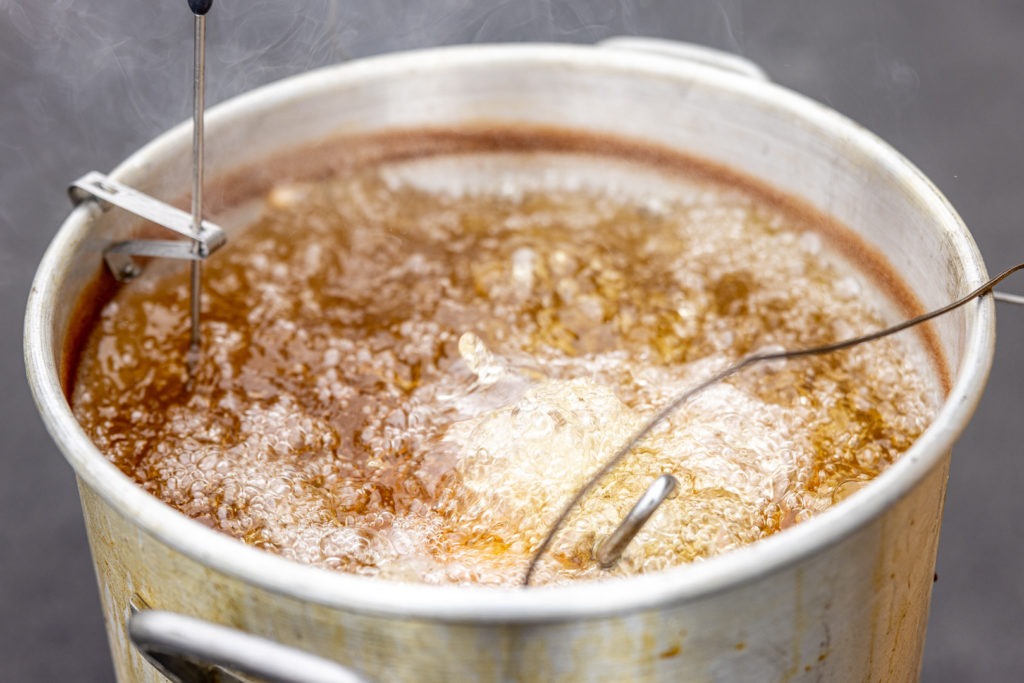
- Kick back in your lawn chair and watch your turkey cook. Most 12-14 pound turkeys will cook in 30-45 minutes. Turkeys larger than 14 pounds will take longer to cook, and the outer area of the meat will be overcooked by the time the internal pull temperature is reached. We used a TimeStick® and counted up the time to keep an eye on the length of our cook. It took our turkey 35 minutes to reach its final pull temperature of 157°F (69°C).
- Don’t Walk Away! Even though Smoke has a very handy wireless receiver, stay right by your fryer’s side through the entire cook. Grab a magazine or a good book and wait for your turkey’s high alarm to go off.
- When the meat’s high alarm sounds, turn the gas off completely. Very slowly and carefully lift the turkey out of the oil and set into a clean roasting pan. Spot-check the internal temperature with an instant-read thermometer like a Thermapen to verify that the tracked temperature is the lowest found.
- If a lower temperature is found, replace the probe into the lowest temperature area in the meat, and return the turkey to the oil. Turn the burner back on and allow to cook until the pull temperature of 157°F (69°C) is reached.
- Allow the turkey to rest for about 15-20 minutes.
- While wearing gloves, remove the turkey from the fryer basket or turkey stand and place onto a carving board. Carve your turkey and serve!
- Allow the oil to cool entirely before pouring it out of the pot and either straining and storing for later use, or disposing of appropriately.
Shop now for products used in this post:


Richard Angiel says
I have been frying turkeys for over 15 years, and have made my share of mistakes. Your statement regarding safety after using the water displacement method is not entirely accurate. The volume of oil in the pot expands when heated. One would probably not notice the increase in oil level since it happens slowly. When measuring the level using the water displacement method, if the liquid level with the turkey in the pot is close to the top, there is still a risk of overflow. I usually keep an old sauce pan and extra pot with me when we fry turkey. As I lower the turkey. If it looks like the oil might overflow, I have my someone scoop out some the oil and put it into the pot so we can safely lower the turkey. Then, if necessary, we can transfer some oil back into the fryer from the pot. I believe we figured this out our second year frying turkey; which was probably our most eventful year. We probably got a bit cocky because the first year went perfectly. As I said, I have made my share of mistakes.
Kim says
Richard,
Thank you for your comment. I’m sure other readers will find this information helpful.
-Kim
Bill says
The expansion of cooking oil should be about 20%, going from 70 F to 350 F. One could put in the turkey, cover with water, remove turkey, pour off about 1/5 of the water, measure the height, then pour off the remaining water and replace with oil. That will possibly give you a bit less oil than you need, but easier and safer in my opinion to top up with some extra oil after putting in the turkey than having to fool around with scooping hot oil.
Jim says
Great post and thanks for the detailed instructions. I’ve always wanted fry a turkey but have been nervous to give it a try. I appreciate the details regarding safety.
Kim says
Jim,
Deep-frying a turkey is a fun cooking method for a whole turkey. I’m glad you appreciated the article, and hope you’ll give this a try!
Thanks,
-Kim
Calamity Jean says
If someone who is allergic to peanuts is coming to the feast, use corn oil instead. Calling for an ambulance shouldn’t be part of dinner.
Kim says
Calamity,
Absolutely! Peanut oil is a great choice for its thermal properties. But be aware of any guests’ allergies! Corn oil is a great alternative, as are sunflower and safflower oils.
Thanks for the comment,
-Kim
John Clark says
Fried turkey is great.
I use an electric turkey fryer which is much safer.
How do you feel about using soy oil? Our local Sam’s club sells it at a good price—-much lower than peanut oil .
Thank you for outstanding products. I just got the new “Smoke” and can hardly wait to use it.
Kim says
John,
Yes! Soybean oil has a smoke point of 450°F and is a great oil for deep frying. It’s a good option if you need to stay away from peanut oil for allergy reasons. And peanut oil can be pricey for sure.
So glad you enjoy your ThermoWorks products! You will LOVE your Smoke™.
Thanks,
-Kim
Kevin says
Im going to deep fry a ham.. any suggestions? We are doing the turkey first , then a 9 pound whole boneless Berkshire ham.
Martin says
Wow! No, I don’t have any suggestions. Make sure the internal temp is right! Please email us a picture of how it turns out. Fascinating idea…
Dan says
I found it amusing that the picture of the setup with all the items notated shows a water fire extinguisher. As you point out use only a dry-chem type extinguisher and not water which would be disastrous if used on a grease fire.
Martin says
Fair point!
Teresa v sullivan says
i wish you would give directions and time and temp for air fryer oven bone in turkey breast
Martin says
If you’re air frying in an oven (i.e. using a hot convection setting) the pull temps are the same. I can’t speak to the time it takes, but I’d imagine somewhere in the range of 60–90 minutes.
Stuart P Hughes says
The Turkey should be cooked with the legs up.
Uncle Skinny says
I like this article and thanks for posting it. There’s no doubt that deep frying turkeys is the way to go. Like everyone else who have fried turkeys, mistakes will be made and I’ve had my fair share over 40 years. One point that needs addressing is the change of temperature when the turkey is immersed into 350F oil. With an aluminum pot, the walls and the bottom of the pot are too thin which disallows the time for the temperature to return back to 350F quickly. I do not use aluminum pots for deep frying because they will eventually start to “pit” with prolonged usage, thereby decreasing the wall thickness of an already thin product. Instead I strictly use 316 stainless steel beer kettles that are used for brewing which are thicker and taller with a jet propane burner. These stainless kettles are far superior and much safer than standard aluminum turkey pots. In my opinion, large aluminum stock pots should be used for boiling and not frying. Additionally, the base of the turkey stand needs to sit about 2 inches above the bottom of the pot to allow the volume of the descending “cooler” oil to heat back up quickly. By elevating the turkey in a thicker stainless pot will help minimize the time of the temperature drop (or delta-T) when deep frying turkeys. Good luck to all brother turkey-fryers out there!
David J says
I’ve fried quite a few turkeys and I have to question your recommendation to put the turkey into the oil at 250F. Once the turkey goes in, there is a significant drop in temperature. It will take quite a while to get temperature back up to 325F. I put my turkey in at 375F and the temperature drops quickly to the 325F target temperature.
Martin says
It is safer to put it in at 250. At 375, there is a lot of bubbling, meaning more chances to overflow and create a fire hazard. Yes, it takes a while to get up to temp, but if you turn your flame on high, you definitely get there soon enough.
Steve says
I have also been frying turkeys for years relying on 3 min/pound and a thermometer to check internal temp.
My question is: can the cable on my ChefAlarm probe stand up to being splashed and or submerged in boiling oil?
Martin says
Steve,
It can stand up to some splashing, but not being submerged in the oil. I did that once before I knew better, and that cable didn’t last much longer.
Amal says
What length probe do you recommend?
Martin says
I recommend our 12″ probe.